How to turn on/off Narrator on Windows 10

Sometimes you may have turned on the narrator by mistake or using a combination key of Windows+ CTRL+ ENTER which will turn on and turn off the narrator’s voice.  The quickest way to use the shortcut keys to turn on/off using these key combinations may vary from OS versions. There are many people who find these settings helpful and some just find annoying if they are turning on by mistake. So, whatever your case is here are the options.

When you first turn on the Narrator you get this screen, where it shows the shortcut keys.

Here is a list of keys

To turn off:

  • Hold the CAPS LOCK key and press ESC key
  • Press WINDOWS + CTRL + ENTER key (if it’s off it will turn back on it toggles on/off)
  • Hold the WINDOWS Key and press ENTER

To turn it on/Off:

Press WINDOWS + CTRL + ENTER key (if it’s off it will turn back on it toggles on/off)

You can also go through the settings options to turn it off, but you will have to press each action twice because first is selection narrator will read to you second time it will make the selection.

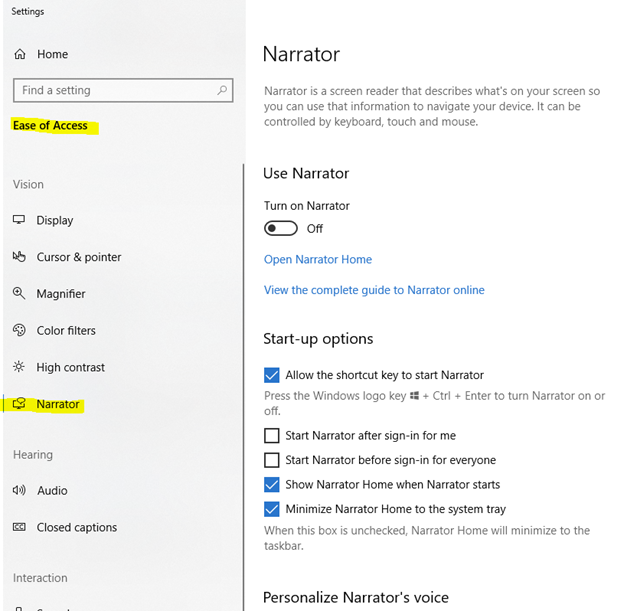
Select START > SETTINGS

Then click on Open Ease of Access and select Narrator you will see all the options to turn on/off the narrator

Or

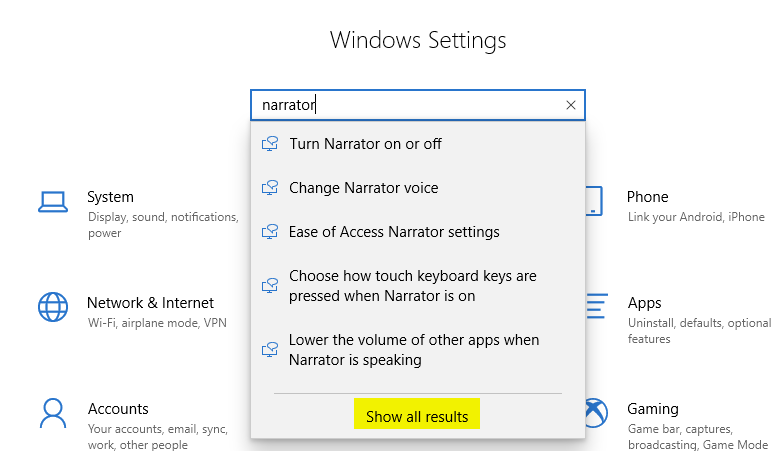
Select START>SETTINGS

Then in the search type narrator, it should give you so of these options and for all options click Show all results:

If you have Surface or other tablets, this might work for you:

Hold down the ALT and TAB keys simultaneously. Then it will bring up the Microsoft Settings window, which will give you options to turn on/off the narrator.

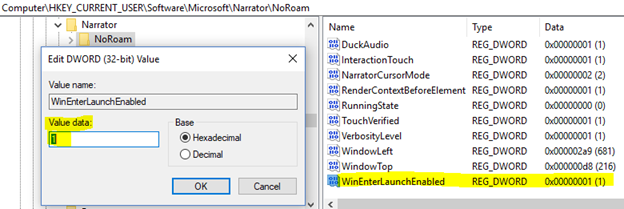
I hope this helps others who looking to turn on/off via registry key, please take a backup in case you need to restore it.

If you really want to turn off permanently or disable Narrator including shortcut key, then you will have to do it via registry key: Just change the value from 1 to 0 (1=on or 0=off)


How to add a local user to Windows 10 via PowerShell

PowerShell is very common to use these days as more and more software doing automation.  Many times it’s harder to find Graphical User Interface (GUI) to add a user or find other settings.  In this post, I am adding a local user via PowerShell and adding a user to a local group.  PowerShell has built-in help and examples too, so if you want to know more about the command just type Get-Help then Name of command and it will give more info about it. Let’s get started exploring the options starting with viewing current users.

To see current local users:

PS C:\> Get-LocalUser

To see Local Groups:

PS C:\> Get-LocalGroup

To see Local Groups Members:

PS C:\> Get-LocalGroupMember -Group Administrators

Adding a new user:

PS C:\>New-LocalUser –Name WhatEverName

When you hit Enter it will give you the option to put the password

Add user to Local Admin Group:

My example user name is: Admin replace that with your user name

PS C:\> add-LocalGroupMember -Group “Administrators” -Member “Admin”

To add more users to a Local admin group:

PS C:\> Add-LocalGroupMember -Group “Administrators” -Member “User1”, “User2”, etc…

To add a domain user to Local Administrator Group:

PS C:\> Add-LocalGroupMember -Group “Administrators” -Member YourDomainName\UserName

To remove a local user:

Make sure you have at least one user account and it’s a member of LocalAdmin group

PS C:\> Remove-LocalUser -Name WhatEverNameYouWantToRemove

To Remove a domain user from Local Administrator Group:

PS C:\> Remove-LocalGroupMember -Group “Administrators” -Member YourDomainName\UserName

There are many more options available using PowerShell now, if you get an error make sure to read it and see where the error is, it will give you clue and also some commands require Admin right you will get an error like Access denied


How to hide Windows updates

Windows 10 recently having many issues, here is how to hide updates that may be causing issues. Windows 10 updates install automatically by default and it also updates some drivers, which may cause an issue with your device or application. The First thing to do is check to see if you have any updates pending if so update it and see if your issues are fixed. If your issues are not fixed then you want to try uninstalling the recent update. After uninstalling the recent update and restarting your computer fixes the issue you can hide that update so Windows 10 doesn’t automatically try the install again. Here is how to hide the updates, so it does not re-install. You should still try to update windows updates to protect your computers, not all updates causing issues.

You will need to Download the “Show or hide updates” troubleshooter package from the (no longer available via Microsoft website), then follow the instructions, I am going to show you one of the updates that are causing issues with Start Menu and Microsoft Edge on some computers. Once you have downloaded the Show and hide update package, run it and click Next

it will scan for issues

Then give you options to Hide updates or Show hidden updates, click on hide update

Select the update you want to hide, and click Next

You should see Troubleshooting has completed, click Close

That’s it, if you need to unhide it, you can following the same process, just have to click on Show hidden updates in earlier step then you will be able to install that update. I hope this helps out some users who are having issues with Windows updates.


How to create CSR for SSL certificate via IIS

Technology era we are living, an SSL certificate is required for most if not all of today’s application to keep the data secure.  It’s very easy to get SSL for your websites, some hosting providers included in your packages.  If you have application then that requires a code signing certificate its silently different type of certificate.  In order for you to get SSL, you will need to generate the certificate signing request (CSR), which you can use IIS manger, many hosting providers let you generate CSR on their portal too or you can use other tools like OpenSSL.  Let’s get started

Login to the server where you have IIS (Windows 10 has IIS)
Open Internet Information Services (IIS) Manager, depending on your view you can need to switch view from Content to Features
Double click on Server Certificates

Then on the right-hand side, you will see an Action menu, where you would click on “Create Certificate Request…

Fill in the details for your Company to be verified by SSL provider, then click on Next
If, you want details on what to fill out the check out this link from Microsoft Server Certificates

Select your Cryptographic service provider and Bit Length that fits your need, then click Next
Note
. Based on your selection you may see different options, I am using RSA, 2048

Next screen will ask you to save the file, select the location and click Finish, it will create WhatEverYouNamedYourFile.txt

That’s all for the process of creating the CSR, now you just need to go to your SSL Provider and copy and paste the code in the FileName.txt that you just saved in the last step. Then it will go through the validation process from your SSL provider, once everything is ok, you will get an email from them when your SSL is ready to be used.