How to fix an Adobe reader broken by Windows update

Windows update KB5005565 breaks Adobe Reader on some computers. You can check your Windows updates to see if any pending updates, if you see it, install it and it may fix your Adobe reader issue. If that does not, try the following options.

Some computers show Save as blank

Save as blank

Option 1: Repair Adobe Reader

Open Apps & features and select Adobe Reader, then choose Change>Repair installation … Then click Next to start the repair process.

Tip: you can open Programs and Features older style by Start>Run>type appwiz.cpl then hit Enter

Repair Adobe Reader

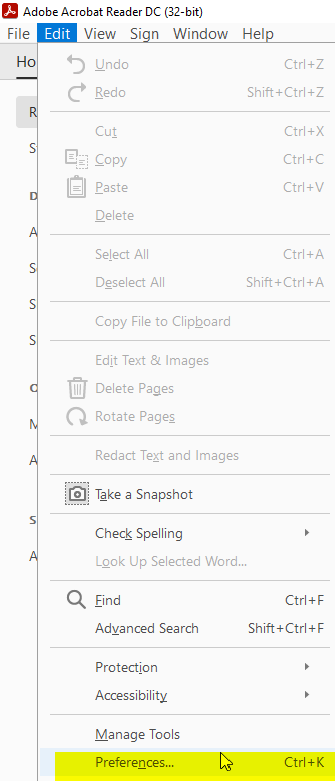
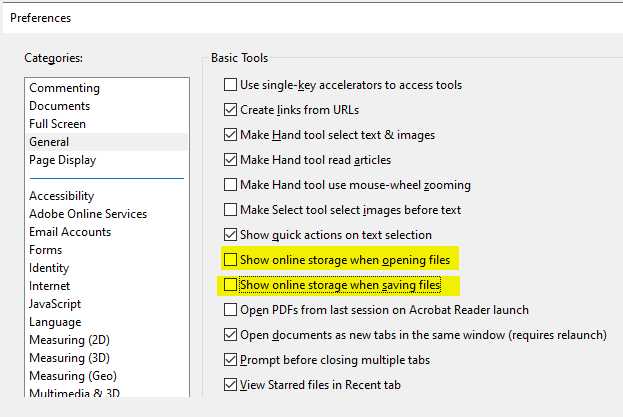
Option 2: Unselecting online save option

Open Adobe Reader, then go to Edit>Preferences… or press Ctrl+K

Uncheck both of these options: if you are not using online storage for saving or sharing
Show online storage when opening files
Show online storage when saving files

You can find some more info on the Adobe community:

https://community.adobe.com/t5/acrobat-reader-discussions/adobe-reader-not-opening/m-p/12394922/page/2

Hope this fix your Adobe issue that caused by Windows update.


How to check if your computer is ready for Windows 11

Windows 11

Windows 11 system requirements are much higher than Windows 10, which means it will not support older hardware. Here are some lists and links in this post to help you find out if your current system is able to upgrade to Windows 11.

List of all minimum system requirements for Windows 11

Processor: 1 gigahertz (GHz) or faster with 2 or more cores on a compatible 64-bit processor or System on a Chip (SoC).
Memory: 4 GB RAM.
Storage: 64 GB or larger storage device.
System firmware: UEFI, Secure Boot capable.
TPM: Trusted Platform Module (TPM) version 2.0.
Graphics card: Compatible with DirectX 12 or later with WDDM 2.0 driver.
Display Resolution: High definition (720p) display that is greater than 9” diagonally, 8 bits per color channel.
Internet connection: Microsoft account and internet connectivity required for setup for Windows 11 Home.

Your device must be running Windows 10, version 2004 or later, to upgrade. Free updates are available through Windows Update in Settings>Update and Security.

for more details on Windows 11 system requirements: https://www.microsoft.com/en-us/windows/windows-11-specifications

You can download this Check for compatibility

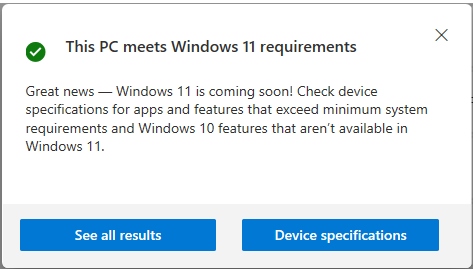
Once you have downloaded compatibility, open it and click on Check now

If your system hardware is newer you should see This PC meets Windows 11 requirements

<!-- wp:paragraph -->
<p>If your system hardware is newer you should see "<strong>This PC meets Windows 11 requirements</strong>"</p>
<!-- /wp:paragraph -->

If you want to see details click on See all results, something like this, your specs will be different

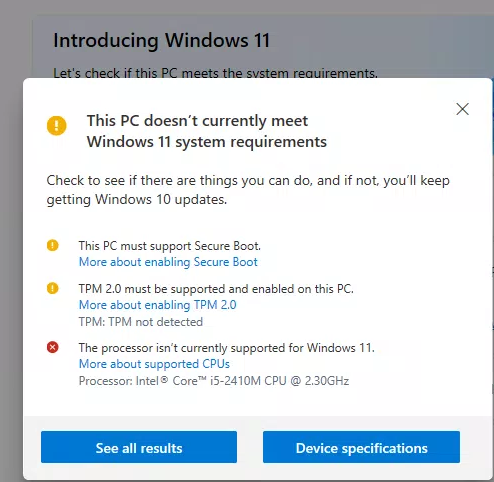
If you have older hardware, you will see something like this: example of this PC does not have Secure Boot enable and Processor does not meet the requirement, most important TPM 2.0, which this PC does not even have.

This PC doesn't currently meet Windows 11 System requirements

You can find more info on Windows 11 https://www.microsoft.com/en-us/windows/get-windows-11 and Frequently asked questions at the bottom of the page

Download Windows 11 ISO: https://www.microsoft.com/software-download/windows11


How to fix boot partition free space in Ubuntu

/boot full

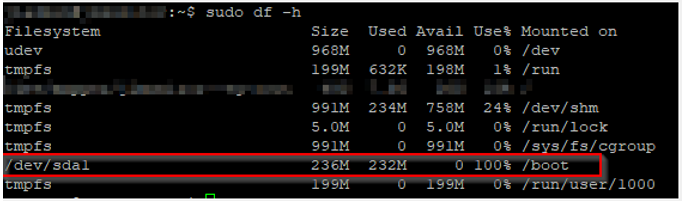
Here is how to free up space in the boot partition in Ubuntu, which may cause issues when trying to update or install a new application. Make sure you have a good backup and be careful running some commands, just double check typo before executing it.

To see If you are running out of boot partition space, run the following command:

command: sudo df -h

You will see how much space is in use, in this screenshot, its /boot is 100% used

/boot 100 used

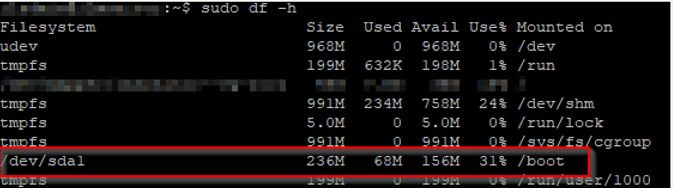
You can try the following command which may clean automatically for you some unused packages.

command: sudo apt autoremove

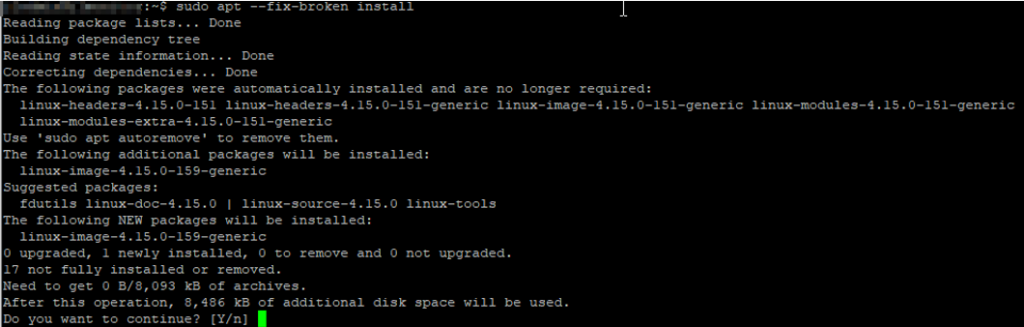
If the above command gives you an error, then continue do following steps

find your currently active boot image by running the following command:

Command:  sudo uname -r

Output may look something like this: 4.15.0-143-generic

To list all images except for active:

Command: sudo dpkg –list ‘linux-image*’|awk ‘{ if ($1==”ii”) print $2}’|grep -v `uname -r`

Output:

linux-image-4.15.0-151-generic
linux-image-4.15.0-156-generic
linux-image-4.15.0-158-generic

To list of images:

sudo dpkg -l | grep linux-image

To remove unused images:

The numbers are based on the output command above, so if your version numbers are different, make sure you change them to match your output.

Command: sudo rm -rf /boot/*-4.15.0-{151,156,158}-*

If you run df -h command to see how much space is in use, you will it went down from 100% to 31%:

Now that you have some free space, let’s do some clean-up. If you try to clean up using apt autoremove, you may still get errors like these:

fix broken packages
some packages are broken

To Fix broken packages

You will need to fix the broken packages before you can do any other clean up, run the following command:

Command: sudo apt –fix-broken install

fixing broken packages

Now that broken packages are fixed, then re-run the autoremove command you will be able to free up disk space:

free disk space from unused packages
Freeing up disk space from unused packages

Update your system

Then re-check for any updates and install it to secure your system:

Command: sudo apt update && sudo apt upgrade

You want to see: All packages are up to date

That’s it, hope this helped you out


How to fix outlook error opening attachments

Cannot create file

Getting errors when trying to open an attachment from Outlook something like “cannot save the attachment.  Cannot create file: FileName.pdf. Right-click the folder you want to create the file in, and then click Properties on the shortcut menu to check your permissions for the folder.” This may be due to permission or a corrupted temp directory. Here is how to fix it, one thing you could try without doing anything is to restart the computer, if that does not fix try the following options.

Error message:

Option 1: rename temp folder

The temp folder of outlook is located at the following location: “YourUserName” which would be your own user name, anything after Content.Outlook\ would be randomly created folder name by an Outlook

Make sure your Outlook is closed, then rename to old or anything you want or simply delete it. Then re-open the outlook, it should recreate the temp folder and your attachment should be fixed

C:\Users\YourUserName\AppData\Local\Microsoft\Windows\INetCache\Content.Outlook\T9U9A03U\

Option 2: Regedit

Please be very careful of changes in the registry, your computer could be non-functional if you make wrong changes, so do it at your own risk. Make sure the outlook is closed

First, open the registry by going to RUN>type regedit

then search for “OutlookSecureTempFolder”

Based on your version of outlook location will be slightly different

  • Office 365 Outlook:
  • Computer\HKEY_USERS\S-1-5-21-1014573083-3332314220-1222384373-8206\SOFTWARE\Microsoft\Office\16.0\Outlook\Security
  • Outlook 2013:
  • Computer\HKEY_USERS\S-1-5-21-1014573083-3332314220-1222384373-8311\SOFTWARE\Microsoft\Office\15.0\Outlook\Security
  • Outlook 2010:
  • Computer\HKEY_USERS\S-1-5-21-1014573083-3332314220-1222384373-8311\SOFTWARE\Microsoft\Office\14.0\Outlook\Security

Then change the OutlookSecureTempFolder location to somewhere you have access. Remember this is the default location, if you do change the custom, and when an update applies it may revert. When you open the outlook it should work now, you should see new random folder after your default location.

That’s it, hope this helps others out there


How to update Microsoft Azure Active Directory Connect

Upgrade-Azure-Active-Directory-Connect

If you have your AD sync to Microsoft Azure and have installed the Active Directory connect, you may need to update, and here is how to do that

To see the status of sync, you can log in to the Microsoft admin portal at https://admin.microsoft.com

on the home page, you should see Sync Status, click on the Sync staus to get to the details page

You should see something like this: Click on Microsoft Download Center or this link: https://www.microsoft.com/en-us/download/details.aspx?id=47594

It will bring you to the Download page, read the requirements, and download to your software

When you run the setup you may get an error message if you don’t have the TLS enabled
https://docs.microsoft.com/en-us/azure/active-directory/hybrid/reference-connect-tls-enforcement

PowerShell command to enable TLS 1.2: got it from the link above, copy from Microsoft so you don’t have typo or if you know how to enable yourself do so

New-Item 'HKLM:SOFTWAREWOW6432NodeMicrosoft.NETFrameworkv4.0.30319' -Force | Out-Null

New-ItemProperty -path 'HKLM:SOFTWAREWOW6432NodeMicrosoft.NETFrameworkv4.0.30319' -name 'SystemDefaultTlsVersions' -value '1' -PropertyType 'DWord' -Force | Out-Null

New-ItemProperty -path 'HKLM:SOFTWAREWOW6432NodeMicrosoft.NETFrameworkv4.0.30319' -name 'SchUseStrongCrypto' -value '1' -PropertyType 'DWord' -Force | Out-Null

New-Item 'HKLM:SOFTWAREMicrosoft.NETFrameworkv4.0.30319' -Force | Out-Null

New-ItemProperty -path 'HKLM:SOFTWAREMicrosoft.NETFrameworkv4.0.30319' -name 'SystemDefaultTlsVersions' -value '1' -PropertyType 'DWord' -Force | Out-Null

New-ItemProperty -path 'HKLM:SOFTWAREMicrosoft.NETFrameworkv4.0.30319' -name 'SchUseStrongCrypto' -value '1' -PropertyType 'DWord' -Force | Out-Null

New-Item 'HKLM:SYSTEMCurrentControlSetControlSecurityProvidersSCHANNELProtocolsTLS 1.2Server' -Force | Out-Null
New-ItemProperty -path 'HKLM:SYSTEMCurrentControlSetControlSecurityProvidersSCHANNELProtocolsTLS 1.2Server' -name 'Enabled' -value '1' -PropertyType 'DWord' -Force | Out-Null
New-ItemProperty -path 'HKLM:SYSTEMCurrentControlSetControlSecurityProvidersSCHANNELProtocolsTLS 1.2Server' -name 'DisabledByDefault' -value 0 -PropertyType 'DWord' -Force | Out-Null
New-Item 'HKLM:SYSTEMCurrentControlSetControlSecurityProvidersSCHANNELProtocolsTLS 1.2Client' -Force | Out-Null

New-ItemProperty -path 'HKLM:SYSTEMCurrentControlSetControlSecurityProvidersSCHANNELProtocolsTLS 1.2Client' -name 'Enabled' -value '1' -PropertyType 'DWord' -Force | Out-Null
New-ItemProperty -path 'HKLM:SYSTEMCurrentControlSetControlSecurityProvidersSCHANNELProtocolsTLS 1.2Client' -name 'DisabledByDefault' -value 0 -PropertyType 'DWord' -Force | Out-Null
	Write-Host 'TLS 1.2 has been enabled.'

Then re-run the AD Connect setup:

Note, if you have a big network, this may take some time, so do off-hours, because it will stop the sync of your AD until the upgrade is completed

You should see the upgrade process and synchronization

Then it will ask you for admin credentials:

If everything goes well you should see, Ready to configure, click Upgrade

Then, the configuration complete

now you can check the status on the admin page

That’s it, hope this helps someone