How to configure OAuth2.0 using EWS on Microsoft O365

App registration

Upgrading from basic authentication to OAuth is a little harder for many small businesses to configure on the Azure portal. Here are the steps I have done to get our EWS service to get it working. You must have admin rights to do the following.

Create an app registration

You need to log in to your Azure portal: Go to Azure Active Directory>App registrations

Next, click on New registration

Next, fill in the info

This is where you choose your access options, based on the selection, the next screen will have different options, for us, we choose Single tenant and Redirect URI option for Public client/native, if you don’t have a URL you can leave it blank

In case you need to add or change the Authentication platform, you can click on Authentication>Add a platform>Select one that works with your Business needs
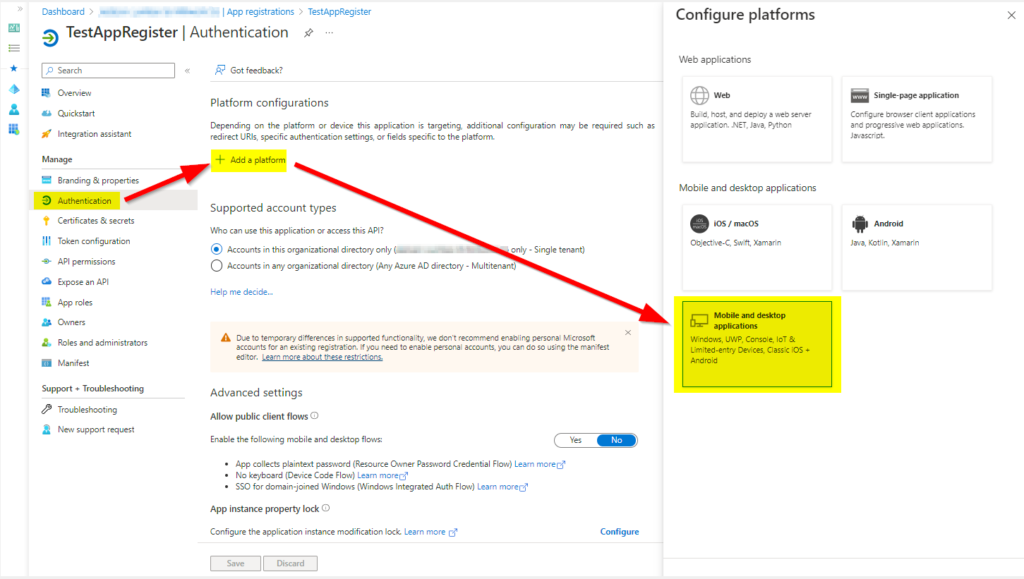
Based on your selection, you will need to select the URL option, or your custom URL

Then give API permission

This can be many permissions or just a few, also based on the type of application, you may get different options

Us, we are using EWS service, so we needed office 365 Exchange Online
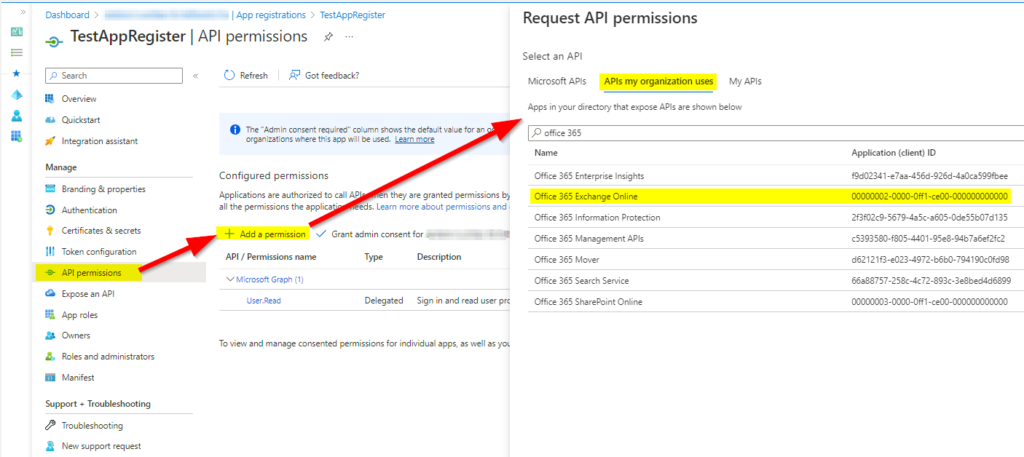
Then you need to select the type of permission, we are using application permissions

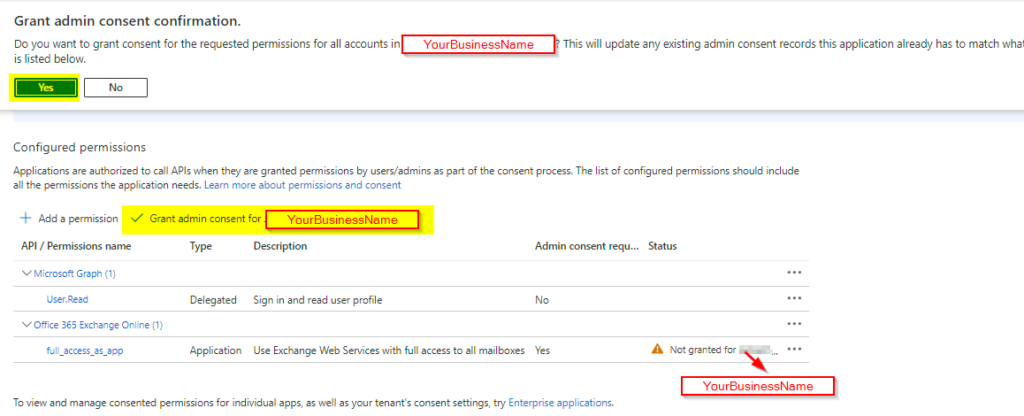
The only thing we can get it working was by giving full_access_as_app

You need to give admin consent to your application, so once you have all permission added, click on Grant admin consent
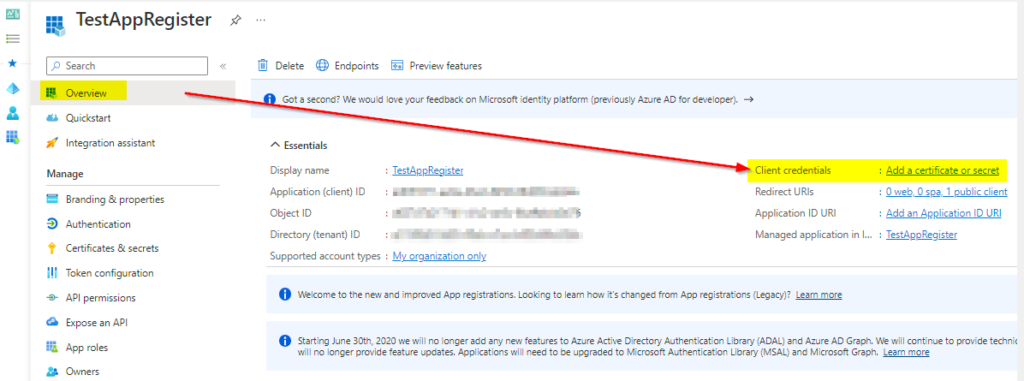
To create client credentials, click on Overview>Add a certificate or secret
Click on the Clent secrets>New client secret
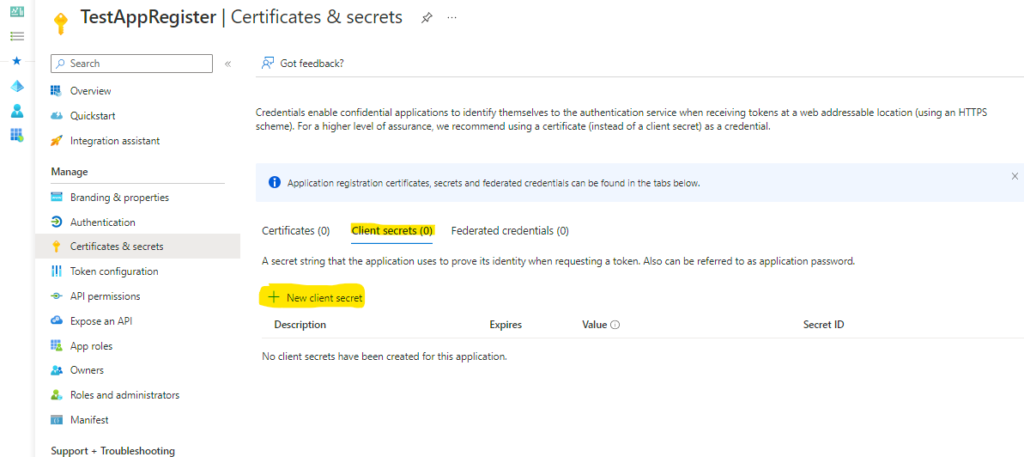
Enter the name, this could be anything and select the time when it Expires, then click on Add

Before you click out of this screen make sure to copy the value of your secret ID, which you will need for your app. Once you leave this screen, you will not be able to get this value back, so you may need to create a new one in case you have not copied it or you need to change it.

For your application, you will need the following info, which you can find it, here

  • Application ID
  • Directory (tenant ID)
  • Endpoints: authorize and token
    • If you have selected the multi-tenant option, your Endpoints URL will be generic, like these:
      https://login.microsoftonline.com/organizations/oauth2/v2.0/authorize
      https://login.microsoftonline.com/organizations/oauth2/v2.0/token
  • Value of secrets from the step above

That’s all, hope this helps someone out there who is going through these changes in technologies


How to convert a mailbox to a shared mailbox on o365

Shared mailbox

There are many cases you can use the shared mailbox on office 365 and save money on license costs. You will still need a license for those who are accessing the shared mailbox. At the time of converting a user mailbox, will need a license assigned to it before you convert it to a shared mailbox. Also, shared mailboxes have limited to 50 GB of data without a license assigned to them. Besides that, it’s like a normal mailbox. Here is how to convert steps

Note: Unless Microsoft adds to new GUI, you will need to use Classic admin center:
https://outlook.office365.com/ecp/

Once you are logged into the admin center, click on recipients>mailboxes>search for user mailbox to be converted

Once selected the mailbox to be converted, on the right side you will see an option Convert to Shared Mailbox”, click Convert

Once clicked Convert you will see a message, Warning are you sure you want to convert this regular mailbox into the shared mailbox? if you are ready click Yes

You will see Converting process bar, once done it will show Completed, it’s very quick, but it might take a while if you have a lot of emails

That’s it, now you can remove the license from this account, but make sure to keep the account, if you delete it, it will delete the shared mailbox

You will be able to see under Teams & groups>Shared mailbox

For classic admin center, you will see under: recipients>shared

In some cases, you may want to save a Copy of sent Items to a shared mailbox or on behalf of this mailbox, by default it’s not saved on the shared mailbox. It’s saved on whoever has access to it, in their sent items folder.

Bonus point to note, you can do the same in reverse, to convert from shared mailbox to Convert to Regular Mailbox


How to clean up old emails quickly from office 365

email box almost full

One of the very common communication is via emails, they do fill up our Inboxes and some of us don’t have time to clean up, which you can do it automatically or manually.  Just carefully when setting automatically to delete, because we as human beings forget and take automation as a privilege, and sometimes it deletes some things we want to keep as history. Here is how to clean up your old email manually or automatically.

Option 1: Manually

Option 2: Automatically via a set of rule

Option 1: Manually

First, Sign-in to your Office 365 by going to https://outlook.office.com
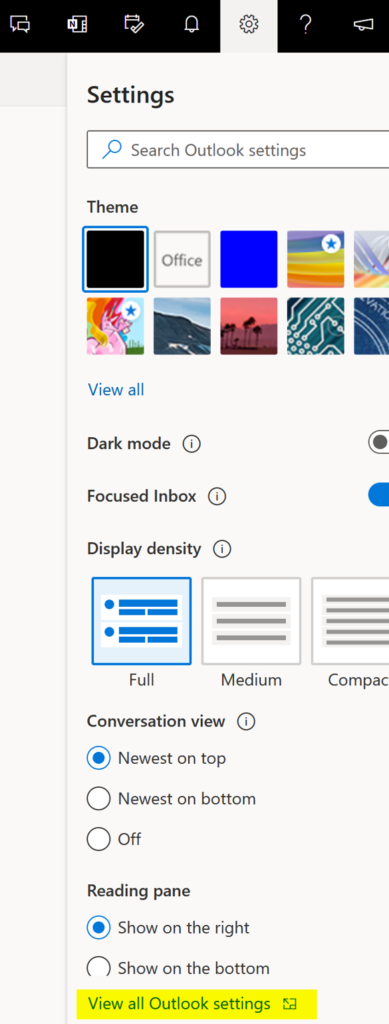
Once you have signed in go to Gear Icon at the top left then go all the way to the bottom, select View all Outlook settings

View all Outlook settings

You will see another pop-up window

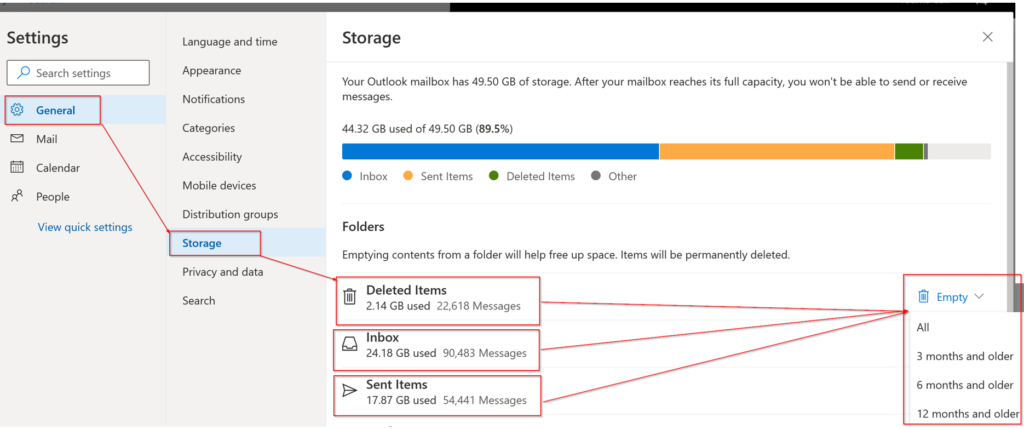
Go to Settings>General>Storage>Then select the folder you want to clean up old emails

Then on the right side, you will have an option to choose from, All, 3 months and older, or 6months and older, or 12 months and older

As, soon as you select the option, it will start deleting your old emails

Note: Items will be permanently deleted

Settings>General>Storage
Storage almost full

After you delete your old email, you will see, the overall size will decrease, in this example, I have deleted Sent Items

After delete old sent Items

That’s it, if you want to set up an automatic rule to delete, you can follow the steps below

Automatically via a set of rule

Once you have signed in go to Gear Icon at the top left then go all the way to the bottom, select View all Outlook settings

You will see another pop-up window

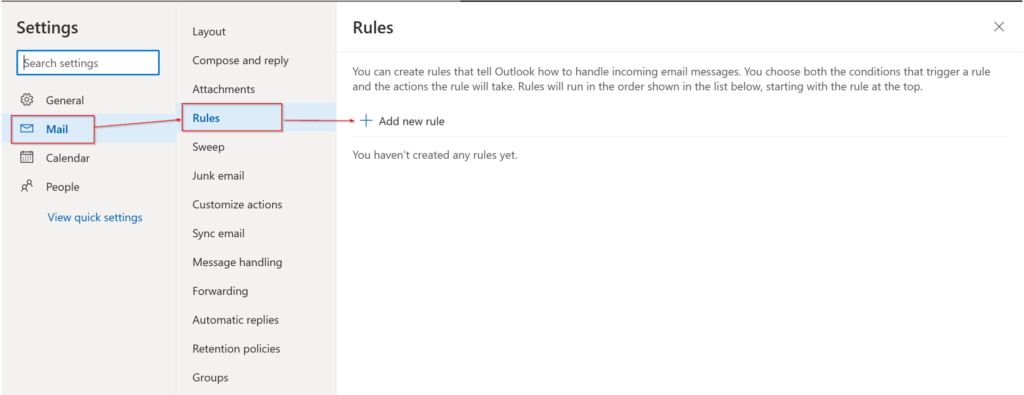
Go to Settings>Mail>Rules>Then click Add New Rule

Settings>Mail>Rules

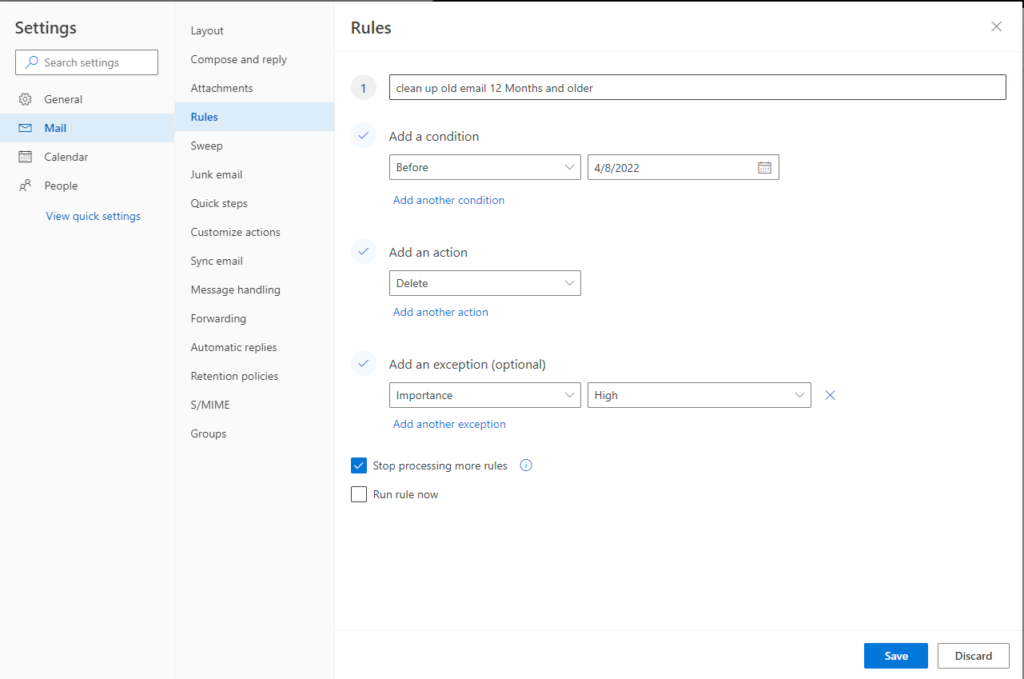
Name your rule, something like “clean up old email 12 Months and older” or something that makes sense to you.

Name of Rule

Now add a condition

There are so many options, select whatever you like, I am selecting “Before 4/8/2022”

Note: you will need to just update the date in the rule later on.

Then select the Action, you want to do, I am selecting “Delete

You can get your emails back from Deleted Items unless the default email deleted policy will clean up have permanently deleted, which most cases 30, 60, or 90 days from the date it was deleted

Also, added an exception so I can keep Importance with “High” or whatever you like.

Once you are happy with everything click Save

That’s it, don’t forget, if you set to delete or whatever condition you have selected, it will automatically do just that, in case later in time you might be wondering what’s happening to my old emails

To change the Date or Turn off the rule, just go to Mail>Rules and click on the pencil icon to change or the Toggle button to turn off.

Double-check all selections before running, because there are no ways to stop, once it started the action you have selected in the rule. If you are unsurely tested on some test account(s).


How to update Microsoft Azure Active Directory Connect

Upgrade-Azure-Active-Directory-Connect

If you have your AD sync to Microsoft Azure and have installed the Active Directory connect, you may need to update, and here is how to do that

To see the status of sync, you can log in to the Microsoft admin portal at https://admin.microsoft.com

on the home page, you should see Sync Status, click on the Sync staus to get to the details page

You should see something like this: Click on Microsoft Download Center or this link: https://www.microsoft.com/en-us/download/details.aspx?id=47594

It will bring you to the Download page, read the requirements, and download to your software

When you run the setup you may get an error message if you don’t have the TLS enabled
https://docs.microsoft.com/en-us/azure/active-directory/hybrid/reference-connect-tls-enforcement

PowerShell command to enable TLS 1.2: got it from the link above, copy from Microsoft so you don’t have typo or if you know how to enable yourself do so

New-Item 'HKLM:SOFTWAREWOW6432NodeMicrosoft.NETFrameworkv4.0.30319' -Force | Out-Null

New-ItemProperty -path 'HKLM:SOFTWAREWOW6432NodeMicrosoft.NETFrameworkv4.0.30319' -name 'SystemDefaultTlsVersions' -value '1' -PropertyType 'DWord' -Force | Out-Null

New-ItemProperty -path 'HKLM:SOFTWAREWOW6432NodeMicrosoft.NETFrameworkv4.0.30319' -name 'SchUseStrongCrypto' -value '1' -PropertyType 'DWord' -Force | Out-Null

New-Item 'HKLM:SOFTWAREMicrosoft.NETFrameworkv4.0.30319' -Force | Out-Null

New-ItemProperty -path 'HKLM:SOFTWAREMicrosoft.NETFrameworkv4.0.30319' -name 'SystemDefaultTlsVersions' -value '1' -PropertyType 'DWord' -Force | Out-Null

New-ItemProperty -path 'HKLM:SOFTWAREMicrosoft.NETFrameworkv4.0.30319' -name 'SchUseStrongCrypto' -value '1' -PropertyType 'DWord' -Force | Out-Null

New-Item 'HKLM:SYSTEMCurrentControlSetControlSecurityProvidersSCHANNELProtocolsTLS 1.2Server' -Force | Out-Null
New-ItemProperty -path 'HKLM:SYSTEMCurrentControlSetControlSecurityProvidersSCHANNELProtocolsTLS 1.2Server' -name 'Enabled' -value '1' -PropertyType 'DWord' -Force | Out-Null
New-ItemProperty -path 'HKLM:SYSTEMCurrentControlSetControlSecurityProvidersSCHANNELProtocolsTLS 1.2Server' -name 'DisabledByDefault' -value 0 -PropertyType 'DWord' -Force | Out-Null
New-Item 'HKLM:SYSTEMCurrentControlSetControlSecurityProvidersSCHANNELProtocolsTLS 1.2Client' -Force | Out-Null

New-ItemProperty -path 'HKLM:SYSTEMCurrentControlSetControlSecurityProvidersSCHANNELProtocolsTLS 1.2Client' -name 'Enabled' -value '1' -PropertyType 'DWord' -Force | Out-Null
New-ItemProperty -path 'HKLM:SYSTEMCurrentControlSetControlSecurityProvidersSCHANNELProtocolsTLS 1.2Client' -name 'DisabledByDefault' -value 0 -PropertyType 'DWord' -Force | Out-Null
	Write-Host 'TLS 1.2 has been enabled.'

Then re-run the AD Connect setup:

Note, if you have a big network, this may take some time, so do off-hours, because it will stop the sync of your AD until the upgrade is completed

You should see the upgrade process and synchronization

Then it will ask you for admin credentials:

If everything goes well you should see, Ready to configure, click Upgrade

Then, the configuration complete

now you can check the status on the admin page

That’s it, hope this helps someone


How to change the view on Outlook

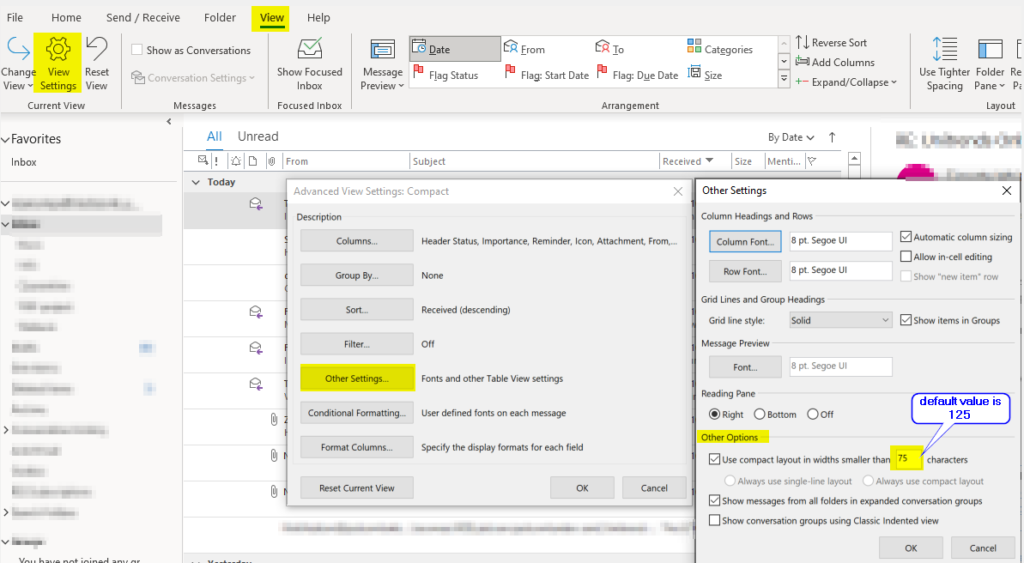
There is a number of ways to change the view and options you can choose from. Most common is having to be able to view these headers so you can sort them, they are From, Subject, Received, Size and Attachments

Based on the size of the screen you might only see this, which means you can need to change size or decrease the Characters from default 125 to like 75 or whichever works for you.

Screenshots are from Outlook 365, but other versions have similar settings too

You can change by going into View>View Settings>Other Settings…>under Other Options

If you like you can add other columns which you like too, it’s all customizable, if you changed something and you don’t like you can Reset the view to default by going to View>Reset View

That’s it, hope this helped out