How to upgrade to PHP 7.4 on Ubuntu

You should upgrade your PHP for your server to version 7.4 or higher for security reasons. You can find PHP version info from here: https://www.php.net/supported-versions.php. Here I am doing an upgrade from PHP version 7.2 to 7.4 on my Ubuntu server, before you do any changes, make sure you have a good backup of your server/application which may be running on your server.

To see current version:

command: php -version
output: PHP 7.2.24-0ubuntu0.18.04.7 and some other details of your server

First, make sure your server is up to date by running the following commands:
Command: apt update
Command: apt-upgrade

Then add repository to install PHP:

Command: add-apt-repository ppa:ondrej/php
Command: apt update

You will get message like this to continue or cancel:
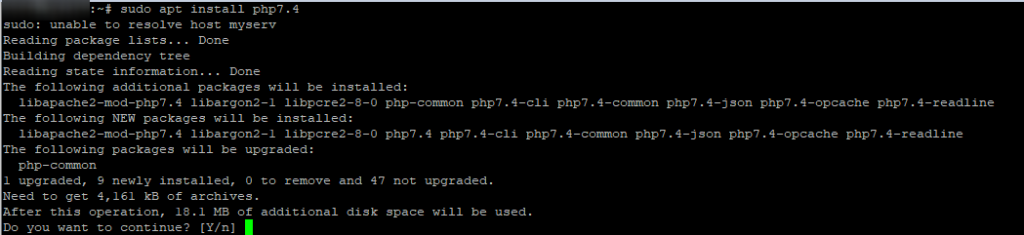
To install PHP7.4

Command: apt install php7.4

To see the version you can re-run the command:

Command: php -version
Output: PHP 7.4.14 with some other info

Now you have the PHP 7.4 on your server you can update your application to take effect of newer version of PHP. Here is example of web server apache

Command: sudo a2enmod php7.4

Considering dependency mpm_prefork for php7.4:
Considering conflict mpm_event for mpm_prefork:
ERROR: Module mpm_event is enabled – cannot proceed due to conflicts. It needs to be disabled first!
Considering conflict mpm_worker for mpm_prefork:
ERROR: Could not enable dependency mpm_prefork for php7.4, aborting

To fix:

Command: sudo a2dismod mpm_event

Module mpm_event disabled.
To activate the new configuration, you need to run:
systemctl restart apache2

Before you restart, you will need to activate PHP7.4, otherwise you will get this error:

Command: sudo systemctl restart apache2

Install PHP 7.4 Extensions

Installing PHP extensions are simple with the following syntax.
Command: sudo apt install php7.4-extension_name

Here are some commonly used php-extensions:

php7.4-common php7.4-mysql php7.4-xml php7.4-xmlrpc php7.4-curl php7.4-gd php7.4-imagick php7.4-cli php7.4-dev php7.4-imap php7.4-mbstring php7.4-opcache php7.4-soap php7.4-zip php7.4-intl

For PHP 7.4 with Apache the php.ini location will be in following directory.
sudo nano /etc/php/7.4/apache2/php.ini

For PHP 7.4 FPM with Nginx the php.ini location will be in following directory.
sudo nano /etc/php/7.4/fpm/php.ini

To search with nano editor: F6 or CTR+W and update the following values for better performance.

upload_max_filesize = 32M 
post_max_size = 48M 
memory_limit = 256M 
max_execution_time = 600 
max_input_vars = 3000 
max_input_time = 1000

For web server to take effect restart the service:
Command: sudo systemctl restart apache2

Finally doing clean up of old stuff no longer needed:

Command: apt autoremove

That’s should it, if you have other applications you just have to update that, some may automatically be done, no other action needed. You should test everything to make sure all functioning well.


WordPress update is currently in progress

How to fix WordPress when upgrading and you get error another update is currently in progress? This could be very simple as wait for 15 minutes and it will clear the error message automatically or you may need to look at the log file to see what’s causing the hang

You might have to change the PHP.ini file to increase the maximum execution time default is 30 seconds. You might see a message like Fatal error: Maximum execution time of 30 seconds exceeded, then change it in your PHP.ini in around line 380 30 to whatever

max_execution_time=30

Your error of URL might be: /wp-admin/update-core.php?action=do-core-upgrade
WordPress update is currently in progress
Another update is currently in progress. If waiting for 15 minutes does not fix it, then you might need to go into the database and: delete the core_updater.lock option from your WordPress database

Also, make sure to clear your cache and restart the web service to get the updated setting for your PHP.ini, that should be it. If you still have error check logs and maybe plugin you used may not be supporting newer version of WordPress.


How to upgrade WordPress

Many websites and company Intranet runs on WordPress around the world. Keeping the WordPress software is very important to keep your data safe. The process can be very simple or it could involve a lot of planning and carefully testing a newer version, before upgrading the live system. If you have set up your WordPress correctly with the right permission and documented all the customization then it should be easy to upgrade. Your template/plugin is the key to your WordPress function. The template should be customized to void the system upgrade issues and tested.

Preparation for upgrade

  • Backup database and installation files, make sure your backup is good
  • Check your current Plugin and Template comparability
  • Have your customization documentation handy, review it make sure they are up to date
  • Make sure you have access to the server directly, in case you lose remote session
  • Plan out and communicate with your users

Upgrade options 1

Login to your WordPress admin pannel, make sure you have full permission

1. Click on Update>Update Now

If everything goes well you should see: latest version installed 5.0.2

Then you need to upgrade the Templates Themes

2. Click on Update> you will see the message:
“The following themes have new versions available. Check the ones you want to update and then click “Update Themes”.”

click on each or select all and update

3. If there are any Plugin updates you will see message:
“The following plugins have new versions available. Check the ones you want to update and then click “Update Plugins”. “

Upgrade options 2

The manual process, assumed you have already done the backup in case anything goes wrong you can restore it. Download WordPress and extract the WordPress you just downloaded

1. Delete the old wp-includes and wp-admin directories from server, so it should look something like this

2. Then upload the wp-includes and wp-admin to server
3. Upload wp-content folder to your server and overwrite existing files
4. upload all of the root directory files and overwite on server

Then go to your WordPress URL, you should see Database update Required, click Update WordPress Database

If everything goes well you should see Update Complete

In case you want to check your WordPress is up to date you can type in URL
/wp-admin/upgrade.php

Then you need to upgrade the Templates Themes/Plugin
Click on Update>
you should see message for Themes/Plugin update, click on each one an update it.

The following plugins have new versions available. Check the ones you want to update and then click “Update Plugins”.

The following themes have new versions available. Check the ones you want to update and then click “Update Themes”.

That’s it, of course to test your website, menu, links, etc…


How to setup WordPress for website

WordPress is a very popular platform for websites and very easy to use.  All you need is a web server that supports PHP, then setup database.  Download WordPress from https://wordpress.org/download/ to your web server and extract it.

To start go to your domain URL to run the installation of WordPress, select Language of your choice and click Continue

WordPress getting start, at this point setup database and user name, which you will need on next screen, then click Let’s go!

Fill in Database information, then click Submit

Checking communication for the database info you enter, if everything went well, then click Run the installation

Welcome to new site, fill in your website information and click Install WordPress

Successfully installed WordPress

That’s it, now just customize it to the way you like it and enjoy it
You may need to check some settings and update it

Recommended Permissions:

  • Directories: 0755
  • Files: 0644
  • owner: www-data

Here are some quick list of feature which can easy to customize your WordPress site:
It also has a new editor called “Gutenberg”, which is very easy to use, if you want to use it, click Install Gutenberg

Appearance> it will change the look of your site, based on Theme
Themes – it will list all your themes
Customize– It will bring you to your current theme, to be customizing
Widgets – list all Available Widgets, which you can activate or disable
Menus – It will list Menu options and able to customize it
Header – It will bring you to your current theme, to customize your header
Editor – It will bring you to Them files


Settings> common settings changes to your site
Genaral– Site Title, Tagline, URL,Timezone, etc..
Writing -Default Post Category, Format, etc..
Reading– Homage Displays, Blog pages show options, Search engine Visibility, etc…
Discussion– Article, Comments, and other settings
Media– image size settings when you upload
Permalinks– URL link display settings
Privacy – set custom policy page


Tools> some tools to deal with your data
Available Tools – list of tools
Import
– options to import data into your WordPress
Export – options to export your data outside of your WordPress
Export Personal Data – to export user data
Erase Personal Data – to erase user data

if you want official version of WordPRess installation you can find it here


Moving your WordPress site to new server via All-in-one WP Migration

Here is another way of moving your new WordPress site to a new server.  I had written one post called How to move your WordPress site to a new server which was the manual way of doing, without the use of any plugin, like this one called All-in-One WP Migration.  It’s a very simple process to do move using this plugin, please make sure you have a good backup before doing anything.  I like said before, use whatever you feel comfortable.  As always I do recommend doing a full backup of your site file and database, just in case you need to go back to it.  In this post, will go through the whole process of moving your WordPress site, using third party plugin called All-in-One WP Migration. Remember, using this third-party plugin is easier, but have to be aware, it may have the restriction on function/size of database or type, which may change at any time.

I am assuming you already have a good working website, permission, and backup.  Will keep this simple and jump right onto moving site.

Install a plugin called All-in-One WP Migration by going to your WordPress admin panel and clicking on Plugins tab>Then Plugins Add New

Search: all in one WP, once you find it click Install, then Activate it.

Then let’s create a backup using the new All-in-one WP Migration plugin, by clicking on Create Backup under All-in-one WP Migration plugin

It will give you many options where you want to back up to, I am going to select the file

Once, it finishes back up it will give you the option to download it, click on it and save, then click close.

In case you want to download the backup via FTP/SFTP: \wp-content\ai1wm-backups

Then log in to the new WordPress site and install the same plugin installation

Now let’s import your data to the new site

Go to All-in-one WP Migration Plugin>Import>Then select the file and find your backup

You will get this warning if you are ready to override, click Proceed

Once it’s done, you should see Successfully message

That’s it.