As you may know, already there are many ways to secure Ubuntu server based on your environment and version of OS. Double checking to be sure you are secure does not hurt at all, but don’t go overboard by locking your self from accessing own server. I have been working with Ubuntu server since Ubuntu 5.04 back in 2007, but have not done any post about it and was not using that much as I am now. Ubuntu Linux system has come a long way for sure, now even power users start using their desktop version. For the most part default security secures your server from any major attack to your server. There are many attacks are from within your own environments and some lazy admin or management who don’t want to pay for support or just keeps post ponding updates. Anyways here I have some list of tweaks I have been using and learning more from other Linux admins on internet.
Keep your server up to date:
sudo apt-get update This will search for an update of your current version and packages that in installed
sudo apt-get upgrade This will install the updates and packages
sudo apt-get dist-upgrade This will look for newer next LTS version
Check supported Releases:
https://wiki.ubuntu.com/Releases
Remove unnecessary packages
sudo apt-get auto-remove
sudo apt-get purge NameOfPackage
Enable built-in basic Uncomplicated Firewall (ufw ): by allowing only need services name or ports
Disabled telnet: very old but have seen people still using it
apt-get remove telnet
Check for hidden open ports with:
netstat
Set a shorter timeout for root sessions
edit /etc/profiles
[ $UID -eq 0 ] && TMOUT=600.
The $UID -eq 0 part refers to the user with the ID of 0 — always root.
The TMOUT=600 or 900 part sets the timeout limit to 10-15 minutes (600-900 seconds)
Change default SSH port from 22 to something else and disable Root user:
Port 22 > Port 90xx or whatever port you want (don’t forget to add a new port to your firewall)
edit /etc/ssh/sshd_config:
PermitRootLogin yes > PermitRootLogin no
Limiting allowed users to login via SSH:
edit /etc/ssh/sshd_config to have ssh login for specific users
bottom of the file, add the line x=device you going to log in from IP or just type User1 User2, etc…
AllowUsers YourUserName@192.xxx.xxx.x
if you need to use a wildcard: to allow any username and from x=network:
AllowUsers @192.xxx.xxx.*
You could also add a Group:
Create group:
Add allowed
AllowGroups SSHGroupName
Then add
service ssh restart
edit /etc/ssh/sshd_config to have ssh login for specific users
bottom of the file, add the line x=device you going to log in from IP
AllowUsers YourUserName@192.xxx.xxx.x
if you need to use a wildcard: to allow any username and from x=network:
AllowUsers @192.xxx.xxx.*
service ssh restart
Add Login Banner which displays before user login:
edit /etc/issue.net
add your own warning message whomever login can see
Then edit /etc/ssh/sshd_config and uncomment the line:
Banner /etc/issue.net
some more options to disable server info by comment out:
edit /etc/pam.d/sshd
session optional pam_motd.so motd=/run/motd.dynamic
network messages to allow or disable (like ICMP, redirects, SYN, etc..):
edit /etc/
Blocking IP spoofing:
edit /etc/host.conf
change from “multi on” to “nospoof on”
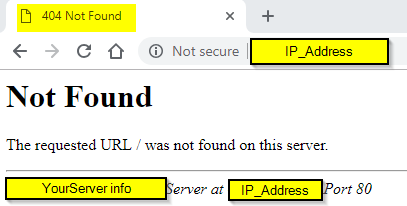
To Turn off Server Signature:
edit /etc/apache2/apache2.conf and add these 2 lines at the end of the config file. Most cases user types wrong URL or by IP address, it
ServerSignature Off
ServerTokens Prod
service apache2 restart
Hide PHP Version
edit (your version of PHP maybe different) /etc/php/7.0/apache2/php.ini
expose_php = Off
You may have older version of PHP:
/etc/php5/apache2/php.ini
expose_php = Off
Also youcould add to your .htaccess file:
# Disable server signature
ServerSignature Off
will add more later on