How to improve application pool timeouts in IIS

There are many settings you can adjust to improve the application pool in IIS, one of them is timeouts. Please take a backup of your settings before making any changes, in case you need to revert it back. Each default settings you change may impact the health of the overall server. There are many reasons to keep it default and many to change it, all depends on the needs of your application. I would not change the IIS recycle settings, they are there to clean up the resources of applications that aren’t in use, like memory, database sessions, etc.. Some settings can be set up within your application to keep it alive by use of a ping service just makes a request on the site every so often.

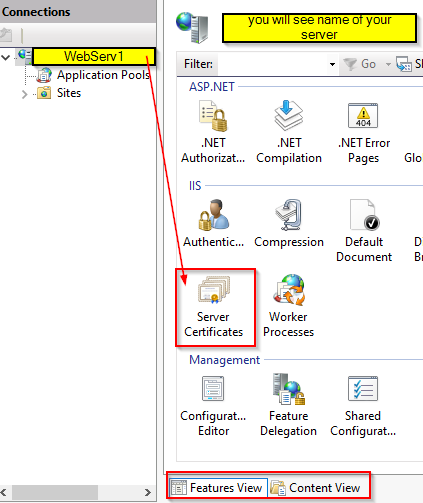
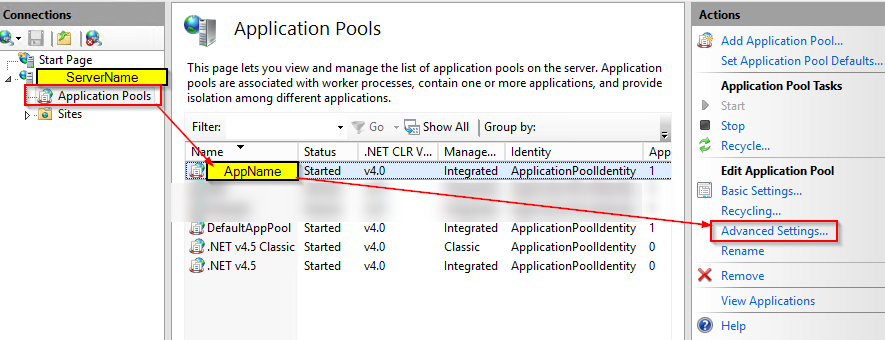
Login in to your server, open IIS Manager.

In the left pane (Connections), select Application Pools.
In the middle pane (Application Pools), select YourApp.
On the right pane (Actions), select Edit Application Pool > Advanced Settings… or just right click and select Advanced settings ..

Then in the Advanced Settings window, under Process Model, set Idle Time-out (minutes) to 0 if you want to disable or change from default 20 minutes to whatever works for you.
Then click OK.

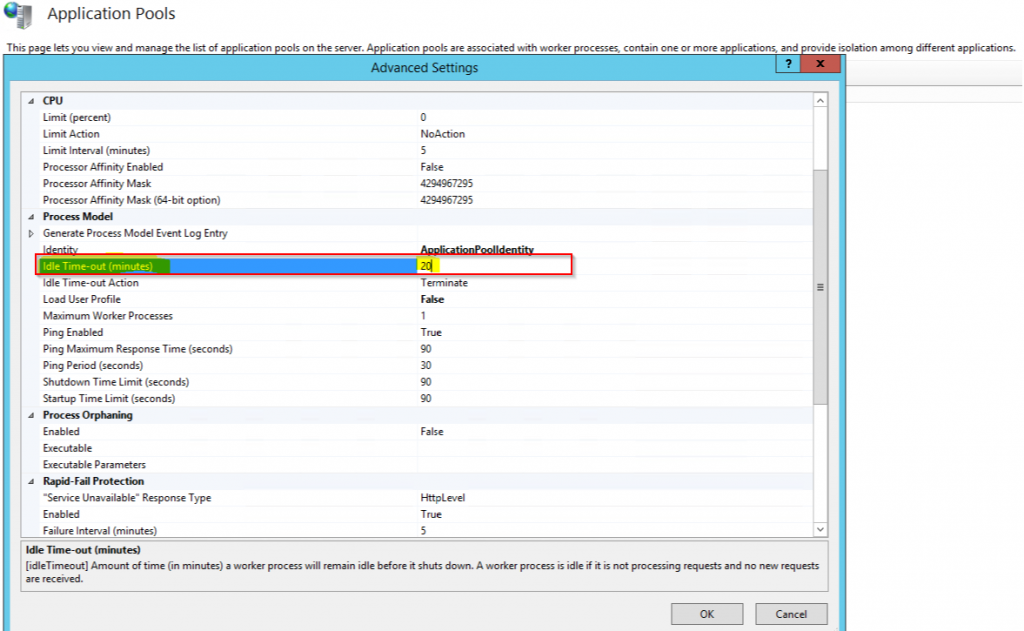
You can change other settings that might help your application performance to stay wake longer, so end users don’t feel the slowness, just keep in mind overall server health, load, memory, CPU will be effected. That’s it for now


How to create CSR for SSL certificate via IIS

Technology era we are living, an SSL certificate is required for most if not all of today’s application to keep the data secure.  It’s very easy to get SSL for your websites, some hosting providers included in your packages.  If you have application then that requires a code signing certificate its silently different type of certificate.  In order for you to get SSL, you will need to generate the certificate signing request (CSR), which you can use IIS manger, many hosting providers let you generate CSR on their portal too or you can use other tools like OpenSSL.  Let’s get started

Login to the server where you have IIS (Windows 10 has IIS)
Open Internet Information Services (IIS) Manager, depending on your view you can need to switch view from Content to Features
Double click on Server Certificates

Then on the right-hand side, you will see an Action menu, where you would click on “Create Certificate Request…

Fill in the details for your Company to be verified by SSL provider, then click on Next
If, you want details on what to fill out the check out this link from Microsoft Server Certificates

Select your Cryptographic service provider and Bit Length that fits your need, then click Next
Note
. Based on your selection you may see different options, I am using RSA, 2048

Next screen will ask you to save the file, select the location and click Finish, it will create WhatEverYouNamedYourFile.txt

That’s all for the process of creating the CSR, now you just need to go to your SSL Provider and copy and paste the code in the FileName.txt that you just saved in the last step. Then it will go through the validation process from your SSL provider, once everything is ok, you will get an email from them when your SSL is ready to be used.


How to redirect HTTP to HTTPS in IIS

Redirect are very common for web servers for most if not all websites these days.  This post I am using the URL Rewrite, if your server does not have already you need to download URL Rewrite extension which works With IIS 7, IIS 7.5, IIS 8, IIS 8.5, IIS 10.  Note.  If you already have the URL Rewrite you can skip to the section Adding Redirect Rule

Installation of URL Rewrite:

You can download directly from this link: https://www.iis.net/downloads/microsoft/url-rewrite

If you already have the Web Platform Installer, you can double click and find it there, under your web server>Sites>Select site>on the right-side panel you will see Management section

To start the installation double click on the URL Rewrite and click Install

Read the terms then click on I Accept

If everything goes well you should see, successfully installed, click Finish
you should see the URL Rewrite, if you don’t close the IIS Manager and re-open it.

Adding Redirect Rule:

Double click on the URL Rewrite for the site you want to redirect

Add your rules here, which fits your needs you may need more than one rules

I am going to create a rule to redirect HTTP to HTTPS:

Click Add Rules(s)
Then click on Blank rule (for Inbound rules)

Fill in the Name and other options shown in the screenshot, then expand the Conditions and click Add

This condition will check if user type’s https, then this rule will be ignored, so it avoids the loop

Nothing set on the server variables, unless you needed in some special case, you can add it, Next, we want to set up the redirect
https://{HTTP_HOST}/{R:1}

https://docs.microsoft.com/en-us/iis/extensions/url-rewrite-module/url-rewrite-module-configuration-reference

Your Rule should look something like this if you open your web.config file:
        <rewrite>
            <rules>
                <rule name=”http to https redirect” stopProcessing=”true”>
                    <match url=”(.*)” />
                    <conditions logicalGrouping=”MatchAny”>
                        <add input=”{HTTPS}” pattern=”^OFF$” />
                    </conditions>
                    <action type=”Redirect” url=”https://{HTTP_HOST}/{R:1}” />
                </rule>
            </rules>
        </rewrite>

If you have issues make sure to check following:

  • Make sure your webserver firewall ports 80 and 443 are opened
  • You may need to restart the IIS service for rule to take effect, also make your local cache is cleared for your browser.
  • Double-check the pattern of your rule make sure it’s correctly typed, not a typo

That’s it