Encrypt TLS-SNI-01 validation is reaching end-of-life

If you are using Let’s Encrypt certification and have received an email to take action on renewal of your certificate.  That’s because lets Encrypt had announced last October 2018, that they will end support for TLS-SNI-01 validation method on February 13, 2019.  You need to update your ACME client to use an alternative validation method alternative validation method: HTTP-01, DNS-01 or TLS-ALPN-01. If no action taken you may have out-dated certificate for your domain.

To check your certbot version:

certbot –version

If have your server up to update, then the version should be 0.28.  If not you can upgrade your Certbot at https://certbot.eff.org/.   It will ask you to pick your software and system and it will give you detail documentation on how to upgrade, baased on your version of software/system.

To install for Apache, you can run this command:

sudo apt-get install python-certbot-apache

To test do a renewal dry run:

sudo certbot renew –dry-run

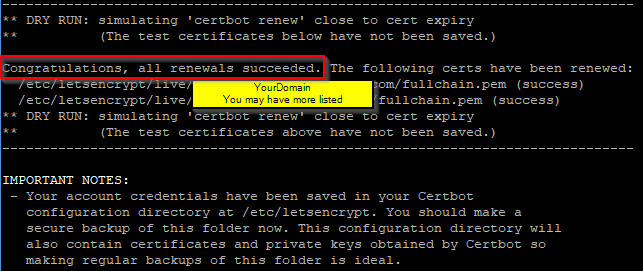
If everything goes well you should see Congratulation, all renewals succeeded, if it fails then you need to fix it. Take a look at log, firewall to make sure it’s not been blocked and try again.

Here is a link from Let’s Encrypt Community Support on How to stop using TLS-SNI-01 with Certbot Please update your server certificate to keep it secure.


How to upgrade Ubuntu 14.04 to 16.04

If you are still running Ubuntu server 14.04, which will be End of Life this Aril 2019, so you should upgrade to 16.04 or 18.04. You can check out Ubuntu Release dates at https://wiki.ubuntu.com/Releases Even though Linux is more secure, that does not mean it should not be kept up to date, to keep your data safe. Longer you keep put out the updates harder it gets, due to many changes on each upgrade. You can check out my post on How to secure your Ubuntu server. Make sure you have a good backup and your backup is tested to be sure data you are backup are good. If you have an option you can do an upgrade on a test server and work out any issues, that way when you do upgrade on production system it goes smooth.

Check list before starting upgrade process

  • Data backed up and verified
  • Make sure your application supports newer packages versions
  • List of application/services so it can be tested after the upgrade
  • Direct access to the server, remote session will give you an error
  • Stopping application/services, not required but if dealing with a database it’s safer
  • Double check storage space for an upgrade to download/install

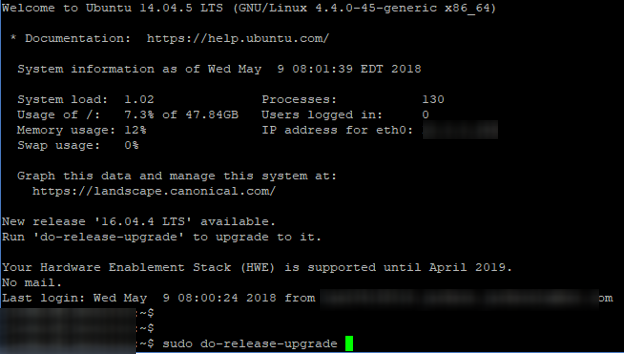
Login to server directly to do the upgrade
Command: sudo do-release-upgrade

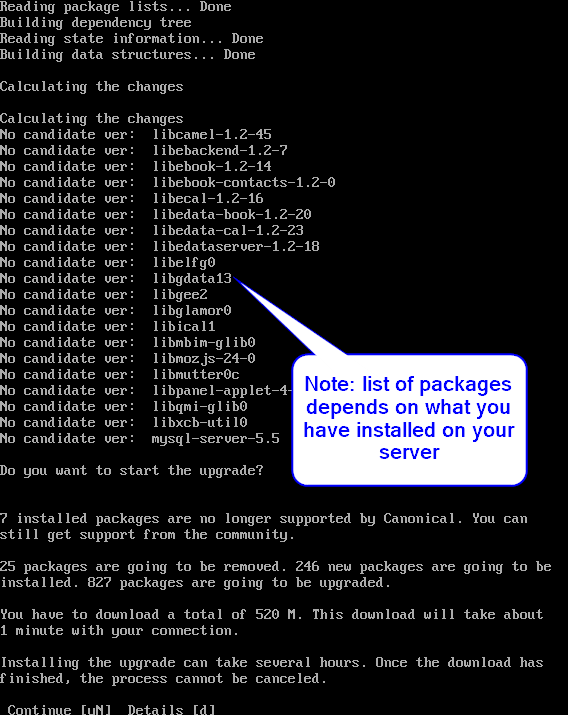
It will go through a list of currently installed packages and then let you choose if you want to go for the upgrade or not.  If you need more details you should press d otherwise press y and ENTER

You may get a message like this select Yes, so if any services needed to be restarted it will automatically without asking you each time. It will start the process of removing obsolete packages, downloading, installing and setting up automatically, unless you have chosen No.

You may get this message and you can make your own choice to keep current version or install newer, you can select to show differences between the versions

It will go though upgrade process, then if everything goes well you should see message System upgrade is complete, then restart by pressing y and Enter key, so your server can restart to finish upgrading.

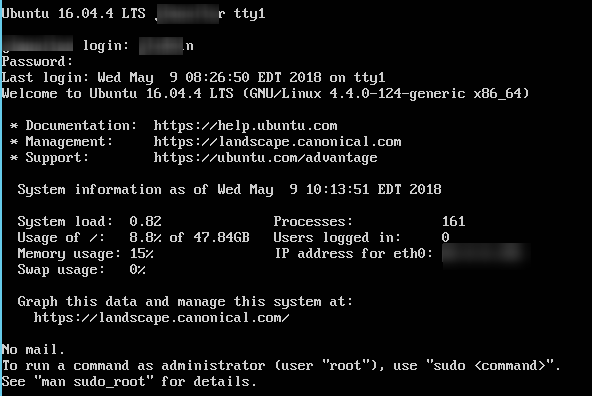
If everything went well you should see login screen

After an upgrade, you should do the following

  • This will check for any updates:
    • sudo apt-get update
  • This will install any updates that it found:
    • sudo apt upgrade
  • This will remove any packages no longer needed:
    • sudo apt-get autoremove 
  • Then check your application/services to make sure they are running and if there any errors fix it.

That’s it, hope this helps out someone out there, good luck

Common issues and solutions:

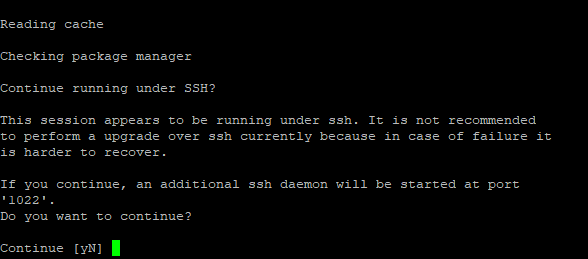
If you are remotely doing upgrade you will get this warning, if something goes wrong with your SSH connection while you are in the middle of an upgrade, then you would have issues getting into your server

You may have issues with PHP version, most likely you may have been running version 5.6, installing the PHP7.0 might fix your issues or newer version:

sudo apt-get install -y libapache2-mod-php7.0


How to secure your Ubuntu server

As you may know, already there are many ways to secure Ubuntu server based on your environment and version of OS. Double checking to be sure you are secure does not hurt at all, but don’t go overboard by locking your self from accessing own server. I have been working with Ubuntu server since Ubuntu 5.04 back in 2007, but have not done any post about it and was not using that much as I am now. Ubuntu Linux system has come a long way for sure, now even power users start using their desktop version. For the most part default security secures your server from any major attack to your server. There are many attacks are from within your own environments and some lazy admin or management who don’t want to pay for support or just keeps post ponding updates. Anyways here I have some list of tweaks I have been using and learning more from other Linux admins on internet.

Keep your server up to date:


sudo apt-get update This will search for an update of your current version and packages that in installed
sudo apt-get upgrade This will install the updates and packages
sudo apt-get dist-upgrade This will look for newer next LTS version

Check supported Releases:
https://wiki.ubuntu.com/Releases

Remove unnecessary packages

sudo apt-get auto-remove
sudo apt-get purge NameOfPackage

Enable built-in basic Uncomplicated Firewall (ufw): by allowing only need services name or ports

ufw allow ssh
ufw allow 80
ufw allow ftp

Disabled telnet: very old but have seen people still using it
apt-get remove telnet

Check for hidden open ports with:

netstat

Set a shorter timeout for root sessions

edit /etc/profiles
[ $UID -eq 0 ] && TMOUT=600.
The $UID -eq 0 part refers to the user with the ID of 0 — always root.
The TMOUT=600 or 900 part sets the timeout limit to 10-15 minutes (600-900 seconds)

Change default SSH port from 22 to something else and disable Root user:

Port 22 > Port 90xx or whatever port you want (don’t forget to add a new port to your firewall)
edit /etc/ssh/sshd_config:
PermitRootLogin yes > PermitRootLogin no

Limiting allowed users to login via SSH:

edit /etc/ssh/sshd_config to have ssh login for specific users
bottom of the file, add the line x=device you going to log in from IP or just type User1 User2, etc…
AllowUsers YourUserName@192.xxx.xxx.x
if you need to use a wildcard: to allow any username and from x=network:
AllowUsers @192.xxx.xxx.*

You could also add a Group:
Create group:
groupadd -r SSHGroupName

Add allowed group to /etc/ssh/sshd_config
AllowGroups SSHGroupName

Then add user to the group:
usermod -a -G SSHGroupName user1

service ssh restart

edit /etc/ssh/sshd_config to have ssh login for specific users
bottom of the file, add the line x=device you going to log in from IP
AllowUsers YourUserName@192.xxx.xxx.x
if you need to use a wildcard: to allow any username and from x=network:
AllowUsers @192.xxx.xxx.*

service ssh restart

Add Login Banner which displays before user login:

edit /etc/issue.net
add your own warning message whomever login can see

Then edit /etc/ssh/sshd_config and uncomment the line:
Banner /etc/issue.net

some more options to disable server info by comment out:

edit /etc/pam.d/sshd
session optional pam_motd.so motd=/run/motd.dynamic

network messages to allow or disable (like ICMP, redirects, SYN, etc..):
edit /etc/sysctl.conf

Blocking IP spoofing:


edit /etc/host.conf
change from “multi on” to “nospoof on”

To Turn off Server Signature:

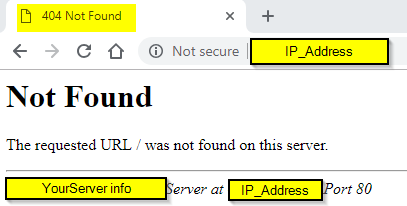
edit /etc/apache2/apache2.conf and add these 2 lines at the end of the config file. Most cases user types wrong URL or by IP address, it display’s your web server info by default.
ServerSignature Off
ServerTokens Prod

service apache2 restart

Hide PHP Version

edit (your version of PHP maybe different) /etc/php/7.0/apache2/php.ini
expose_php = Off

You may have older version of PHP:
/etc/php5/apache2/php.ini
expose_php = Off

Also youcould add to your .htaccess file:
# Disable server signature
ServerSignature Off

will add more later on


How to setup WordPress for website

WordPress is a very popular platform for websites and very easy to use.  All you need is a web server that supports PHP, then setup database.  Download WordPress from https://wordpress.org/download/ to your web server and extract it.

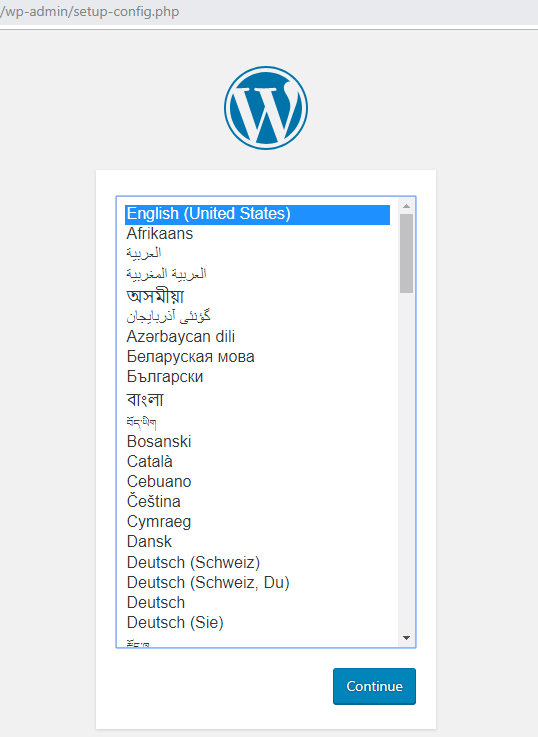
To start go to your domain URL to run the installation of WordPress, select Language of your choice and click Continue

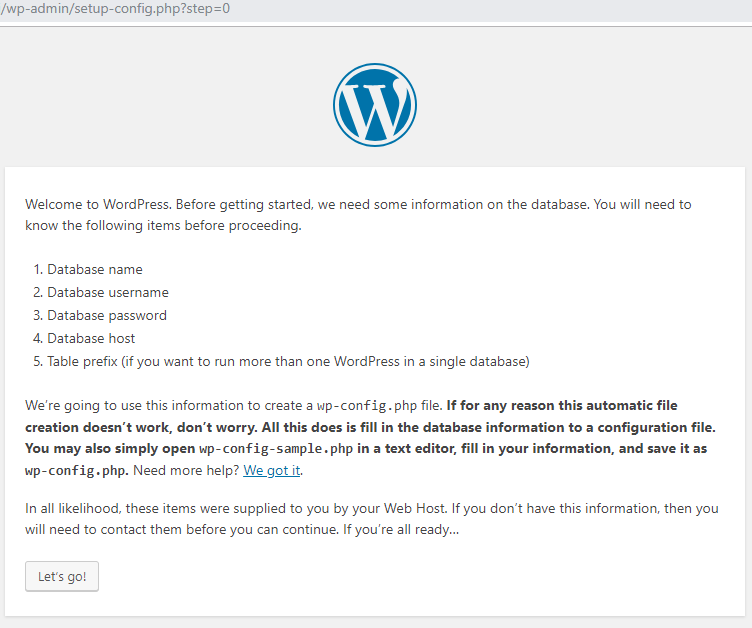
WordPress getting start, at this point setup database and user name, which you will need on next screen, then click Let’s go!

Fill in Database information, then click Submit

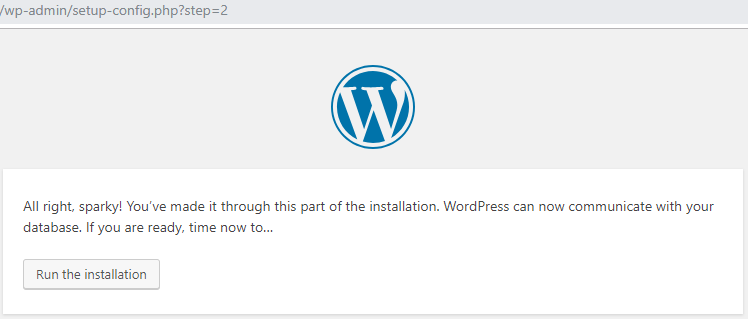
Checking communication for the database info you enter, if everything went well, then click Run the installation

Welcome to new site, fill in your website information and click Install WordPress

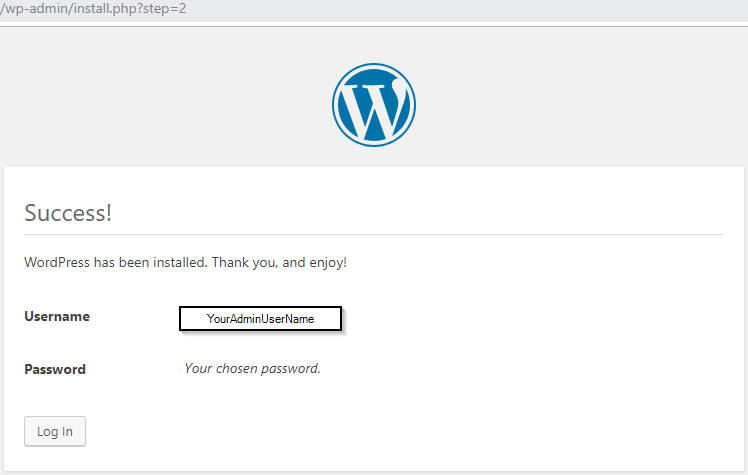
Successfully installed WordPress

That’s it, now just customize it to the way you like it and enjoy it
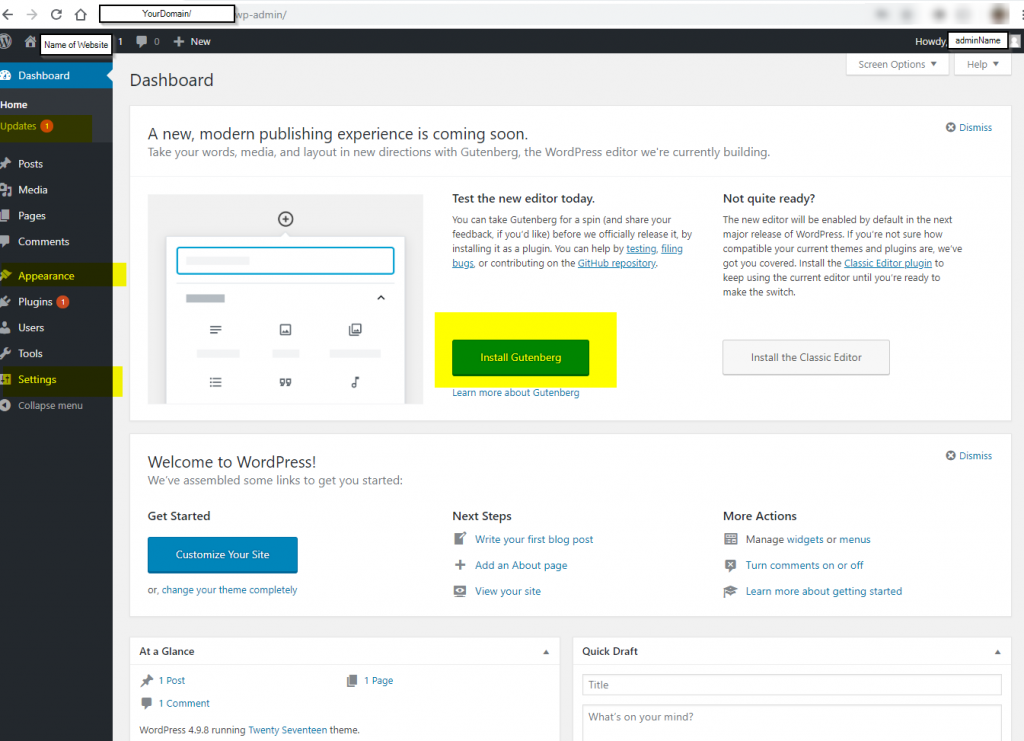
You may need to check some settings and update it

Recommended Permissions:

  • Directories: 0755
  • Files: 0644
  • owner: www-data

Here are some quick list of feature which can easy to customize your WordPress site:
It also has a new editor called “Gutenberg”, which is very easy to use, if you want to use it, click Install Gutenberg

Appearance> it will change the look of your site, based on Theme
Themes – it will list all your themes
Customize– It will bring you to your current theme, to be customizing
Widgets – list all Available Widgets, which you can activate or disable
Menus – It will list Menu options and able to customize it
Header – It will bring you to your current theme, to customize your header
Editor – It will bring you to Them files


Settings> common settings changes to your site
Genaral– Site Title, Tagline, URL,Timezone, etc..
Writing -Default Post Category, Format, etc..
Reading– Homage Displays, Blog pages show options, Search engine Visibility, etc…
Discussion– Article, Comments, and other settings
Media– image size settings when you upload
Permalinks– URL link display settings
Privacy – set custom policy page


Tools> some tools to deal with your data
Available Tools – list of tools
Import
– options to import data into your WordPress
Export – options to export your data outside of your WordPress
Export Personal Data – to export user data
Erase Personal Data – to erase user data

if you want official version of WordPRess installation you can find it here


osTicket installation on Ubuntu 16.04

osTicket is one of the great open source support system, very easy to install and use.  I have noted the whole process, short version, and detailed version.  What you will need from start to finish.  This installation is fresh, without any add-ons or any customization osTicket version 1.10.1.  I have written this installation based on Ubuntu 16.04 with Apache as a web server, it may work just fine with other versions of Ubuntu servers or similar to other flavors of Linux systems.  Assuming you have your web server and domain up and running without any issues.  So, let’s get started

What you will need

  • Server requirements:  You can get up to date from official docs from osTicket very well documented
    • PHP 5.6 (or better I am going to be using PHP7.0)
    • MySQL 5.0 (or better)
    • 2GB memory recommended 4GB or more
  • Access to web/database server via SSH
  • Access to site file via (FTP, SFT, GUI, SSH, etc. …)

Getting server ready to install osTicket:

Installing requirements, you may need to run add this to repository void error, log in to your web server via SSH

Commands:
sudo apt-add-repository ppa:ondrej/php
sudo apt-get install php7.0-gd php7.0-imap php7.0-xml php7.0-mbstring php7.0-intl phpapcu

Downloading osTicket:

https://osticket.com/download/
Once you have downloaded then extract it or upload it to your web server common location: /var/www/

Then set the permission:

commands: make sure to change /var/www/ to your path
sudo chown -R www-data:www-data /var/www/

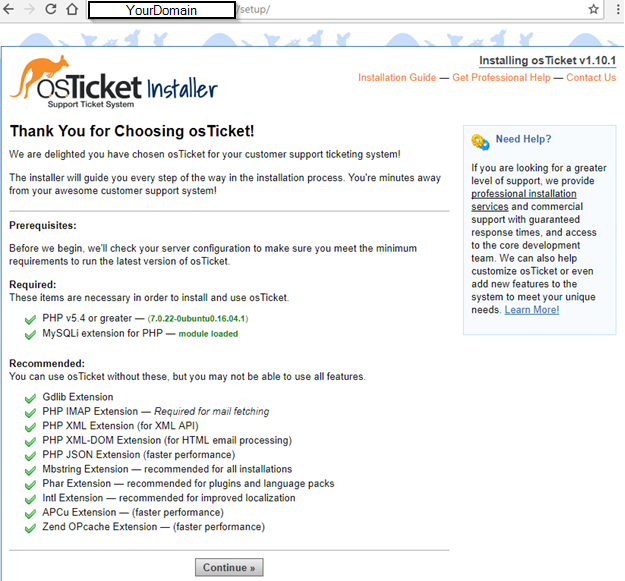
Click Continue once you have fixed any issues, please correct it before going forward
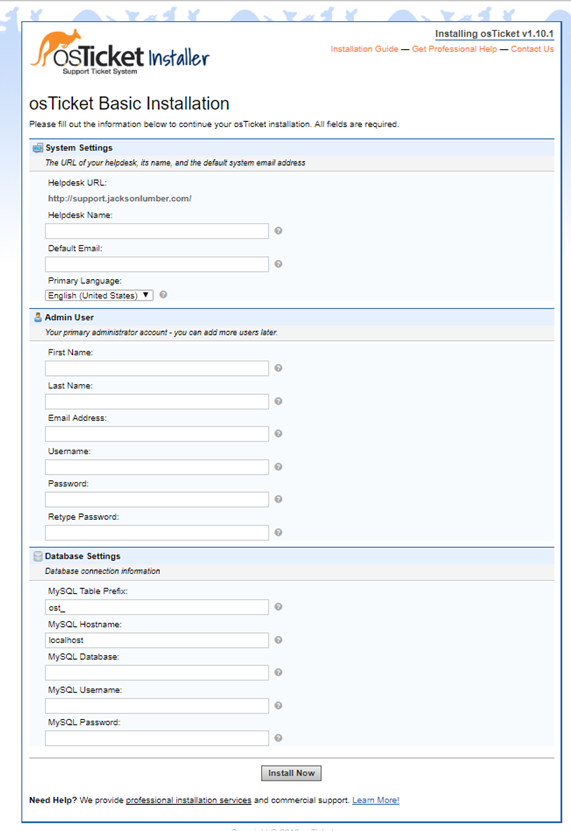
Setup osTicket Database and give full permission using whichever tool you are comfortable with it, then fill in details and click Install now
if everything went well you should see Congratulation, then just change the permission of your config file
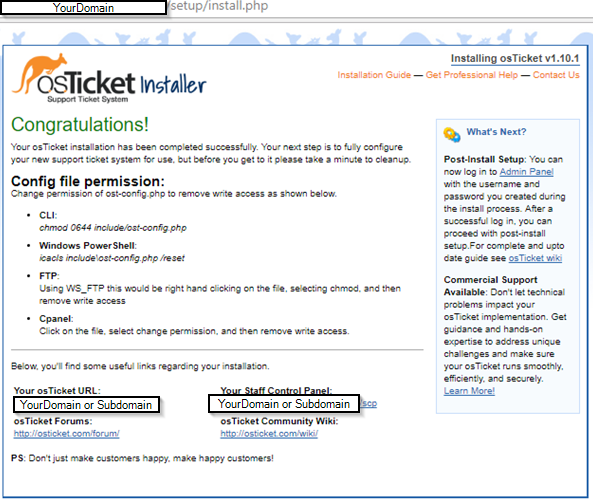
You should be able to login to your osTicket support system with the information you used earlier, see my notes, where I have put in some common issues you may encounter when installing.

Notes and common errors/solution: 

You may need to do these if you get errors or other settings changes


If you have not copied the ost-sampleconfig.php to include/ost-config.php
then you will get the following message
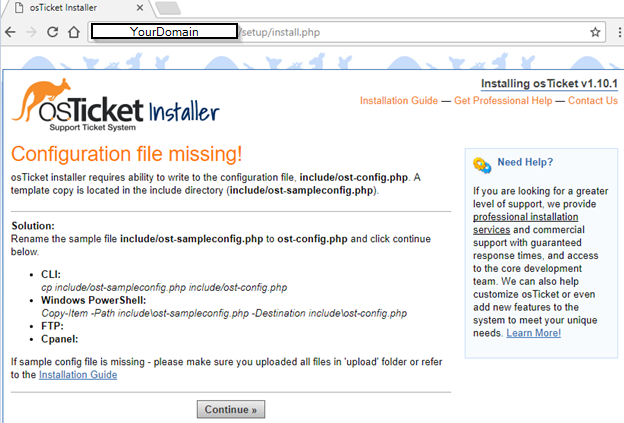

You will also need to make sure that ost-config.php has correct permission, otherwise, you will get this message:
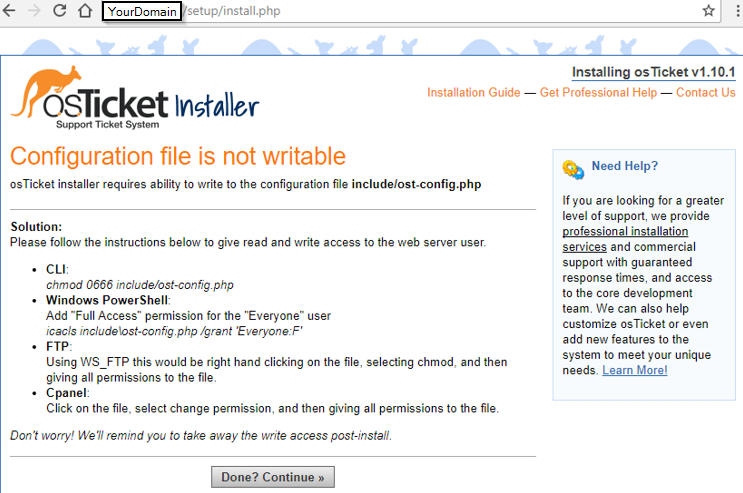

if you have already installed the PHP IMAP extension and still gives you an error, take a look at your php.ini file and enable it by uncommenting /etc/php/php.ini:
;extension=imap.so
to
extension=imap.so


You may need to restart the web service after making changes to take effect:
sudo systemctl restart apache2


error: Valid CSRF Token Required OsTicket:
then need to edit file class.ostsession.php round line 191
catch (DoesNotExist $e) {
$this->data = new SessionData([‘session_id’ => $id]);
$this->data->session_data = “”;


error: Php 7.2 compatibility issue (not recommended to use this version of PHP on osTicket 1.10.1 or 1.10.4, it should support on new version 1.11)
then need to edit file class.ostsession.php round line 197

if(!is_string($this->data->session_data)) { $this->data->session_data = strval($this->data->session_data);

}


These commands to install PHP version 7.0 extensions manually one at a time:
Sudo apt-get install php7.0-gd
Sudo apt-get install php7.0-imap
Sudo apt-get install php7.0-xml
Sudo apt-get install php7.0-mbstring
Sudo apt-get install php7.0-intl
Sudo apt-get install php-apcu


Make sure to protect your ost-config after the installation by changing the permission:
sudo chmod 0644 /var/www/include/ost-config.php