Setup Hyper-V on a Windows server 2019

How to setup Hyper-V on a Windows server 2019. It’s a very easy process for basic setup, it can be very complicated if you want to do isolation, VLAN, and NIC teaming. This post will start basic, Hyper-V host running Windows server 2019, it can be a standard or datacenter if you want to run many VMs and some advanced features. Let’s get started

Once you have windows server 2019 install and updated, we can install Hyper-V a couple of ways via GUI or PowerShell

Option 1: GUI

Option 2: using Powershell

Install Hyper-V using Server Manager:

open up Server Manager, then click Manage>Add Roles and Feature

Click Next:

Select Role-based, then click Next

The select server you want to install Hyper-V, click Next

Then select the Hyper-V check box.

You will get an option to include management tools, which most likely you want so click add features

Then click Next

If you only have one Network card then select the box to share with Hyper-V host/VM’s traffic, otherwise leave it unchecked.

Then you should see confirm installation, if everything is good, click Install, otherwise, click previous to make a change or click Cancel to exit out without making changes.

Once the installation is complete, the server needs to restart for Hyper-V settings to apply

You will find Hyper-V Manager under Start>Windows Administrative Tools

Or from the server manager under Tools>Hyper-V Manager

You should something like this:

Installing Hyper-V via PowerShell

Open PowerShell with Administrator rights

PS > Install-WindowsFeature -Name Hyper-V -IncludeManagementTools

Success Restart Needed Exit Code      Feature Result

——- ————– ———      ————–

True    Yes            SuccessRest… {Hyper-V Module for Windows PowerShell, Hy…

WARNING: You must restart this server to finish the installation process.

To verify Hyper-V installed:

Command: Get-WindowsFeature -Name *Hyper-V*

That’s all for Hyper-V installation, next need to setup networking, then start installing VM’s on it.


How to upgrade to PHP 7.4 on Ubuntu

You should upgrade your PHP for your server to version 7.4 or higher for security reasons. You can find PHP version info from here: https://www.php.net/supported-versions.php. Here I am doing an upgrade from PHP version 7.2 to 7.4 on my Ubuntu server, before you do any changes, make sure you have a good backup of your server/application which may be running on your server.

To see current version:

command: php -version
output: PHP 7.2.24-0ubuntu0.18.04.7 and some other details of your server

First, make sure your server is up to date by running the following commands:
Command: apt update
Command: apt-upgrade

Then add repository to install PHP:

Command: add-apt-repository ppa:ondrej/php
Command: apt update

You will get message like this to continue or cancel:

To install PHP7.4

Command: apt install php7.4

To see the version you can re-run the command:

Command: php -version
Output: PHP 7.4.14 with some other info

Now you have the PHP 7.4 on your server you can update your application to take effect of newer version of PHP. Here is example of web server apache

Command: sudo a2enmod php7.4

Considering dependency mpm_prefork for php7.4:
Considering conflict mpm_event for mpm_prefork:
ERROR: Module mpm_event is enabled – cannot proceed due to conflicts. It needs to be disabled first!
Considering conflict mpm_worker for mpm_prefork:
ERROR: Could not enable dependency mpm_prefork for php7.4, aborting

To fix:

Command: sudo a2dismod mpm_event

Module mpm_event disabled.
To activate the new configuration, you need to run:
systemctl restart apache2

Before you restart, you will need to activate PHP7.4, otherwise you will get this error:

Command: sudo systemctl restart apache2

Install PHP 7.4 Extensions

Installing PHP extensions are simple with the following syntax.
Command: sudo apt install php7.4-extension_name

Here are some commonly used php-extensions:

php7.4-common php7.4-mysql php7.4-xml php7.4-xmlrpc php7.4-curl php7.4-gd php7.4-imagick php7.4-cli php7.4-dev php7.4-imap php7.4-mbstring php7.4-opcache php7.4-soap php7.4-zip php7.4-intl

For PHP 7.4 with Apache the php.ini location will be in following directory.
sudo nano /etc/php/7.4/apache2/php.ini

For PHP 7.4 FPM with Nginx the php.ini location will be in following directory.
sudo nano /etc/php/7.4/fpm/php.ini

To search with nano editor: F6 or CTR+W and update the following values for better performance.

upload_max_filesize = 32M 
post_max_size = 48M 
memory_limit = 256M 
max_execution_time = 600 
max_input_vars = 3000 
max_input_time = 1000

For web server to take effect restart the service:
Command: sudo systemctl restart apache2

Finally doing clean up of old stuff no longer needed:

Command: apt autoremove

That’s should it, if you have other applications you just have to update that, some may automatically be done, no other action needed. You should test everything to make sure all functioning well.


How to migrate from FRS to DFSR on Windows server 2019

How to migrate from FRS (File Replication Service) to DFSR (Distributed File System Replication) on Windows server 2019? Microsoft has introduced later in Windows server 2008, if you are adding Domain controller Windows server 2019, you will get an error and you must migrate from FRS to DFSR. When the DFSR migration process starts it copies the contents of SYSVOL to a parallel folder called SYSVOL_DFSR, and then it gets shares out in migration phases. Please make sure your current domain is in good health status and has good backup.

  • Make sure you have free space on the drive where SYSVOL exists (normally on C drive) on your domain controller
    • free space should be current SYSVOL folder, plus a 10% or more
  • Make sure you have Admin rights to all of your domains
  • Make sure the Active Directory replication is working and healthy
    • To check the replication status: PS C:\Windows\system32> repadmin /ReplSum
  • Maike sure the SYSVOL is shared on DC
    • To check share: PS C:\Windows\system32> net share
    • To test all connectivities : Dcdiag /e /test:sysvolcheck /test:advertising

Start of migration

First, we need to make sure all domain controllers are in Prepared State, you check by running the following command:
dfsrmig /getmigrationstate

PS C:\Windows\system32> Dfsrmig /getmigrationstate
All domain controllers have migrated successfully to the Global state (‘Start’).
Migration has reached a consistent state on all domain controllers.
Succeeded.

Then start setting each state and wait between states until “Migration has reached a consistent state on all domain controllers” time it takes could all depends on how long it takes to sync, most common network should not take more than 15 minutes, but a larger network or custom sync duration this could take longer.

First state

PS C:\Windows\system32> Dfsrmig /setglobalstate 1
Current DFSR global state: ‘Start
New DFSR global state: ‘Prepared

Migration will proceed to ‘Prepared’ state. DFSR service will copy the contents of SYSVOL to SYSVOL_DFSR folder.

If any domain controller is unable to start migration, try manual polling. Or run with option /CreateGlobalObjects. Migration can start anytime between 15 minutes to 1 hour.

Succeeded.

PS C:\Windows\system32> Dfsrmig /getmigrationstate
All domain controllers have migrated successfully to the Global state (‘Prepared’). Migration has reached a consistent state on all domain controllers.

Succeeded.

Second state

PS C:\Windows\system32> Dfsrmig /setglobalstate 2
Current DFSR global state: ‘Prepared
New DFSR global state: ‘Redirected

Migration will proceed to ‘Redirected’ state. The SYSVOL share will be changed to SYSVOL_DFSR folder, which is replicated using DFSR.

Succeeded.

PS C:\Windows\system32> Dfsrmig /getmigrationstate
All domain controllers have migrated successfully to the Global state (‘Redirected’). Migration has reached a consistent state on all domain controllers.

Succeeded.

Last state

PS C:\Windows\system32> Dfsrmig /setglobalstate 3
Current DFSR global state: ‘Redirected
New DFSR global state: ‘Eliminated

Migration will proceed to ‘Eliminated’ state. It is not possible to revert this step.

If any read-only domain controller is stuck in the ‘Eliminating’ state for too long run with option /DeleteRoNtfrsMember.

Succeeded.

PS C:\Windows\system32> Dfsrmig /getmigrationstate
All domain controllers have migrated successfully to the Global state (‘Eliminated’). Migration has reached a consistent state on all domain controllers.

Succeeded.

That’s it your migration is completed, you can check replication and domain controller windows folder you should see something similar as screenshot below:

on DC C:\Windows\SYSVOL_DFSR
on DC C:\Windows\SYSVOL_DFSR\ you should see domain and sysvol
on DC C:\Windows\SYSVOL_DFSR\domain you should see Policies, scrips, GPS’s, etc..
on DC C:\Windows\SYSVOL_DFSR\sysvol you should see your domain(s)

Possible issues/solutions:

If you get permission denied you need to make sure your command prompt is open with Administrator

If dfsr fails to migrate check this link:

https://docs.microsoft.com/en-us/troubleshoot/windows-server/group-policy/dfsr-sysvol-fails-migrate-replicate


How to Compact Virtual Hard Disk

These days most of us using virtual storage drives for a server, most of the time these virtual storage disks are configured dynamically, so it grows as we use it, but does not shrink when you delete data unless you do compact. If you are using Hyper-V servers, it’s very easy to do, other hypervisors also offer similar compacting, you may just have to look around.

Here is screenshot of before compacting drive:

To compact in Microsoft Hyper-V hypervisor:

Open the Hyper-V Manager
Select the VM
Right-click on VM, click Settings
Select the Hard Drive that you want to compact, then click Edit
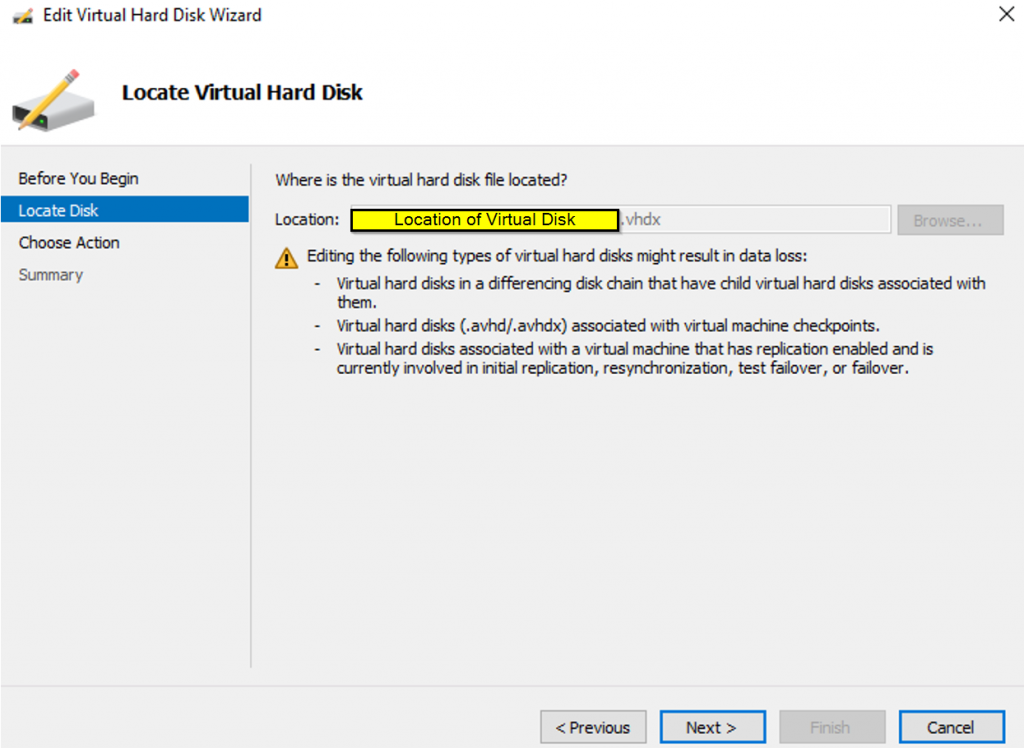
It will give you the location of the Disk and warning, please make sure you have a good backup, just in case something goes wrong
Click Next

If you only see Expand option, that means your VM is running, you can’t Compact
Click Next

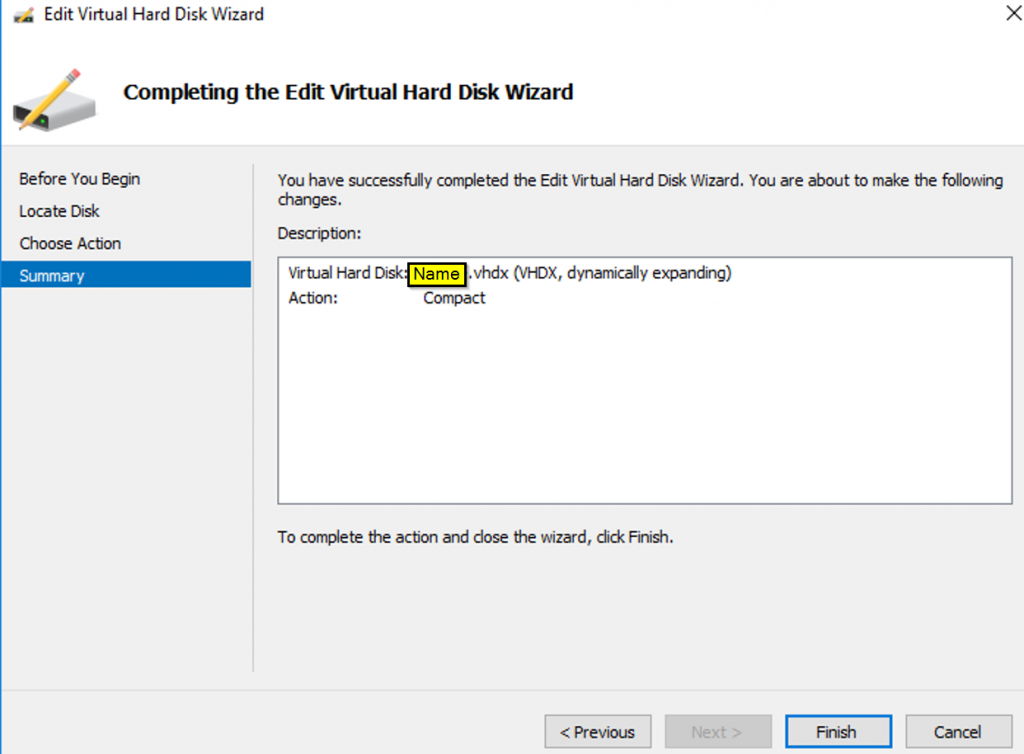
Summary of Disk, click Finish and it will start compacting, time it takes to compact are depends on speed of drive and how much data you have deleted.

This is what it looks like after compacting, the size will vary depends on how much of your data being deleted.

After Compacting:

That’s it, if you don’t get the drive space back, make sure to do the Drive Optimization first then re-do the compacting

To drive Optimize:

Login into server and right click on the drive select Properties

Click on Tools tab
Click on Optimize

Then select the drive if you have more then one and click on Optimize


How to delete Active Directory user with privilege issue

There may be a number of reasons you can’t delete some users from Active Directory, one of them could be domain admin or enterprise admin privileges. Another could be some objects are still in use or not sync up with an exchange, they both have some many references, so can’t delete active directory user with exchange ActiveSync

I had come across one after migration to Office 365, some user account that may have old Exchange attributes that cannot be deleted and you will have to manually give your self full access. here is how to delete those account that has privilege issues.

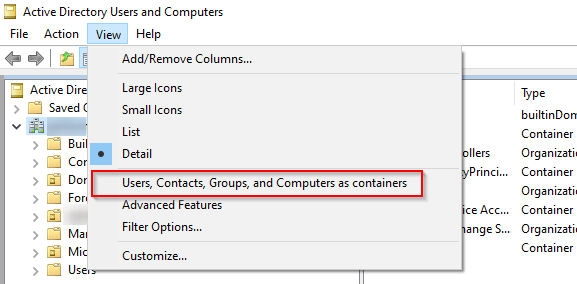
First you need to change the view to: use the “view -> users, Contacts, Groups, and Computers as containers”

Then go to the user you are having issue deleting, give you self full permission to object then you should be able to delete it