How to delete old VM from Hyper-V Cluster

Hyper-V cluster is a very common business network uses, which allows system admin to do system updates, without having any downtime. There are times when VM (Virtual Machine) are created for a test or just got upgraded and left to be deleted later on. Cleaning up old VM will free up the storage space. In this post I will have steps on deleting VM from Hyper-V cluster, before deleting, check the location of the VM because deleting from the Cluster server, will not free up the storage, you will need to delete it manually. You can see the location of the VM by going to settings of the VM and select the Disk, it will display full path where your VM disk is stored.

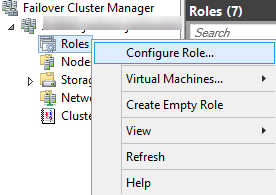
Open Failover Cluster Manager, then click on Roles, you should see list of VM’s, select the one you want to delete, then right on it and select Remove.
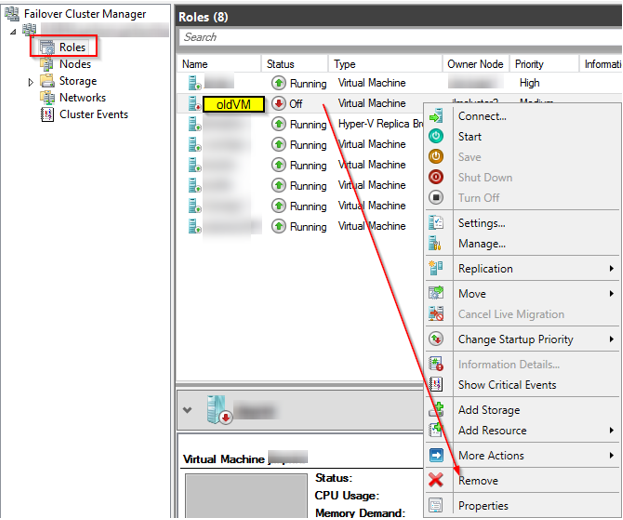
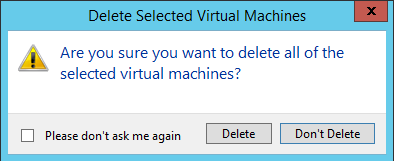
You will get confirmation message, make sure it’s the correct VM, then click Yes, The VM will be removed from the Cluster.

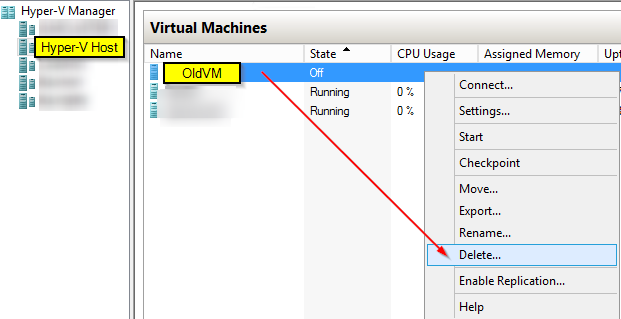
Then go to Hyper-V host where VM was running from, so you can remove from list

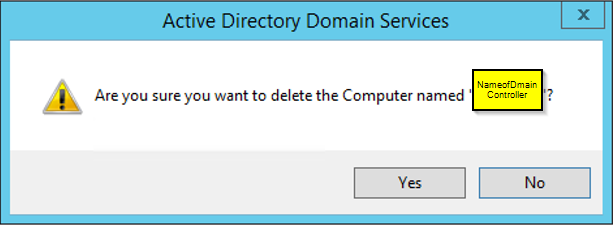
Confirmation are you sure you want to delete, if it’s correct VM you are deleting click Delete.

Now the VM is deleted from Cluster and remove from Hyper-V host, it’s time to delete the VM disk, by going to the location you looked at before you deleted the VM. That should give you back the storage space. That’s it, you get an error check the windows log or application log, it will give you more info.


How to restore deleted VM from Cluster

By mistaken you have deleted good VM and if you still have the VM disk, you can still bring it back online. As long as VM disk is not deleted from the Hyper-V it would be a very easy restore. Option 1 if you have not deleted VM from Hyper-V if you have deleted from Hyper-V follow option 2 after selecting VM from the Cluster Role.

Option 1

Open Failover Cluster Manager

Right click on the Roles>choose Configure Role …


Then you may get this default message: click next

Select the Virtual Machine, then click Next

Then you will see your deleted VM here: select it and click Next

If you don’t see the VM go to Option 2

Confirmation, Click Next

If everything goes well you should see success message with summary, if you want to see details click on View Report or click Finish.

Options 2

If you deleted VM and removed the Hyper-V host then you not see here, then you will need to add VM as new and use the same Disk

Adding new VM to Cluster with existing disk

Select the Cluster node (Hyper-V host), then click ok

Then you may see the New Virtual Machine Wizard, click Next

Then the VM to whatever you like, then click Next

Select the Generation of the VM:

Then set Memory and click Next

Select networking from list, then click Next

At this screen you will select the use an existing virtual hard disk, then click Next

You should see the Summary of new VM, if everything is good, click Finish

If everything goes well, you should see the Success message, click View Report for details or click Finish

That’s it, you should see your recovered VM back in the Cluster


Clean up dead domain controller Windows 2012 R2

Many small companies have a small network and they have limited IT staff or manage IT services to take care of their network. I have seen old network devices, application, plan for cleaning up but it’s been forgotten which creates a problem in the future. The worse part is when the company doesn’t have a strict policy, budget or just don’t want to change, so things just build up until it reaches to a dead end. The domain controller is very important part of the network, if it keeps up to date and removed the old controller, then it could cause major issues. Here is how to clean up an old domain controller. Make sure you have a good backup and primary domain controller is a good healthy state.

Open Active Directory Users and Computers

Select domain>Domain Controllers>on right side it will list your domain controllers on the right side panel. You will see DC Type GC (Global Catalog) and Read-Only, GC Domain Controller.


Right click on the domain controller you want to delete, select delete. You will see confirmation screen select Yes

Select the options to clean up when your old domain controller deletes

Then it’s going to have confirmation and list of operations, based on your selection, once check then click OK

If your domain controller is part of GC, you will see: “This Active Directory Domain Controller is a global catalog“, before you click Yes, make sure you have at least one Global Catalog domain controller.

That will remove your old domain controller, then clean up any other metadata left around. If you have multi sites, open Active Directory Sites and Services: Sites>Delete old site

You will get Confirm Subtree Deletion message, click yes if nothing else is on that site

Then check your primary domain controller health and logs, to make sure everything is fine. Keep your eyes open on any application/services that may have any issues, it should not, but just in case. That’s it


Adding standalone VM to Hyper-V Cluster

If you already have created VM on Hyper-V standalone and its running, but now you want to add to part of Hyper-V Cluster so its high availability, then the process is simple.  Before taking this action make sure your storage is available on Cluster storage because your current VM will move its current local storage from standalone to Cluster storage. Also, it’s best to have a good backup in case something were to go wrong with the process. This was done on Microsoft Windows server 2012 R2, the process is similar to Windows 2016 server. When you move the VM from Windows 2012 or 2012 R2, you may get upgrade version option, don’t upgrade if you want to replicate or have option to run VM on Windows 2012 or 2012 R2.

Open up Failover Cluster Manger

Expand tree and right click on Roles>Configure Role
You may or may not get Wizard screen if you had selected “Do not show this page again” before

Select Virtual Machine from the list of Role

It’s going to find any VM that is not part of Cluster, you just need to select that VM then click Next

Confirm Virtual Machine, click Next

You will get Summary and will have option for report, double check everything well went, you may get some warning about storage or networking. like I had here, The path VMname.vhdx where the virtual hard disk is stored is not a path to storage in the cluster or to storage that can be added to the cluster. You must ensure this storage is avaiblale to every node in the cluster to make this virtual machine highly available

How to change the Storage of VM on Hypev-V Cluster:

While in the failover Cluster Manger

Right click on the VM that you want to move the Storage to cluster then Move>Virtual Machine Storage

Change the storage to new location of the Cluster storage and click Start to move the storage.

That’s is you should see your new VM now on the Hyper-V cluster

if you have any issues, check the logs, firewall, storage, version, etc.. and try again.


Windows Admin Center to manage Local and Remote server

Microsoft had announced Windows Admin Center (formerly Project Honolulu) back on April 12, 2018, and it’s been increasing use of Windows Admin Center to manage local and remote servers.  It’s used by many IT admins since it’s very lightweight and it can be installed on Windows 10 client machine (need admin rights to manage servers).  Microsoft has been adding many features on every new updates, it also have Extensions supports, so more products can be intergraded, at the moment more Preview.  If you are using Microsoft Azure, this would be great tool going forward to use instead of using 3rd party systems.  Once you have installed Windows Admin Center on your Windows 10 Client machine or on Windows server 2016 there are no agents need on target system. It uses Microsoft Edge (Windows 10, version 1709 or later) or Google Chrome browser.  It can manage Windows server 2008 R2, 2012, 2012 R2, 2016, and manage hyper-converged clusters, only requirements are windows management framework 5.1

It’s similar to Remote Server Administration Tools (RSAT), Microsoft Management Console (MMC) and other tools.  This does not replace but it give more options in central modern management and it’s free.

To get started first download the Windows Admin Center: http://aka.ms/WACDownload


1. Double click the setup to start the install, accept the terms and click Next

2. Click Next

3. Click Install (if you want or need to change port you can and also if you want to create desktop shortcut select box)

4. If everything goes well you should see following screen, and ready to be used.

Go to URL:6516 or whatever ports you had set on step 3 and start adding servers.

You will see Tools based on your server or PC hardware/software capabilities, here is compare tools between Windows server 2016 vs. Windows 10 Pro

That’s it, enjoy it


If you have issues as I did, here are some options to fix

If you get an error: Microsoft.PowerShell.LocalAccounts

Run this on powershell with admin rights:
[Environment]::SetEnvironmentVariable(“PSModulePath”,”%SystemRoot%\system32\WindowsPowerShell\v1.0\Modules;” + ([Environment]::GetEnvironmentVariable(“PSModulePath”,”User”)),”User”)


Also, you may need to re-run the install again to uncheck the “Allow Windows Admin Center to modify this machine’s trusted hosts settings” Modifying TrustedHosts is required in a workgroup environment, or when using local administrator credentials in a domain. You need to configure TrustedHosts manually.


Common FaQ’s: https://docs.microsoft.com/en-us/windows-server/manage/windows-admin-center/use/troubleshooting

For more information: https://www.microsoft.com/en-us/cloud-platform/windows-admin-center