osTicket v1.12 is released on April 24, 2019, it’s open source ticket system. You can find full release notes at https://github.com/osTicket/osTicket/releases. For osTicket version 1.12 PHP version 5.6 to 7.2, 7.2 is recommended.
Upgrade process is very simple, I am doing 1.10.4 to 1.12
Make sure you have a good backup of Database and files of osTicket
Then put the system in the offline mode: by going to /scp/settings.php
Download the new version from https://osticket.com/download/ and choose the osTicket Core, v1.12 (Latest Release)
Upload to your server v. 1.12 and replace current files/folders from Upload folder from your downloaded, and exclude the script folder/files
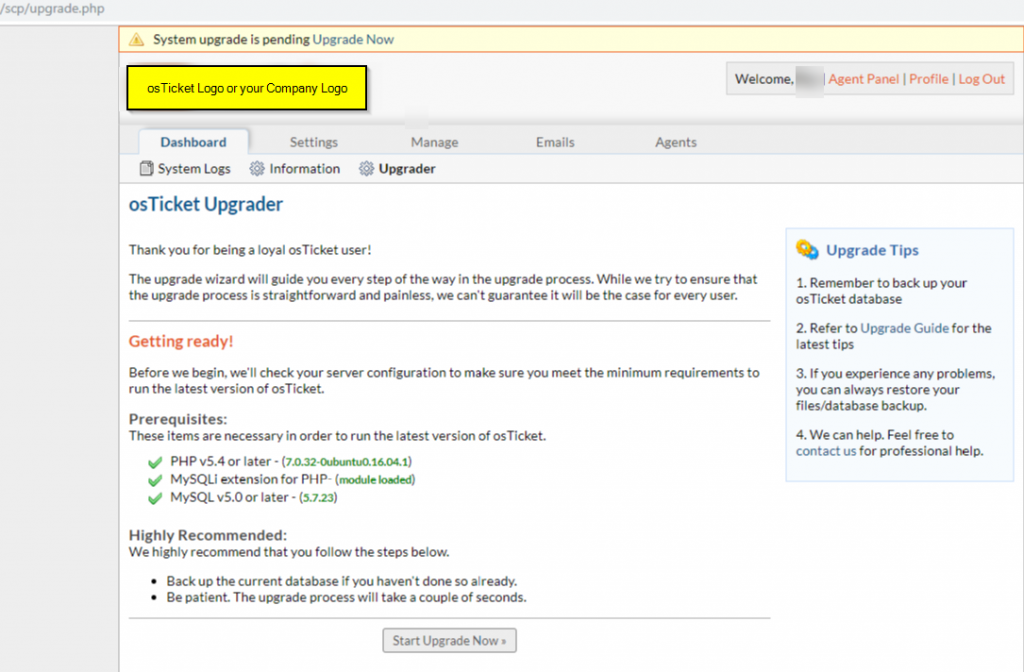
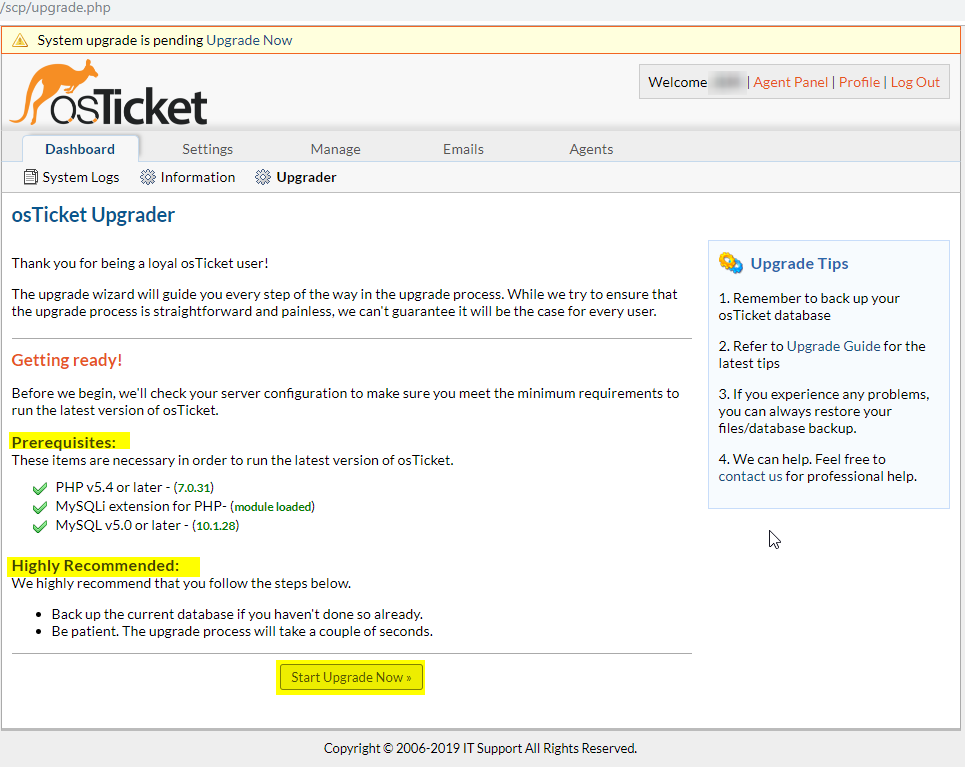
Make sure you have the correct permission, then go to the URL/SCP of the osTicket system and log in, you should see osTicket Upgrader, make sure your Prerequisites are all good, if any errors correct it, then click Start Upgrade Now
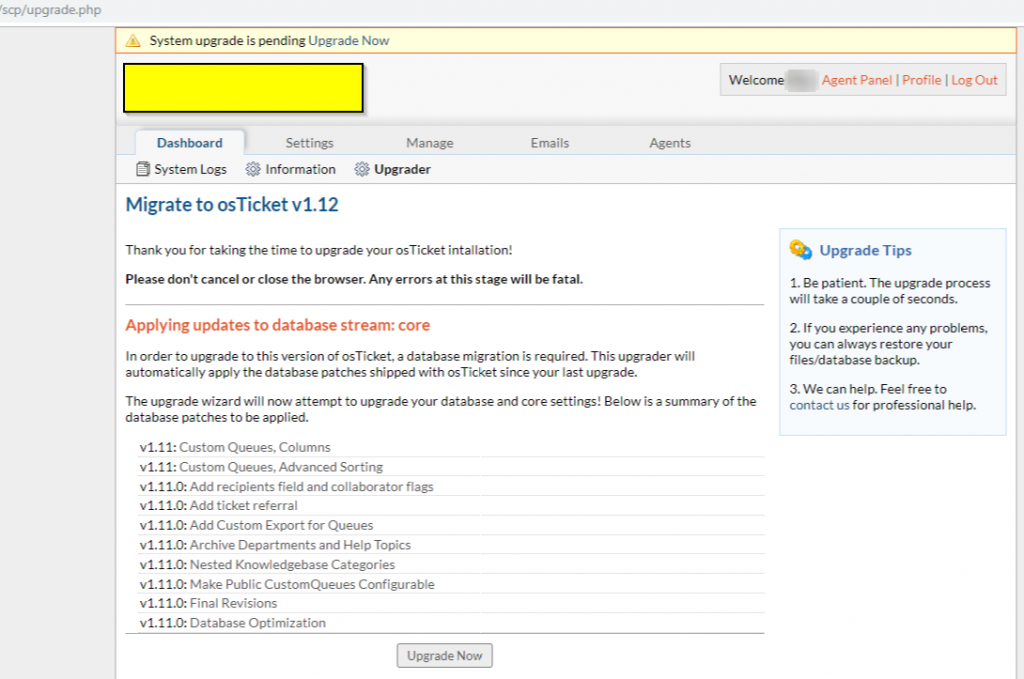
Then you will get Migrate to osTicket v1.12, click Upgrade now
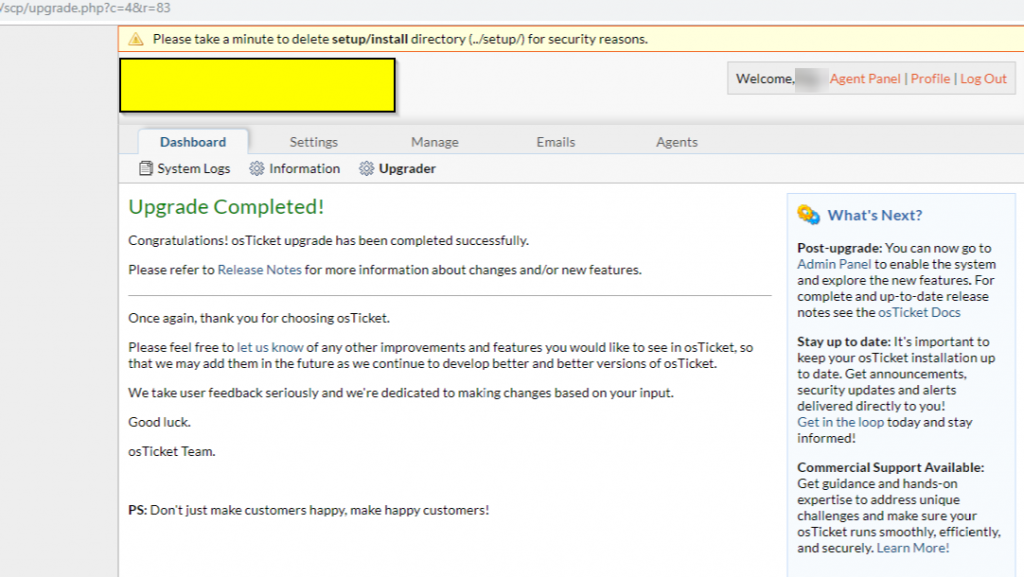
Then if everything goes well you should see Upgrade Completed
Delete the /setup folder and update any customization you may have, test it, then once all is good you can put the system back online. If you have customized PHP core files, those need to be re-applied after the upgrade. Also, make sure your plugins are good, if needed upgrade do so, make sure it supports the ent version. Good luck
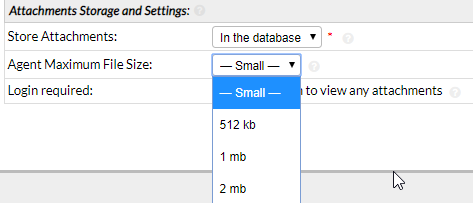
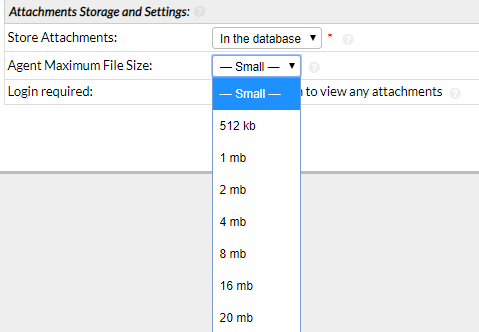
How to attach bigger attachment in osTicket ticket system? The default setting is set to small or maybe what your web server support. If your web server already set to allow bigger attachment, then you can do it via osTicket settings page. If you have access to the server to make changes to your PHP.ini file then it’s very easy to do.
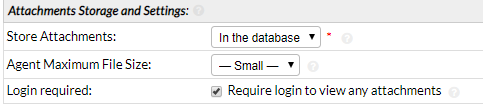
This is what your settings might look like:
If your server php.ini file has already change then go to your osTicket /scp/settings.php at the bottom of the page you will see Attachment Storage and Settings, where you will see whatever your web server maximum set to.
Editing php.ini look for upload_max_filesize= change to whatever you like.
If you have increased via editing the PHP.ini file to higher you will get more options
You will need to restart your web services to get updated settings. That’s it, enjoy bigger attachments to your support ticket system osTicket, Thank you osTicket team.
How to set up an email on an osTicket ticket system, setting up an email to create tickets and get a response back on a ticket system. It’s very easy to set up and to make the changes in case you need to if your support email changes. Here I will list a few email settings for you and you will get an idea, it’s similar you just have to check your email server requirements. Make sure you have the regular email address for your support email. It does not work with shared or forward.
Common settings::
Hostname: your email server FQDN
Port number: this can be different based on what your account setting is
Mail Box Protocol: this would be combined with the Port number, based on your account
Fetch Frequency: this can be whatever you like starting from 1 Minute
Email per Fetch: how many emails do you want to pull at once, this can also be from 1 to whatever
Fetched Emails: What happens once it creates a ticket, this should be set to move to a folder or delete, if you set it to Do nothing, you will have issues
Header Spoofing: some have off and some have it on
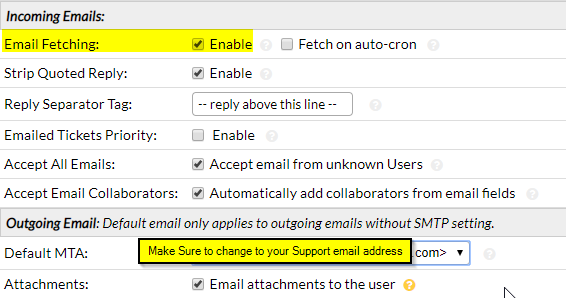
Incoming and Outgoing email:
Make sure you have email Fetching enabled for incoming emails, otherwise, by default, it will only pull emails when Agent is logged in to the system
For Outgoing email, make sure to set your support email address default as None: Use the PHP mail function
It’s under Emails>Settings Make sure your Email Login Information is correct
Gmail settings:
This can be different based on your Gmail account settings, so check your Gmail settings and make sure to have the correct hostname, port, protocol, etc… Header spoofing is not needed.
Authentication “Yes” / MTA set as default SMTP account / PORT – 587
If you are using (G Suite) or 2FA settings you will need to create an app password:
Log in to your Gmail account and access the following link Go to security and click the app password. Select the app or Give a custom name that makes sense to you and click generate, now use that app-specific password in your osTicket system.
In some cases, you might need to force to use TLS, in that case, you can use the hostname as: tls://smtp.gmail.com
Exchange
Hostname: YourMailServer.domain.com
Port Number: 993
Mail Box Protocol: IMAP + SSL
Fetch Frequency: 1 minute (s)
Emails Per Fetch: 30
Fetched Emails: Move to folder: TicketsOrWhateverName
Microsoft office 365:
make sure your hostname and ports are correct Hostname: smtp.office365.com or outlook.office365.com Ports:587 or 993 or 25
For Synology NAS: You will need to setup Cron Job: /usr/local/bin/YourPHPVerison /volume1/web/osticket/upload/api/cron.php
Check the logs to find more details of osTicket under /scp/logs.php Web server, email server, Apache, etc… Many times hostname, ports, or protocol are mixed up or typos could cause the email not to work. You might have firewall issues or IP blocking. Hope this help out someone out there
Also, FYI: Ports information
IMAP uses port 143 But if you use SSL/TLS encrypted IMAP uses port 993
POP uses port 110 But if you use SSL/TLS encrypted POP uses port 995
SMTP uses port 25 But if you use SSL/TLS encrypted SMTP uses port 587 (formerly 465)
update: this version no longer support please use 1.12 or latest
Finally, osTicket v1.11 is released open source ticket system, it has lots of new feature people been waiting for a long time. You can find official documents and a full list of all the features on here. Most important issues people had was PHP version too old in 1.10.4. The osTicket v1.11 supports PHP version v5.6-v7.2.
How to upgrade from 1.10.4 to 1.11
Make sure you have a good backup of Database and files of osTicket
Then put the system in the offline mode: by going to /scp/settings.php
Upload to your server v. 1.11 and replace current files/folders from Upload folder from your downloaded, and exclude the script folder/files
Make sure you have the correct permission, then go to the URL/SCP of the osTicket system and login, you should see osTicket Upgrader, make sure your Prerequisites are all good, if any errors correct it, then click Start Upgrade Now
Then you should see Apply updates to database stream: core, click Upgrade Now
If everything went well you should see Upgrade Completed
Delete the /setup folder and update any customization you may have, test it, then once all is good you can put the system back online
That’s it if you have customized PHP core files, those needs to be re-applied after the upgrade. Also, make sure your plugins are good, if needed upgrade do so, make sure it supports the new version. one more thing, if using Language packs, you can find them at the osTicket website, those do needs to be updated. You will find many solutions to the problem in a forum where people report and help out each other. Please read your error message and logs of your system web server, PHP, osTicket, it gives many ideas about why things are not working. Many of them due to the PHP version not supported. If you were to get help from the forum, please include your system information, like osTicket, PHP version, web server, and remember forum support is free, so don’t order/demand to fix your issues. They do offer paid support if you wish to pay for it. Thank you very much to the osTicket team for their hard work on keeping osTicket System up to date.
The osTicket is a great truly open source ticket system, you can customize to fit your business needs. If you are running an older version of osTicket, it’s best to keep up to date with stable releases to keep your ticket system protected. If you wait too long for an upgrade and newer version have many changes then it would get harder. The upgrade process is about the same for most version unless major version which might have database changes and it will run the upgrade script. Here is how to upgrade from version 1.10.1 to 1.10.4
Make sure you have a good backup of Database and files of osTicket
Then put the system in the offline mode: by going to /scp/settings.php
Upload to your server v. 1.10.4 and replace current files/folders from Upload folder from your downloaded, and exclude the script folder/files
Make sure you have the correct permission, then go to the URL/SCP of the osTicket system and login
Delete the /setup folder and update any customization you may have, once all is good you can put system back online
That’s it, if customized PHP core files, those needs to be re-applied after the upgrade. If are using plugins, make sure it supports the new version. Most if not all open source project is fully customizable and downside to is keeping up to date with any customization been done to the core system. You will find many solutions to the problem in a forum where people report and help out each other. Please read your error message and logs of your system web server, PHP, osTicket, it gives many ideas about why things are not working. Many of them due to PHP version not supported. If you were to get help from the forum, please include your system information, like osTicket, PHP version, web server, and remember forum support is free, so don’t order/demand to fix your issues.
Note because 1.10.1 to 1.10.4 upgrade did not have any database changes so you will not see the upgrader screen. If you want you can run manually upgrader: /scp/upgrade.php, most likely you will see the message: “Nothing to do! System already upgraded to v1.10.4 with no pending patches to apply. ”
Common issues/solution:
error: Valid CSRF Token Required solution: edit include/class.ostsession.php line around 191