Adding new switch to current network

Before adding new switch to current network, need to make sure there are no configuration set that may override your current network.  Always connect the new switch to test or local computer and check the configuration or just do factory reset.  Then set the management IP, do all the firmware updates, set NTP server so you get correct date/time and VLAN’s if needed on your network.  Recommended to disable any ports that are not being used and also to disabled the local console port, so someone just don’t plug their device and make changes.

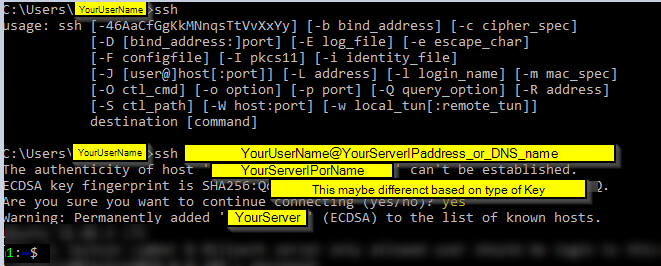
Connect your new switch to locally to your laptop via console port or newer switches have micro USB to USB, which is more common.  Then use terminal of your choice and check configuration/management IP
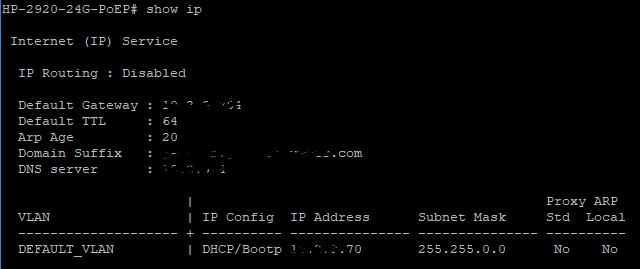
Commend: show ip

For HP switches you can find firmware from this link https://h10145.www1.hpe.com/support/SupportLookUp.aspx

Firmware screen may vary from model to model, here I am using the HP 2920 24G PoE, you can get to firmware under System>Updates/Downloads, then under Software Image, click Update

You should see Choose File option where you can browse to firmware file then click Save

You may get the message for confirmation to start the upload of a new firmware, click Yes

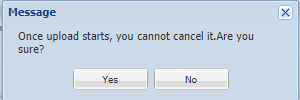
If everything went well you should see Primary Software Image one you uploaded, then click Reboot, so it can boot to a new firmware

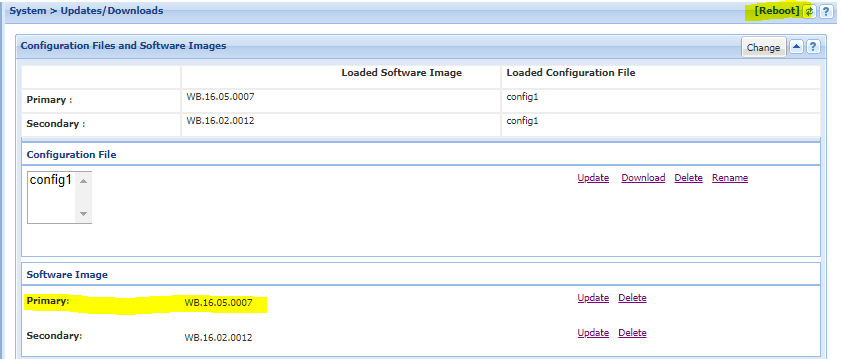
After the upgrade you should see something like this:

Traditional GUI

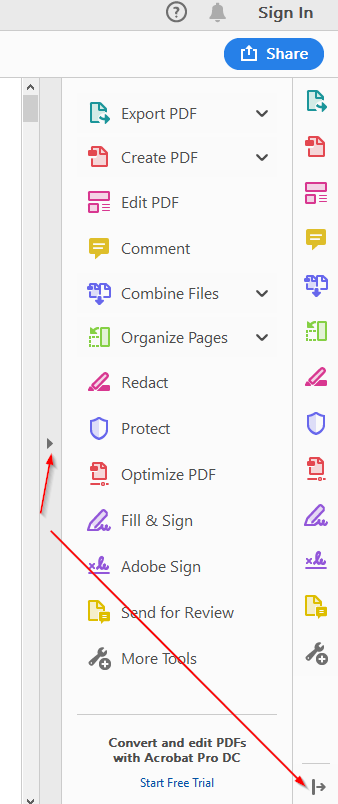
If for some reason you need to access old Traditional GUI you can do by click on the User Icon top right hand.

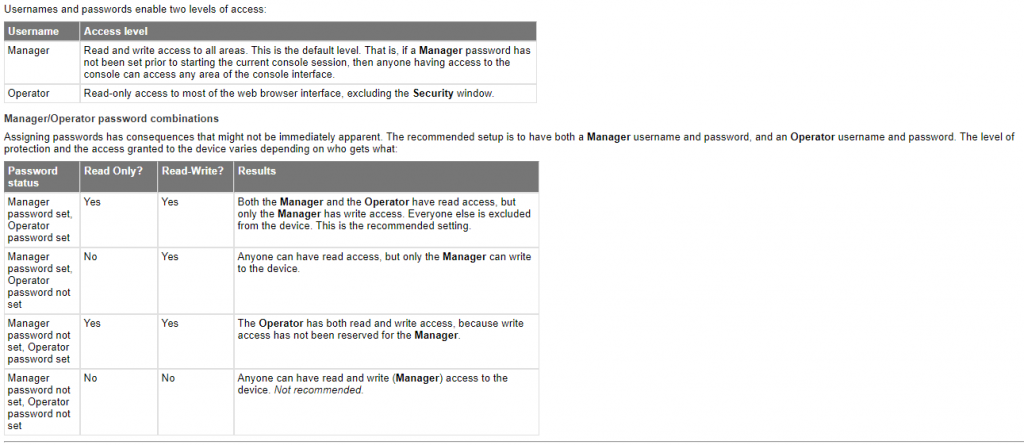
Screenshot from HP website: Under Security>Device Passwords>Authorized Users

You can find all the options for this model switch from HP website

https://support.hpe.com/hpsc/doc/public/display?sp4ts.oid=1009060832&docLocale=en_US&docId=emr_na-a00042220en_us

You can click through each categories and get more details

These are basic user/password protection built in. Most likely if you working for a big company or have big network, you would be using a third-party tool to secure their network also for login logs records, etc.…

To change User Name:

from default manager to something else
SW1(config)# password manager user-name WhatEverUserNameYouWant

 OCTET-STR             Enter an octet string.

To change User Name: from default operator to something else

SW1(config)# password operator user-name WhatEverUserNameYouWant
 OCTET-STR             Enter an octet string.

To enable password storage in SHA-256 form

SW1(config)# password non-plaintext-sha256

To Set time zone:

SW1(config)# clock timezone us eastern

To enable daylight saving:

SW1(config)# clock summer-time

To set the correct daylight time rule:

SW1(config)# time daylight-time-rule continental-us-and-canada

To set SNTP to sync time:

SW1(config)# sntp server priority 1 IP_Address_of_your_SNTP_Server
SW1(config)# sntp unicast
SW1(config)# sntp 60
SW1(config)# timesync sntp

To see status of your SNTP:

SW1(config)# show sntp statistics
SNTP Statistics
Received Packets  : 1
Sent Packets      : 1
Dropped Packets   : 0
SNTP Server Address                                   Auth Failed Pkts
  —————————————             —————-
  IP_Address_of_your_SNTP_Server      0

Hope it helps someone out there, there are many options to secure your network, just make sure you have good document on what’s been set and where to access it, when need comes.  Otherwise, you will be locked out of your own secured network.


Adobe Reader Hide or Remove Tool Pane

Adobe Reader is used everywhere these days, many browsers supported built-in PDF viewer. Since Adobe Acrobat Reader came out, many features are added for the paid version, but if you are using just free Reader, this Tool pane is just annoying. Every time you open the PDF document in Adobe Acrobat Reader. You have three options To hide Tools Pane or To Remove Tools Pane or Other options. If you are not using any paid version of Adobe application removing is best option by editing Adobe Acrobat installation file. This option will Remove Tools pane, will not be able to open, which is best if you are not using any paid version cloud-based application.

To hide the Tool Pane:

Open Adobe Acrobat Reader or any PDF document Document

Click on the Arrows to hide the Tool Pane

Or you can click on View>Show/Hide>Tools Pane

or use keyboard and press Shift+F4

Once you have hiden the Tools Panes, then Go to Edit>Preferences
Select Documents under Categories, then on right side select checkbox Remember the current state of Tools Pane

Open a any PDF document and the Tools Pane should be hidden, and can be shown with the Shift+F4 key as before.

Remove Tools pane

To remove it, you will need to open installation of your Adobe Acrobat Reader and edit Viewer.aapp file by right click on the file and open in notepad or any text editor, my file location is: C:\Program Files (x86)\Adobe\Acrobat Reader DC\Reader\AcroApp\ENU\Viewer.aapp

Then comment out or delete this code from the file

<Layout name="Default">
    <RHP>
        <Component name="AppShortcutListView" type="Custom"/>
    </RHP>
</Layout>

So it should be something like this:

<Application xmlns="http://ns.adobe.com/acrobat/app/2014" title="Viewer" id="Viewer" majorVersion="1" requiresDoc="true" minorVersion="0">

</Application>

Open any PDF document and the Tools Pane should be removed if you need to put it back in future you will need edit this file or re-install Adobe Acrobat Reader.

Other options:

This option is for advance users and requires you to make changes to registry key, which can cause issue, if not done correctly. For Acrobat DC your registry path might be slightly different, please look for the similar or same name. Make sure to close Acrobat Reader if it is opened

Open Registry by : typing in command: regedit

For Adobe Acrobat Reader or Adobe DC:

HKEY_CLASSES_ROOT\Acrobat.Document.DC\shell\Open\command

String to be modified original:
“C:\Program Files (x86)\Adobe\Acrobat DC\Acrobat\Acrobat.exe” “%1”

Change it to:
“C:\Program Files (x86)\Adobe\Acrobat DC\Acrobat\Acrobat.exe” /A “navpanes=0” “%1”

You may have:
“C:\Program Files (x86)\Adobe\Acrobat Reader DC\Reader\AcroRd32.exe” / u “%1”


For Acrobat Reader XI of version location might be:

HKEY_CLASSES_ROOT\AcroExch.Document.11\shell\Read\command

This is the original:
“C:\Program Files (x86)\Adobe\Reader 11.0\Reader\AcroRd32.exe” “%1”

Change it to:
“C:\Program Files (x86)\Adobe\Reader 11.0\Reader\AcroRd32.exe” /A “navpanes=0” “%1”

That’s it, you might need to restart the computer.


How to fix iPhone Visual Voicemail

Visual voicemail is a great feature and very easy to use, since you can see the list of all your voicemail and just by clicking on it and can hear it too. There are times when your visual voicemail stops working on iPhone for some odd reason. This could happen for many reasons, if know what you have changed before visual voicemail was working, try undoing it, in most case you might not even remember. Here are a few things you could check to fix your visual voicemail for your iPhone. Note: if you are using an older version of iPhone you might want to update it to keep your iPhone safe and fixes bugs that might stopped visual voicemail from working.

Restarting your phone – in most case fixes it if some settings might have changed or hung which will clear out when you restart your iPhone

-Putting phone in Airplane mode – it will be under Settings, once airplane mode is on, then turn it off, this will refresh the network connection for WiFi and your mobile carrior

  • Check for Timezone, make sure its correct if you are traveling for some reason it may have not updated
  • Reset the network settings: Settings>General management (or About Phone)>Reset>Reset network settings. It will reset Wi-FI, Bluetooth and Mobile network
  • If you have not set up your voicemail set it by calling your own number from your own phone or press and hold 1
  • If you are using Wi-Fi calling feature and your WiFi network connection not stable you might have an issue, try turning off WiFi
  • If your Mobile Network service is weak in the area you are at, then you might also have an issue, wait until you are in better coverage
  • if none of these works, call your cell phone carrier and they will reset voicemail settings or network setting on their end, you might need to call them from another phone

Hope this helps someone out there who is having issues with iPhone visual voicemail.


Built-in OpenSSH client on Windows 10

Windows 10 has been adding more features which support open source like SSH client built-in, Windows updates started installing by default around April 2018 OpenSSH client. It’s a tool for Linux admin to connect from Windows computer before this Windows user has to install manually SSH client for Windows commonly used Putty, if you need a full set of feature of the SSH visit: https://www.openssl.org/

Now you can find it in Windows 10 under:
Settings>Apps & features>Then click on Manage optional features

You should see there OpenSSH client

To use it just open Windows command prompt or power shell and type ssh

to connect to your Linux server just type: ssh UserName@LinuxServerIP_or_DNS_Name

The first time it will prompt host key fingerprint and ask you to confirm to get connected type yes and enter your password

You should be connected to your Linux server
Start using Linux right from your Windows computer, when done just type exit as you normally would.

In case you need to remove known hosts added to your computer you can find it at C:\Users\YourUserName\.ssh\known_hosts

Next time you connect to the same server and known hosts has not been removed it will just ask for your password
Enjoy it Linux inside Window world 🙂


How to secure your Ubuntu server

As you may know, already there are many ways to secure Ubuntu server based on your environment and version of OS. Double checking to be sure you are secure does not hurt at all, but don’t go overboard by locking your self from accessing own server. I have been working with Ubuntu server since Ubuntu 5.04 back in 2007, but have not done any post about it and was not using that much as I am now. Ubuntu Linux system has come a long way for sure, now even power users start using their desktop version. For the most part default security secures your server from any major attack to your server. There are many attacks are from within your own environments and some lazy admin or management who don’t want to pay for support or just keeps post ponding updates. Anyways here I have some list of tweaks I have been using and learning more from other Linux admins on internet.

Keep your server up to date:


sudo apt-get update This will search for an update of your current version and packages that in installed
sudo apt-get upgrade This will install the updates and packages
sudo apt-get dist-upgrade This will look for newer next LTS version

Check supported Releases:
https://wiki.ubuntu.com/Releases

Remove unnecessary packages

sudo apt-get auto-remove
sudo apt-get purge NameOfPackage

Enable built-in basic Uncomplicated Firewall (ufw): by allowing only need services name or ports

ufw allow ssh
ufw allow 80
ufw allow ftp

Disabled telnet: very old but have seen people still using it
apt-get remove telnet

Check for hidden open ports with:

netstat

Set a shorter timeout for root sessions

edit /etc/profiles
[ $UID -eq 0 ] && TMOUT=600.
The $UID -eq 0 part refers to the user with the ID of 0 — always root.
The TMOUT=600 or 900 part sets the timeout limit to 10-15 minutes (600-900 seconds)

Change default SSH port from 22 to something else and disable Root user:

Port 22 > Port 90xx or whatever port you want (don’t forget to add a new port to your firewall)
edit /etc/ssh/sshd_config:
PermitRootLogin yes > PermitRootLogin no

Limiting allowed users to login via SSH:

edit /etc/ssh/sshd_config to have ssh login for specific users
bottom of the file, add the line x=device you going to log in from IP or just type User1 User2, etc…
AllowUsers YourUserName@192.xxx.xxx.x
if you need to use a wildcard: to allow any username and from x=network:
AllowUsers @192.xxx.xxx.*

You could also add a Group:
Create group:
groupadd -r SSHGroupName

Add allowed group to /etc/ssh/sshd_config
AllowGroups SSHGroupName

Then add user to the group:
usermod -a -G SSHGroupName user1

service ssh restart

edit /etc/ssh/sshd_config to have ssh login for specific users
bottom of the file, add the line x=device you going to log in from IP
AllowUsers YourUserName@192.xxx.xxx.x
if you need to use a wildcard: to allow any username and from x=network:
AllowUsers @192.xxx.xxx.*

service ssh restart

Add Login Banner which displays before user login:

edit /etc/issue.net
add your own warning message whomever login can see

Then edit /etc/ssh/sshd_config and uncomment the line:
Banner /etc/issue.net

some more options to disable server info by comment out:

edit /etc/pam.d/sshd
session optional pam_motd.so motd=/run/motd.dynamic

network messages to allow or disable (like ICMP, redirects, SYN, etc..):
edit /etc/sysctl.conf

Blocking IP spoofing:


edit /etc/host.conf
change from “multi on” to “nospoof on”

To Turn off Server Signature:

edit /etc/apache2/apache2.conf and add these 2 lines at the end of the config file. Most cases user types wrong URL or by IP address, it display’s your web server info by default.
ServerSignature Off
ServerTokens Prod

service apache2 restart

Hide PHP Version

edit (your version of PHP maybe different) /etc/php/7.0/apache2/php.ini
expose_php = Off

You may have older version of PHP:
/etc/php5/apache2/php.ini
expose_php = Off

Also youcould add to your .htaccess file:
# Disable server signature
ServerSignature Off

will add more later on