How to configure OAuth2.0 using EWS on Microsoft O365

App registration

Upgrading from basic authentication to OAuth is a little harder for many small businesses to configure on the Azure portal. Here are the steps I have done to get our EWS service to get it working. You must have admin rights to do the following.

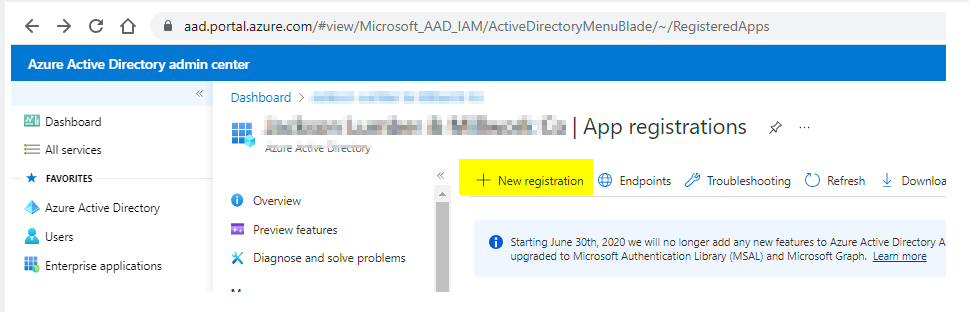
Create an app registration

You need to log in to your Azure portal: Go to Azure Active Directory>App registrations

Next, click on New registration

Next, fill in the info

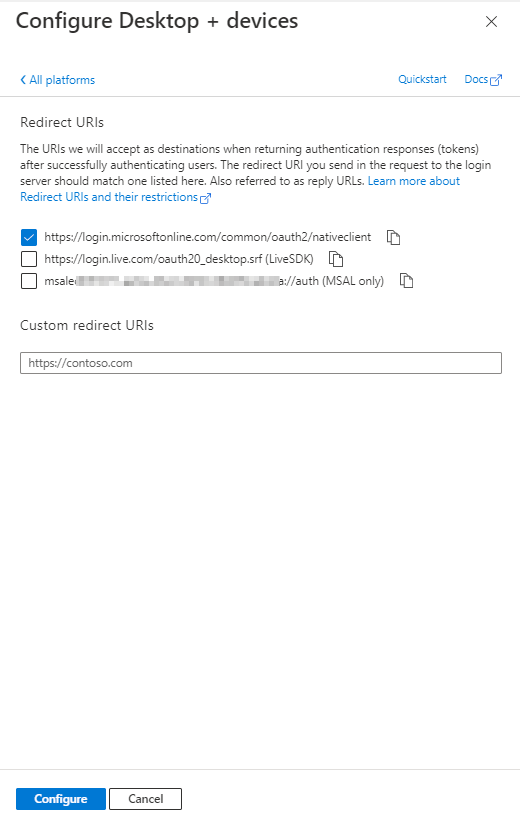
This is where you choose your access options, based on the selection, the next screen will have different options, for us, we choose Single tenant and Redirect URI option for Public client/native, if you don’t have a URL you can leave it blank

In case you need to add or change the Authentication platform, you can click on Authentication>Add a platform>Select one that works with your Business needs

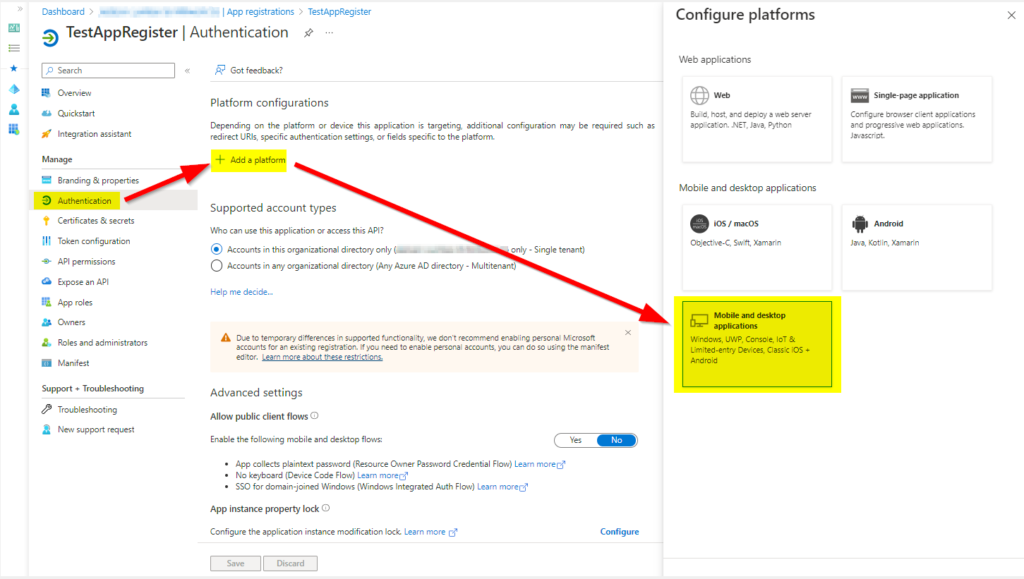
Based on your selection, you will need to select the URL option, or your custom URL

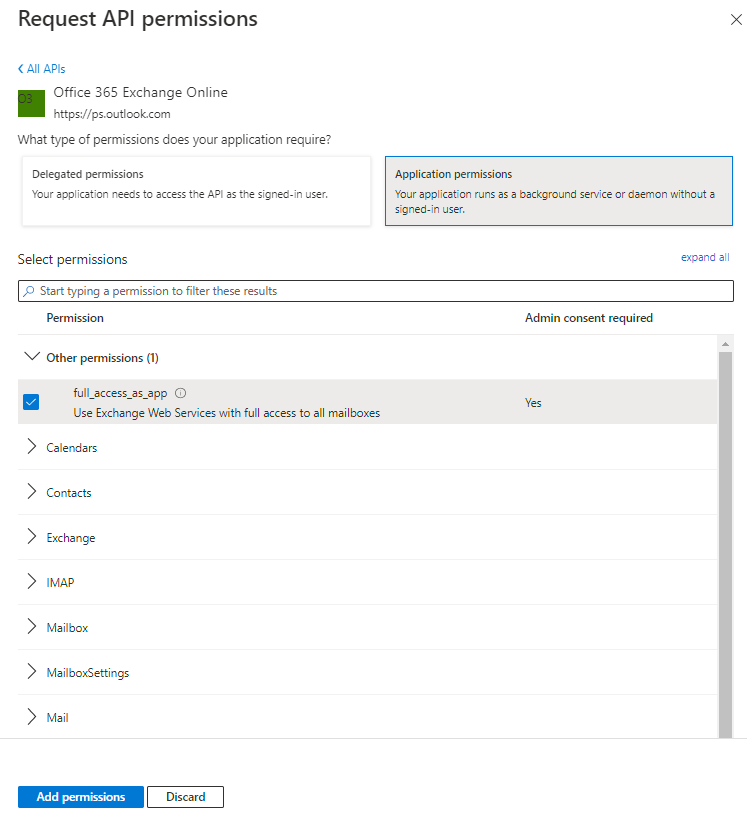
Then give API permission

This can be many permissions or just a few, also based on the type of application, you may get different options

Us, we are using EWS service, so we needed office 365 Exchange Online

Then you need to select the type of permission, we are using application permissions

The only thing we can get it working was by giving full_access_as_app

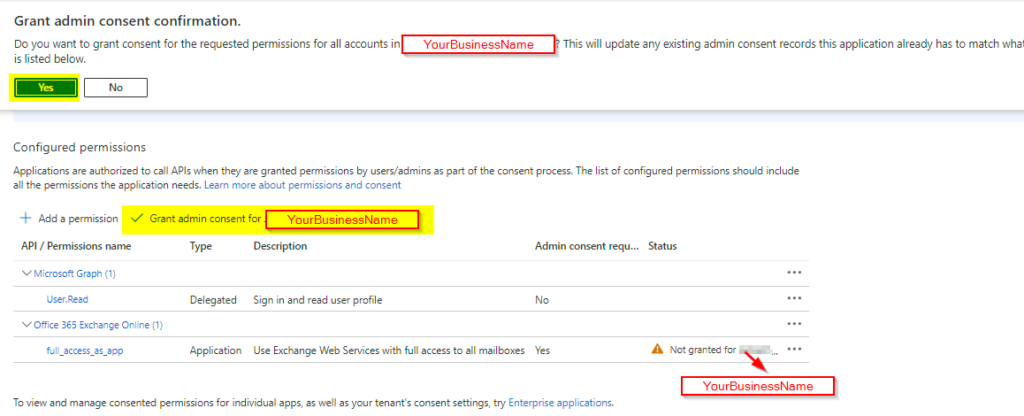
You need to give admin consent to your application, so once you have all permission added, click on Grant admin consent

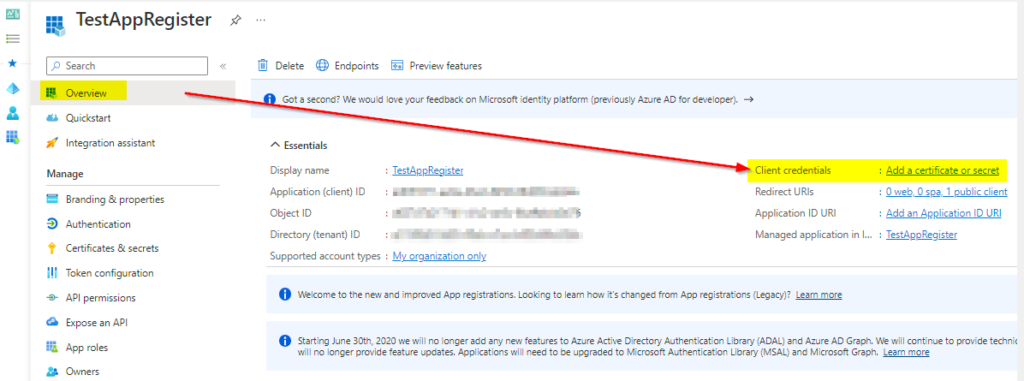
To create client credentials, click on Overview>Add a certificate or secret

Click on the Clent secrets>New client secret

Enter the name, this could be anything and select the time when it Expires, then click on Add

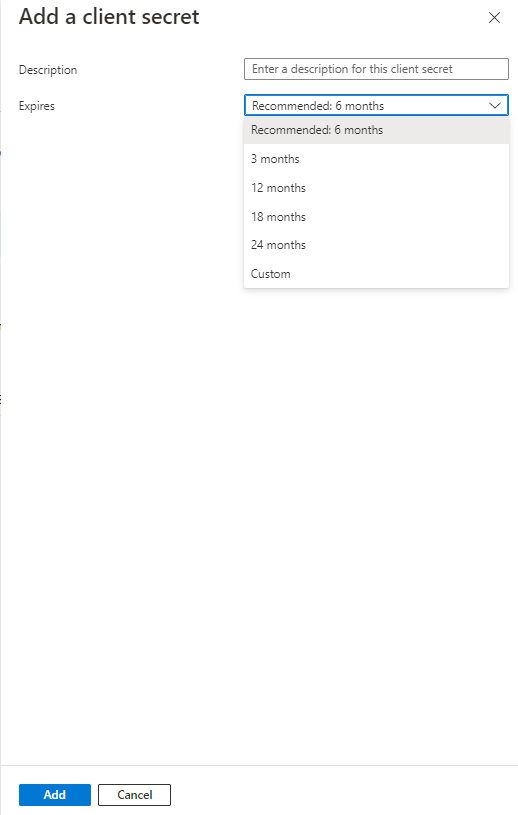
Before you click out of this screen make sure to copy the value of your secret ID, which you will need for your app. Once you leave this screen, you will not be able to get this value back, so you may need to create a new one in case you have not copied it or you need to change it.

For your application, you will need the following info, which you can find it, here

  • Application ID
  • Directory (tenant ID)
  • Endpoints: authorize and token
    • If you have selected the multi-tenant option, your Endpoints URL will be generic, like these:
      https://login.microsoftonline.com/organizations/oauth2/v2.0/authorize
      https://login.microsoftonline.com/organizations/oauth2/v2.0/token
  • Value of secrets from the step above

That’s all, hope this helps someone out there who is going through these changes in technologies


How to test email via PowerShell

Test email via PowerShell

If you are not sure if your email settings are working or not, you can send a test email via the PowerShell command.

Open PowerShell: command

note: From email is an email with an issue or one you trying to set up and To email can be any email address where you can check to see if you get the test email.

Send-MailMessage -From EmailAccount@YourDomain.com -To YourEmailAddress@gmail.com -Subject “Test Email” -Body “Test SMTP Service from Powershell using Port 587” -SmtpServer smtp.office365.com -Credential $creds -UseSsl -Port 587

It will prompt you to enter your username and password

If everything goes well, you will not see anything, otherwise, it will give you an error message

If you have a typo or forget to put -From or -To you might get errors, something like this:

Send-MailMessage : A positional parameter cannot be found that accepts argument


How to Synchronize folders in Thunderbird

Thunderbird

Thunderbird email client has so many options to customize the way you like it. One of them is to synchronize the folders that you want. By default, it only shows Inbox, but if you have subfolders, it will not synchronize. If you don’t have the Thunderbird mail client installed, you can download it from here: https://www.thunderbird.net/en-US

To see other folders, you need to Subscribe, by right click on the account, then selecting Subscribe …

account>Subscribe

Now Check the Box for any folders you want to sync or uncheck if you want to remove them. Click ok

Subscribe Folder list

That’s it for these settings

To remove from offline sync:

Right-click on the account, then settings

Synchronization & Storage>Advanced

Synchronization & Storage

You can uncheck if you don’t want to sync offline, then click ok, these folders will still get new emails, but they will not be available if you don’t have internet access.

Items for Offline Use

That’s all for now, enjoy it


How to compact your email to regain storage

Compact email

Before you do this, make sure you delete any emails you don’t need and empty out deleted items, otherwise, you will not regain storage space. Outlook creates an Offline Outlook Data File (.ost), which caches data of your emails, default location is system drive:\Users\YourUserName\AppData\Local\Microsoft\Outlook

Also, if you have created an Archive of your email, then you will have Outlook Data File (.pst), which also needs to do compact if you are cleaning up and trying to regain storage space, otherwise it just grows larger. The default location for .PST is the Documents\Outlook Files folder

To compact .OST, open Outlook

Click Menu>Info>Account Settings

Info>Account Settings

Next click on Data Files>Select your email or account.ost file extension

Then click on Settings …

Account Settings>Data Files

Select the Advanced tab, then click on Outlook Data File Settings …

Advanced>Outlook Data File Settings

Click on Compact Now to start compacting

Compact email

Note, if you have not done this before, it will take some time, next time you do this it will be quick, the storage space regained will depend on how much you have deleted your old emails. You can do the same thing for your.PST file

Note: make sure to empty your Deleted folder


The trust relationship between this workstation and the primary domain failed

AD trust failed

it’s not common, but once in a while you will come across an error like this “The trust relationship between this workstation and the primary domain failed“, causes of this are very, it’s very easy to fix it too, here are some list of reasons:

  • Admin deleted Computer object in AD
  • System restored, which is a different machine account password than AD
  • Machine imaged and restored
  • object corruption in AD
  • AD policy disables a computer after x number of days

You will get a message like this:

If you are logged into the computer local user, you can test by running the PowerShell command

command: Test-ComputerSecureChannel -Server NameOfDomainController

In this example, it’s showing true, but if you are having an issue you would get false

To fix it:

You can reset it by running a PowerShell command:

Command: Reset-ComputerMachinePassword -Credential YourDomainName\YourDomainAdmin

or you can rest from Domain Controller

Another way is to disjoin from the domain and re-join it

If you get this on your network status: Unauthenticated

That means your PC to domain controller lost trust

You can try running the repair command to fix it

When you run Test-ComputerSecureChannel and get the result False, which means your computer lost trust in your domain controller

The repair command will fix, it without restarting your computer, it will prompt you for domain admin credential:

Test-ComputerSecureChannel -Repair -Credential (Get-Credential)

You may need to restart the network adaptor to take effect

command: Restart-NetAdapter *

note: * means all networks will restart, if you have more than one you can use -Name and Name of your adaptor

Hope that helped you out with your issue