Setup Hyper-V on a Windows server 2019

How to setup Hyper-V on a Windows server 2019. It’s a very easy process for basic setup, it can be very complicated if you want to do isolation, VLAN, and NIC teaming. This post will start basic, Hyper-V host running Windows server 2019, it can be a standard or datacenter if you want to run many VMs and some advanced features. Let’s get started

Once you have windows server 2019 install and updated, we can install Hyper-V a couple of ways via GUI or PowerShell

Option 1: GUI

Option 2: using Powershell

Install Hyper-V using Server Manager:

open up Server Manager, then click Manage>Add Roles and Feature

Click Next:

Select Role-based, then click Next

The select server you want to install Hyper-V, click Next

Then select the Hyper-V check box.

You will get an option to include management tools, which most likely you want so click add features

Then click Next

If you only have one Network card then select the box to share with Hyper-V host/VM’s traffic, otherwise leave it unchecked.

Then you should see confirm installation, if everything is good, click Install, otherwise, click previous to make a change or click Cancel to exit out without making changes.

Once the installation is complete, the server needs to restart for Hyper-V settings to apply

You will find Hyper-V Manager under Start>Windows Administrative Tools

Or from the server manager under Tools>Hyper-V Manager

You should something like this:

Installing Hyper-V via PowerShell

Open PowerShell with Administrator rights

PS > Install-WindowsFeature -Name Hyper-V -IncludeManagementTools

Success Restart Needed Exit Code      Feature Result

——- ————– ———      ————–

True    Yes            SuccessRest… {Hyper-V Module for Windows PowerShell, Hy…

WARNING: You must restart this server to finish the installation process.

To verify Hyper-V installed:

Command: Get-WindowsFeature -Name *Hyper-V*

That’s all for Hyper-V installation, next need to setup networking, then start installing VM’s on it.


How to change the view on Outlook

There is a number of ways to change the view and options you can choose from. Most common is having to be able to view these headers so you can sort them, they are From, Subject, Received, Size and Attachments

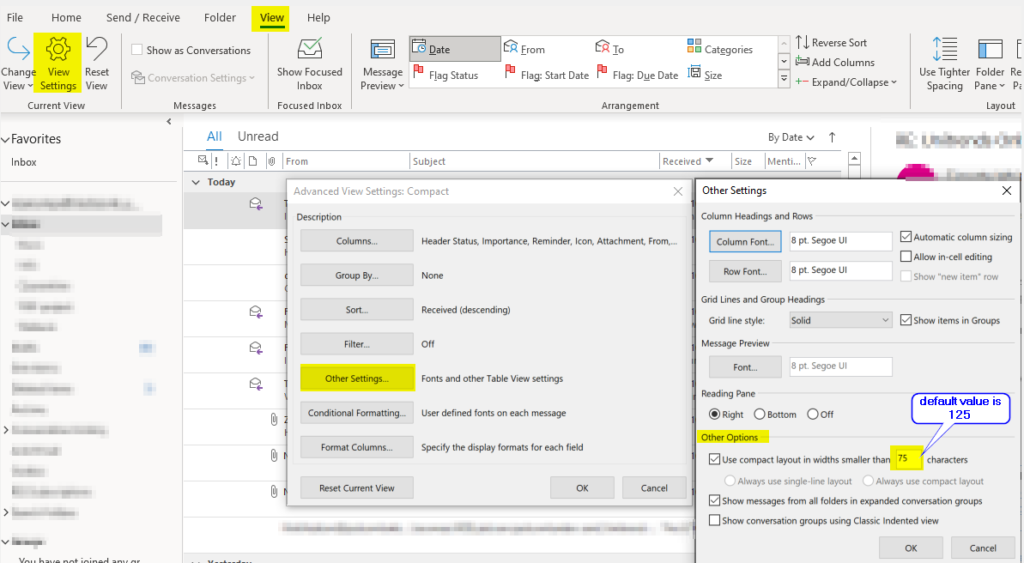
Based on the size of the screen you might only see this, which means you can need to change size or decrease the Characters from default 125 to like 75 or whichever works for you.

Screenshots are from Outlook 365, but other versions have similar settings too

You can change by going into View>View Settings>Other Settings…>under Other Options

If you like you can add other columns which you like too, it’s all customizable, if you changed something and you don’t like you can Reset the view to default by going to View>Reset View

That’s it, hope this helped out


How to fix Windows 10 Blue Screen of Death

There might be many reasons you get Blue Screen of Death (BSOD) and there are many ways to fix them. Most of them are caused by the updates, it could be Windows update, driver, or hardware changes in your computer. Sometimes new software installed that’s conflicting with Windows or drivers. Windows update that pushed out earlier in a month by Microsoft is causing Windows to experience BSOD (Blue Screen of Death), but not all computers are affected, only using those that are conflicting.

Here is an example of Windows update, which got affected whom using Kyocera printers:

Windows 10 Ver.20H2/2004 : KB5000802
Windows 10 Ver.1909/1903 : KB5000808
Windows 10 Ver.1803 : KB5000809
Windows 10 Ver.1809 : KB5000822

Solution from Microsoft released a patch, on March 18th, 2021:

Windows 10 Ver.20H2/2004: KB5001567
Windows 10 Ver.20H2/2004 : KB5001649
Windows 10 Ver.1909/1903 : KB5001648
Windows 10 Ver.1803  : KB5001634
windows 10 Ver.1809  : KB5001638

You will need to manually uninstall bad update and install the patch to fix.

To uninstall via command:
wusa /uninstall /kb:5000802

To see list of updates via PowerShell:

Get-Hotfix

So, keep your eye on Windows updates if its causing issue you can uninstall it or look for new updates to fix it.

Resources for troubleshooting:

Microsoft Troubleshoot blue screen errors: https://support.microsoft.com/en-us/sbs/windows/troubleshoot-blue-screen-errors-5c62726c-6489-52da-a372-3f73142c14ad?ui=en-US&rs=en-US&ad=US


How to upgrade to PHP 7.4 on Ubuntu

You should upgrade your PHP for your server to version 7.4 or higher for security reasons. You can find PHP version info from here: https://www.php.net/supported-versions.php. Here I am doing an upgrade from PHP version 7.2 to 7.4 on my Ubuntu server, before you do any changes, make sure you have a good backup of your server/application which may be running on your server.

To see current version:

command: php -version
output: PHP 7.2.24-0ubuntu0.18.04.7 and some other details of your server

First, make sure your server is up to date by running the following commands:
Command: apt update
Command: apt-upgrade

Then add repository to install PHP:

Command: add-apt-repository ppa:ondrej/php
Command: apt update

You will get message like this to continue or cancel:

To install PHP7.4

Command: apt install php7.4

To see the version you can re-run the command:

Command: php -version
Output: PHP 7.4.14 with some other info

Now you have the PHP 7.4 on your server you can update your application to take effect of newer version of PHP. Here is example of web server apache

Command: sudo a2enmod php7.4

Considering dependency mpm_prefork for php7.4:
Considering conflict mpm_event for mpm_prefork:
ERROR: Module mpm_event is enabled – cannot proceed due to conflicts. It needs to be disabled first!
Considering conflict mpm_worker for mpm_prefork:
ERROR: Could not enable dependency mpm_prefork for php7.4, aborting

To fix:

Command: sudo a2dismod mpm_event

Module mpm_event disabled.
To activate the new configuration, you need to run:
systemctl restart apache2

Before you restart, you will need to activate PHP7.4, otherwise you will get this error:

Command: sudo systemctl restart apache2

Install PHP 7.4 Extensions

Installing PHP extensions are simple with the following syntax.
Command: sudo apt install php7.4-extension_name

Here are some commonly used php-extensions:

php7.4-common php7.4-mysql php7.4-xml php7.4-xmlrpc php7.4-curl php7.4-gd php7.4-imagick php7.4-cli php7.4-dev php7.4-imap php7.4-mbstring php7.4-opcache php7.4-soap php7.4-zip php7.4-intl

For PHP 7.4 with Apache the php.ini location will be in following directory.
sudo nano /etc/php/7.4/apache2/php.ini

For PHP 7.4 FPM with Nginx the php.ini location will be in following directory.
sudo nano /etc/php/7.4/fpm/php.ini

To search with nano editor: F6 or CTR+W and update the following values for better performance.

upload_max_filesize = 32M 
post_max_size = 48M 
memory_limit = 256M 
max_execution_time = 600 
max_input_vars = 3000 
max_input_time = 1000

For web server to take effect restart the service:
Command: sudo systemctl restart apache2

Finally doing clean up of old stuff no longer needed:

Command: apt autoremove

That’s should it, if you have other applications you just have to update that, some may automatically be done, no other action needed. You should test everything to make sure all functioning well.


How to pair Logitech receiver using Unifying

Logitech Unifying Software, lets you add and remove devices that use a Unifying receiver. So if you lost a device and have a receiver you can add another device to the Logitech receiver to pair your device. Here is a quick how-to, it’s a very easy process

First, download the Logitech Unifying software
Once you downloaded the software, open the software and install it, then open Logitech Unifying Software to configure i

Click Next

Plugin receiver: then click Next

Turn on your device, or restart to get detected

If it detects your device you will see something similar to this if you have a keyboard (if you have a mouse you see a message asking to move the mouse): if it’s working select Yes and click Next

Then you should see Congratulations message

If you have an issue or the device not detected you will see a message like this, which means either your device not supported or fail to receive a signal, try again, check the battery, or try another USB port.

That’s it, hope it helped you out