How to upgrade osTicket to 1.11

update: this version no longer support please use 1.12 or latest

Finally, osTicket v1.11 is released open source ticket system, it has lots of new feature people been waiting for a long time. You can find official documents and a full list of all the features on here. Most important issues people had was PHP version too old in 1.10.4.  The osTicket v1.11 supports PHP version v5.6-v7.2.

How to upgrade from 1.10.4 to 1.11

  1. Make sure you have a good backup of Database and files of osTicket
  2. Then put the system in the offline mode: by going to /scp/settings.php
  3. Download the new version from https://osticket.com/download/ and choose the osTicket Core, v1.11 (Latest Release)
  4. Upload to your server v. 1.11 and replace current files/folders from Upload folder from your downloaded, and exclude the script folder/files
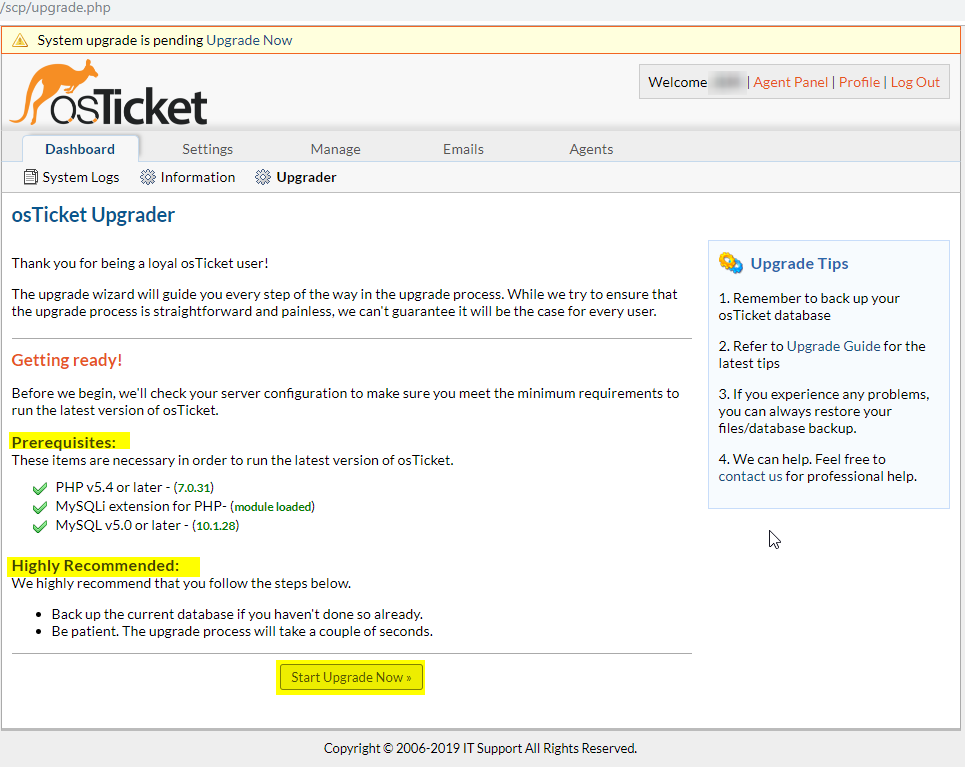
  5. Make sure you have the correct permission, then go to the URL/SCP of the osTicket system and login, you should see osTicket Upgrader, make sure your Prerequisites are all good, if any errors correct it, then click Start Upgrade Now
  6. Then you should see Apply updates to database stream: core, click Upgrade Now
  7. If everything went well you should see Upgrade Completed

  8. Delete the /setup folder and update any customization you may have, test it, then once all is good you can put the system back online

That’s it if you have customized PHP core files, those needs to be re-applied after the upgrade. Also, make sure your plugins are good, if needed upgrade do so, make sure it supports the new version. one more thing, if using Language packs, you can find them at the osTicket website, those do needs to be updated.   You will find many solutions to the problem in a forum where people report and help out each other. Please read your error message and logs of your system web server, PHP, osTicket, it gives many ideas about why things are not working. Many of them due to the PHP version not supported. If you were to get help from the forum, please include your system information, like osTicket, PHP version, web server, and remember forum support is free, so don’t order/demand to fix your issues.  They do offer paid support if you wish to pay for it.  Thank you very much to the osTicket team for their hard work on keeping osTicket System up to date.


Increase allowed maximum attachment size

On exchange 2010 or may be applied to other versions of on-premise exchange. You have maximum attachment size setting to allow people to send to other users and there are many causes based on settings of, database, mailbox, email spam system, firewall, etc… Also, there is one more on Active sync, which is by default is 10 MB, so it does not matter, if you have allowed bigger attachment. When using the smartphone you will see the server rejected message when your attachment is larger than 10 MB.

You can Open the web.config settings of the Microsoft Active Sync

Then edit the httpRuntime maxRequestLength to whatever you like

After the change is been made, you will need to restart the IIS service to take effect of your new settings. Then you should be able to send bigger attachments from your smartphone. Some other things to be noted, if your mail server allowing bigger attachment that does not mean other mail server will accept bigger attachment. Most spam system scanner inside your attachments and can block if something inside attachment have strange type of content.


Clean up dead domain controller Windows 2012 R2

Many small companies have a small network and they have limited IT staff or manage IT services to take care of their network. I have seen old network devices, application, plan for cleaning up but it’s been forgotten which creates a problem in the future. The worse part is when the company doesn’t have a strict policy, budget or just don’t want to change, so things just build up until it reaches to a dead end. The domain controller is very important part of the network, if it keeps up to date and removed the old controller, then it could cause major issues. Here is how to clean up an old domain controller. Make sure you have a good backup and primary domain controller is a good healthy state.

Open Active Directory Users and Computers

Select domain>Domain Controllers>on right side it will list your domain controllers on the right side panel. You will see DC Type GC (Global Catalog) and Read-Only, GC Domain Controller.


Right click on the domain controller you want to delete, select delete. You will see confirmation screen select Yes

Select the options to clean up when your old domain controller deletes

Then it’s going to have confirmation and list of operations, based on your selection, once check then click OK

If your domain controller is part of GC, you will see: “This Active Directory Domain Controller is a global catalog“, before you click Yes, make sure you have at least one Global Catalog domain controller.

That will remove your old domain controller, then clean up any other metadata left around. If you have multi sites, open Active Directory Sites and Services: Sites>Delete old site

You will get Confirm Subtree Deletion message, click yes if nothing else is on that site

Then check your primary domain controller health and logs, to make sure everything is fine. Keep your eyes open on any application/services that may have any issues, it should not, but just in case. That’s it


Encrypt TLS-SNI-01 validation is reaching end-of-life

If you are using Let’s Encrypt certification and have received an email to take action on renewal of your certificate.  That’s because lets Encrypt had announced last October 2018, that they will end support for TLS-SNI-01 validation method on February 13, 2019.  You need to update your ACME client to use an alternative validation method alternative validation method: HTTP-01, DNS-01 or TLS-ALPN-01. If no action taken you may have out-dated certificate for your domain.

To check your certbot version:

certbot –version

If have your server up to update, then the version should be 0.28.  If not you can upgrade your Certbot at https://certbot.eff.org/.   It will ask you to pick your software and system and it will give you detail documentation on how to upgrade, baased on your version of software/system.

To install for Apache, you can run this command:

sudo apt-get install python-certbot-apache

To test do a renewal dry run:

sudo certbot renew –dry-run

If everything goes well you should see Congratulation, all renewals succeeded, if it fails then you need to fix it. Take a look at log, firewall to make sure it’s not been blocked and try again.

Here is a link from Let’s Encrypt Community Support on How to stop using TLS-SNI-01 with Certbot Please update your server certificate to keep it secure.


Recover Deleted mailbox on exchange 2010

In case you have deleted mailbox my mistake, you may still be able to recover if your backup has not run yet.  You can recover mailbox as the same user or attach to a new user. If you have deleted the Active Directory account when you had delete Mailbox, you need to re-create it first then you will be able to attach the disconnected mailbox to a user. If you don’t see anything under Disconnected mailbox, then you will not be able to reconnect without restoring from your backup first. If you want to remove mailbox check post How to remove Mailbox only on exchange 2010

Reconnect disconnected Mailbox

Open Exchange Management Console
Expand Recipient Configuration>Disconnected Mailbox
On the right side select user mailbox, you want to reconnect.

You will need to choose mailbox type, if it’s User Mailbox, Room Mailbox, Equipment Mailbox or Linked Mailbox, based on your selection you will see different options to choose from, here I am selecting User Mailbox

You will have option to choose Matching user or Existing User

  • Matching: you will not get option to select user, it will automatically connect Matching user
  • Existing user: Then you will get option to search same or another user, if user does not exist, create it first then try reconnecting.

How to Remove Mailbox via Power shell

Open Exchange Management Shell

Remove-Mailbox –Identity “NameOfUser”

Then it will give you message “Are you sure you want to perform this action?” once you are sure type y and press Enter

If you don’t want to get confirmation:

Remove-Mailbox –Identity “NameOfUser” -Confirm:$false