Install open source flat-file CMS Grav on Ubuntu

Grav is open source flat-file CMS which means without any needs of the database.  It only has two requirements web server like Apache, Nginx, IIS, etc … and PHP 5.6.3 or higher.  It uses Markdown for formatting syntax and it automatically converts to HTML.  It also has a Normal or Expert mode for editing content.  I am installing this on Ubuntu 16.04, but it should work just fine with other versions of Ubuntu as long as you meet the server/PHP requirement.  Also, Grav have two options when you download Grav core or Grav Core + admin plugin, I am using installing with Admin plugin to get more options.

Installation is very easy, once you have the web server of your choice and PHP version meets the requirement.

Download the Grav from https://getgrav.org/downloads and extract it then upload it to your web server

Then just go to your Domain URL and you should see the following screen, where you fill in your admin information and click Create User

If everything goes well it should bring you to Dashboard screen, this is your admin screen, where you will be able to add, delete, and make changes to your Grav CMS.  Also before you do anything click Backup and it will automatically back up for you.

This is default home page of Grav after fresh installation

If you want to edit your page to your Grav CMS login to admin (YourDomain/admin)
To edit Home Page, click on Pages>click Home

Now you should be to edit Content and click on the other tabs to see more options, Advance and Mode type Normal/Expert.

After the installing you may need to upgrade, just click on the Update on your dashboard and click continue

Back to your dashboard you should see fully updated, otherwise click check for updates

That’s it, enjoy it


How to Clone old drive to Samsung solid state drive

When you replace your old spinning drive with any solid state drive will double your computer speed.  There are many solid state drive vendors and versions of the drives, some are more reliable than others.  I had written one post for SanDisk SSD drive and this one I am writing about the Samsung SSD software, much easier to use.  I have been using Samsung drive for a long time and it’s the one I feel more reliable, that does not mean other vendors is not, you can use any vendors you like and I am sure they all have some kind of cloning software included or have to find something else.  Cloning software saves you time and keeps all your data/software installed as if nothing changed to your computer system, but you will see the speed increase for sure.  You will be thinking after why I have not done this upgrade before.  Let’s get started.

What you will need:
Tool to open your Laptop/Desktop to replace a hard drive
USB to SATA cable (unless you have the second slot to put new drive)
SSD drive same size or whatever your data total size is plus future free size to store more data

Download the cloning software: Data Migration Software at https://www.samsung.com/semiconductor/minisite/ssd/download/tools/

Once downloaded, double click to start the installation, then choose the Language then click Next

Click Next

Read the Agreement, Accept and click the Next

Then Click Install

Then click Finish

Then open the Samsung Data Migration software, you may have a shortcut on your desktop or you will find it in the program list.  If for some reason you have an older version you may get update option, if you get that screen then do the Update by click on Update 

It should go through same installation process as above, once updated it may open Samsung Data Migration software, if not open it manually to start the clone process.

At this point you can plugin your new drive, if you have not done yet.  You should see your current drive and new Samsung SSD Drive on bottom, make sure it’s the right drive, you may have to click on refresh to see.  If you don’t see the drive then you may have to install the driver.

Once is confirmed that’s the right drive and everything else is closed, Click Start and you will get Warning screen asking Would you like to start cloning? Click Yes


The time it takes to cloning may vary base on data type, size of data and speed of your current drive, for me, it took about 1 hour.  Make sure you don’t stop the process and if it’s laptop make sure to have your power cord is plugged in.

Click Close

Then you will get an option to Exit or Shut Down, Click ShutDown and remove an old drive and put the new drive in.

That’s it, once the computer comes back you will see much faster.  No more waiting and now you can be happier 🙂


How to setup WordPress for website

WordPress is a very popular platform for websites and very easy to use.  All you need is a web server that supports PHP, then setup database.  Download WordPress from https://wordpress.org/download/ to your web server and extract it.

To start go to your domain URL to run the installation of WordPress, select Language of your choice and click Continue

WordPress getting start, at this point setup database and user name, which you will need on next screen, then click Let’s go!

Fill in Database information, then click Submit

Checking communication for the database info you enter, if everything went well, then click Run the installation

Welcome to new site, fill in your website information and click Install WordPress

Successfully installed WordPress

That’s it, now just customize it to the way you like it and enjoy it
You may need to check some settings and update it

Recommended Permissions:

  • Directories: 0755
  • Files: 0644
  • owner: www-data

Here are some quick list of feature which can easy to customize your WordPress site:
It also has a new editor called “Gutenberg”, which is very easy to use, if you want to use it, click Install Gutenberg

Appearance> it will change the look of your site, based on Theme
Themes – it will list all your themes
Customize– It will bring you to your current theme, to be customizing
Widgets – list all Available Widgets, which you can activate or disable
Menus – It will list Menu options and able to customize it
Header – It will bring you to your current theme, to customize your header
Editor – It will bring you to Them files


Settings> common settings changes to your site
Genaral– Site Title, Tagline, URL,Timezone, etc..
Writing -Default Post Category, Format, etc..
Reading– Homage Displays, Blog pages show options, Search engine Visibility, etc…
Discussion– Article, Comments, and other settings
Media– image size settings when you upload
Permalinks– URL link display settings
Privacy – set custom policy page


Tools> some tools to deal with your data
Available Tools – list of tools
Import
– options to import data into your WordPress
Export – options to export your data outside of your WordPress
Export Personal Data – to export user data
Erase Personal Data – to erase user data

if you want official version of WordPRess installation you can find it here


Moving your WordPress site to new server via All-in-one WP Migration

Here is another way of moving your new WordPress site to a new server.  I had written one post called How to move your WordPress site to a new server which was the manual way of doing, without the use of any plugin, like this one called All-in-One WP Migration.  It’s a very simple process to do move using this plugin, please make sure you have a good backup before doing anything.  I like said before, use whatever you feel comfortable.  As always I do recommend doing a full backup of your site file and database, just in case you need to go back to it.  In this post, will go through the whole process of moving your WordPress site, using third party plugin called All-in-One WP Migration. Remember, using this third-party plugin is easier, but have to be aware, it may have the restriction on function/size of database or type, which may change at any time.

I am assuming you already have a good working website, permission, and backup.  Will keep this simple and jump right onto moving site.

Install a plugin called All-in-One WP Migration by going to your WordPress admin panel and clicking on Plugins tab>Then Plugins Add New

Search: all in one WP, once you find it click Install, then Activate it.

Then let’s create a backup using the new All-in-one WP Migration plugin, by clicking on Create Backup under All-in-one WP Migration plugin

It will give you many options where you want to back up to, I am going to select the file

Once, it finishes back up it will give you the option to download it, click on it and save, then click close.

In case you want to download the backup via FTP/SFTP: \wp-content\ai1wm-backups

Then log in to the new WordPress site and install the same plugin installation

Now let’s import your data to the new site

Go to All-in-one WP Migration Plugin>Import>Then select the file and find your backup

You will get this warning if you are ready to override, click Proceed

Once it’s done, you should see Successfully message

That’s it.


How to move your WordPress site to new server

There are many ways to move your WordPress site to a new server.  Whatever you feel comfortable use it, there is no right or wrong way of doing it.  I do recommend doing a full backup of your site file and database, just in case you need to go back to it.  It’s a good idea to have more than one version of backup and keep the backup in a different location.  We will go through the whole process of moving your WordPress site, without using third party tools. Using third-party tool is easier, but have to be aware, it may have the restriction on function/size of database or type.

What you will need:

  • Internet access to download WordPress, go to https://wordpress.org/download/
  • Web server I am using Apache
  • Access to web/database server (mostly its same server, but it can be two different servers)
  • Access to site file via (FTP, SFT, GUI, etc. …)
  • SSH access to MySQL/Web server

WordPress Requirements: “We recommend servers running version 7.2 or greater of PHP and MySQL version 5.6 OR MariaDB version 10.0 or greater”

Backup:

MySQL Database exporting:
command: mysqldump  -u UserName -p DatabaseName > databaseBackupName.sql

Setting up new WordPress:

Copy WordPress installation files to your web server (default location /var/www/Your_WordPress) that you have downloaded from WordPress.org

Give ownership to the web server system user www-data.
command: chown -R www-data:www-data /var/www/Your_WordPress/

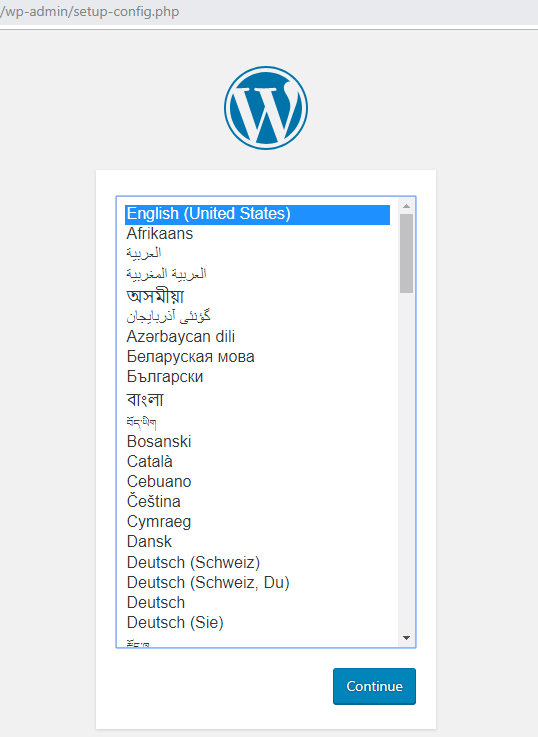
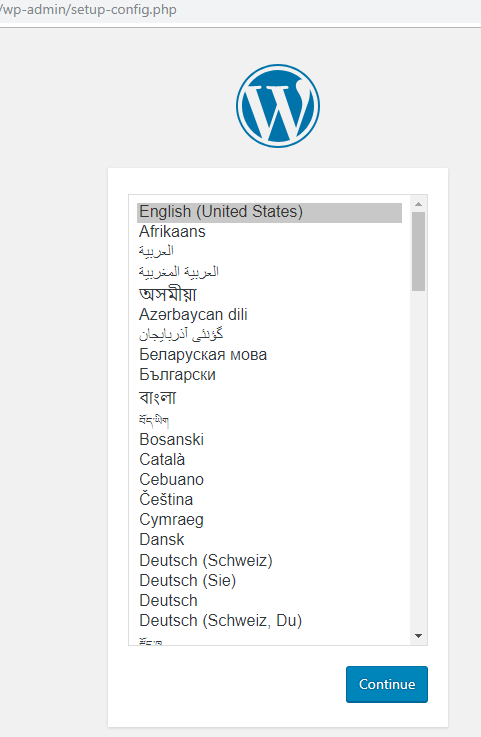
Go to URL of your WordPress, if everything is correct you should see Installation screen.  Choose your Language then click Continue

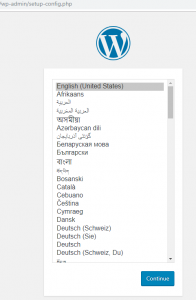
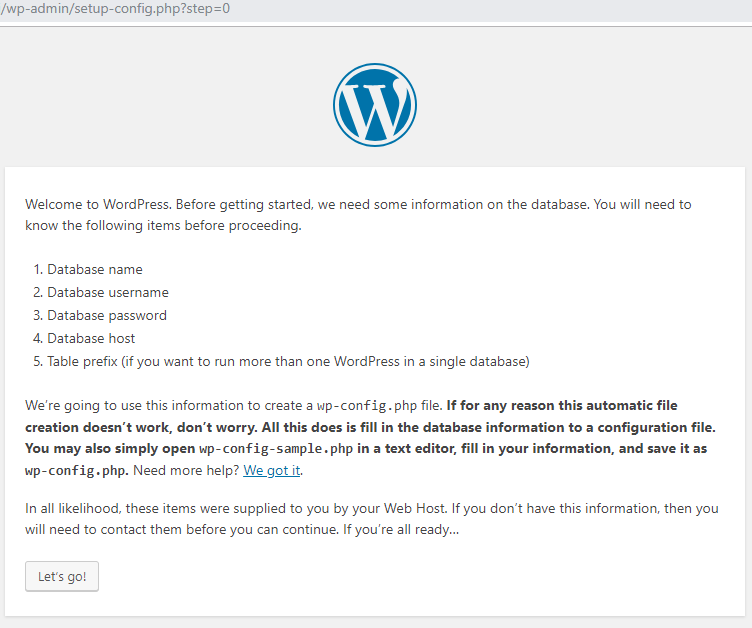
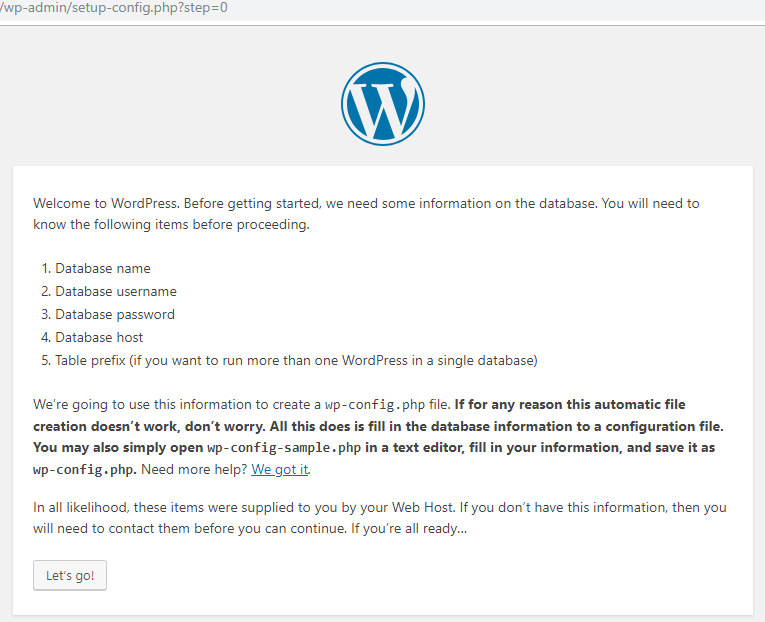
If you have any error correct it, then click let’s go

Login to your Mysql server and create a database:

Command: create database wpdb_name;

Grant access to the new database:

Command: grant all privileges on wpdb_name.* to UserName@localhost;
Command: flush privileges;
Then you can exit

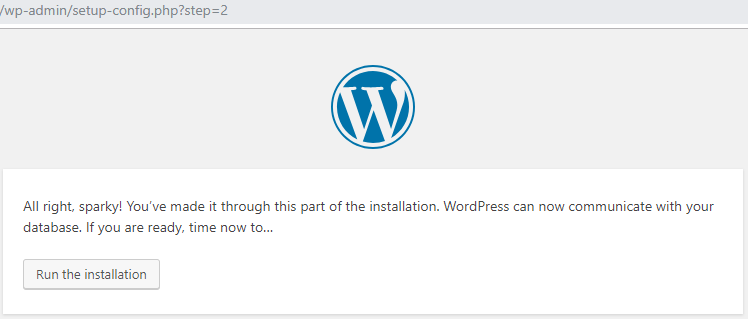
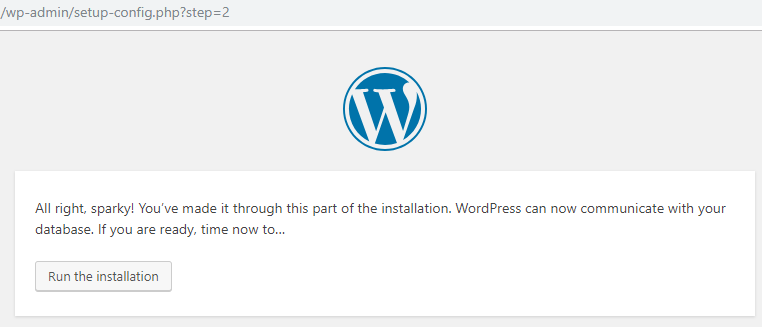
Go to URL of your WordPress and fill in the Database, username, password, and hostname, then click Submit

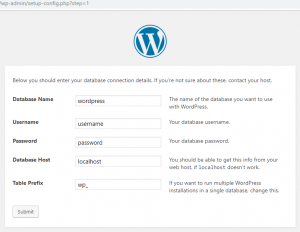
If all is good, you should be able to click “Run the installation”

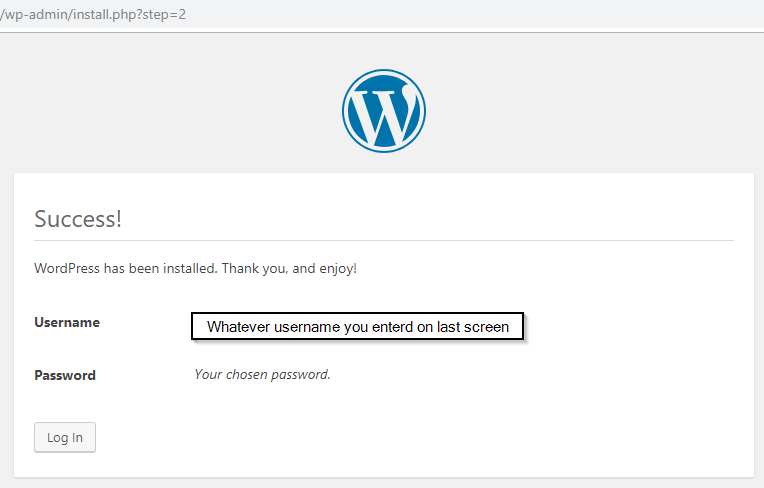
Fill in the information then click Install WordPress

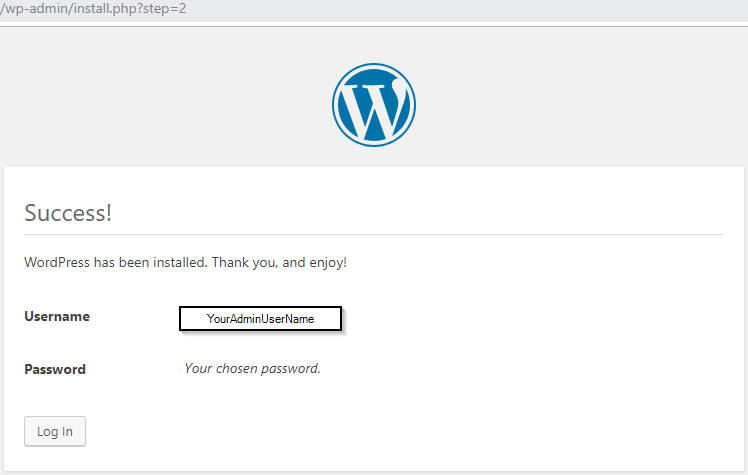
if everything went well you should see the Success screen, click Login

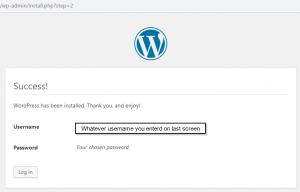
Login to your fresh installation of your WordPress to make sure it’s all is up to date

Now let’s import the database to your WordPress, so you get your data:

Login to your web server or SSH to it: Then run this command to import the database
mysql -u SQLuserName-p NameOfDataBase < /LocationOfBackUPDatabase/WordPressDataBase.sql

Then update the URL:

Otherwise you will get: HTTP ERROR 404

Then Login to your Mysql:
command:use NameOfWordPressDB;
WordPress Address (URL):
command: mysql> update wp_options set option_value = ”http://URLofYourSite/’ where option_id = 1;

Site Address (URL):
command: mysql> update wp_options set option_value = ”http://URLofYourSite/’ where option_id = 2;

Check to verify if changes were made:
command: mysql> select * from wp_options where option_value = ‘http://URLofYourSite/’;

Images URL update:
UPDATE wp_posts SET post_content=(REPLACE (post_content, ‘https://OldDomain’,’https://NewDomain’));

To exit type \q:
command: mysql> \q

Or

if you want to hard coded: inside: wp-config.php top of the file

define(‘WP_HOME’,’https://yourdomain.com’);
define(‘WP_SITEURL’,’https://yourdomain.com’);

Or via GUI admin panel:
/wp-admin/options-general.php

If you have custom themes, you need to copy it to the new site:

Default Location: \wp-content\themes

Don’t’ forget to copy the media (images/videos you may have):

Default location: \wp-content\uploads

Also, if you have hardcoded any URL within your site, you will have to update it, all the post and any internal URL should be updated automatically

You may have issues, links not redirecting
in your .htaccess you may have to change it to make it work
example: https://YourDomainName.com/public_html/
then you will need to put /public_html/ because by default it only has /

That should be it, hope you find this useful