How to Change Screen Resolution on Windows 10

Why would you want to change the resolution?  If Icons or texts are too small then you can decrease the resolution, it will make your Icons and text bigger, but it would not be clear.  If your Icons are bigger and want smaller and clear, then you would increase the resolution.

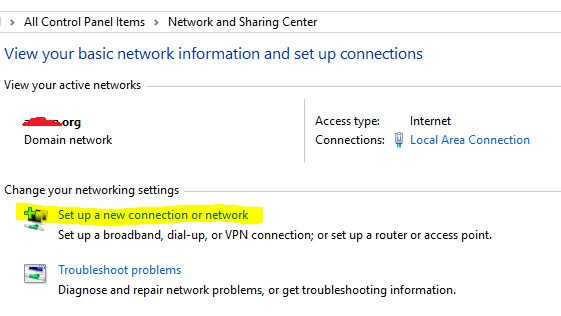
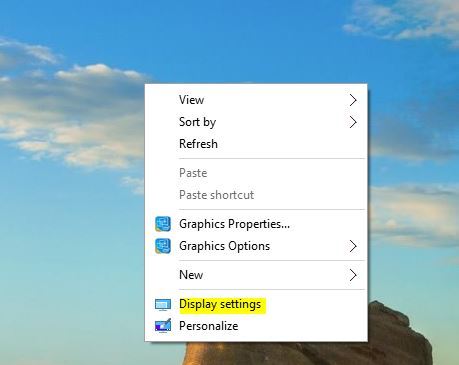
To change the screen resolution on your Windows 10 computer, all you have to do is right-click anywhere on an empty area of your desktop, and then choose Display Settings


Click on Advanced display settings


Then based on your computer hardware you will have options to increase or decrease the Resolution.

Once you find the right setting, which works for you and then click on the  Apply to see the change.


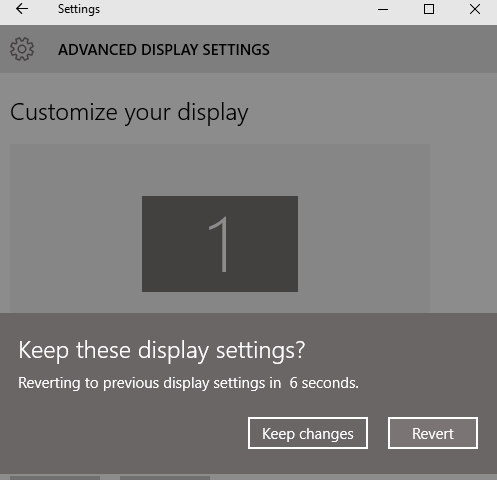
You will see a screen with the message:

Keep these display settings?  Reverting to previous display settings in 15 seconds and counting down.  If you don’t click on Keep changes, it will automatically revert back.

That is it.  There are other settings you can find by installing the display driver software for your computer hardware, which gives you a lot more options.


How to Setup VPN on Windows 10

Setting up VPN on Windows 10 is similar to Windows 7 and 8, looks might be little different.  You will need the VPN server information to connect, your system administrator needs to give permission before you can connect.

  1.  Right click on the “Network icon” then Click on “Open Networking and Sharing Center
  2. Click on the “Set up a new connection or network
  3. Then choose the “Connect to a workplace” then Next
  4. Click on the “Use my Internet connection (VPN)
  5. Then fill in your VPN details:
    Type in Internet address: “VPN_address or IP”
    Destination name: Name the connection this will show on your network name (similar to your Wi-Fi name)
    Then Click “Create

That is it, now you can connect to your new VPN connection by clicking on “Network Icon” you will see whatever you named your VPN.  Note: if you have checked the “Remember my credentials” box, then it will connect to your VPN automatically, otherwise it will prompt you for username and password.


Spyware and Adware removal

Trying to find good spyware and adware removal software for free?  Well, you have come to the right place.  I have been looking for good software that really removes spyware and adware from the computer not put more in your computer.  I have tested other software out there that say they remove spyware and adware from your computer, but many of them are fake.  This is excellent software that really removes and clean up spyware and adware from your computer it’s called: Malwarebytes and it’s free for home users, you have an option for paid version which gives you more options.  You can find it at http://www.malwarebytes.org Also here is how you can install it and scan for malware, spyware and adware Step by Step:

Basic Guide:

Note: Guide for the Advance user at the end of the Basic guide

    1. Go to http://www.malwarebytes.org and click on “free download”
    2. Then you may get a pop-up asking you want to run/save or will start downloading
    3. If you clicked on Run it should start the installation, follow installation screen
    4. If you have selected save option then you will need to click “Run” to start the installation process.
    5. Once it’s finished installing the software should open up and will have the option to scan your computer for Malware, spyware, and ad-wares click on “Scan
      Note: you can choose the Quick Scan for a faster and basic scan or choose Full scan for an advance scan and it will take a little longer based on how much data it needs to scan.
    6. After it’s finished scanning it will say show result and will give you an option to remove it or if it’s legit you can exclude it.

Advanced Users:

    1. Go to http://www.malwarebytes.org and download the free version
    2. Install it and scan for malware, spyware, and adware
    3. After it’s finished scanning it will say show result and will give you an option to remove it or if it’s legit you can exclude it.

If it finds some spyware or adware please remove it then restart your computer and then try to scan again to make sure it’s removed sometime it requires to reboot your computer for some files to be deleted.  Some spyware put’s it’s self back when you re-boot.  If that’s the case you may need to see where that file is located and delete it manually.


Increase Virtual Memory on Your Computer

Sometimes when using your computer you might get some errors saying that virtual memory on your computer is low. This normally happens when you have many applications open on your system and your computer has run out of virtual memory space. What’s virtual memory anyways – you might be wondering? Virtual memory is a computer system technique which gives an application program the impression that it has contiguous working memory (an address space) while in fact it may be physically fragmented and may even overflow on to disk storage. Systems that use this technique make programming of large applications easier and use real physical memory more efficiently than those without virtual memory. Cool, now that you know what virtual memory is all about, how can you increase it on your computer, so you don’t get those dreaded errors, and hopefully your computer runs a little faster? Here is how you do it:

On your desktop, go to MY COMPUTER right click it and go to PROPERTIES

Select the ADVANCED tab, and under the PERFORMANCE option click on the SETTINGS

on the performance option window click on the ADVANCED tab again

On the VIRTUAL MEMORY option click “CHANGE

Select the system drive, normally C: and make sure Custom Size option is checked. Increase the initial size (MB) numbers to double of what you have. If you have 1024 increase it to 2048 and then increase the maximum size (MB) to double of the initial size number. Click on OK and restart your computer.

That’s it; hopefully, you won’t get those virtual memory errors anymore.