How to redirect HTTP to HTTPS in IIS

Redirect are very common for web servers for most if not all websites these days.  This post I am using the URL Rewrite, if your server does not have already you need to download URL Rewrite extension which works With IIS 7, IIS 7.5, IIS 8, IIS 8.5, IIS 10.  Note.  If you already have the URL Rewrite you can skip to the section Adding Redirect Rule

Installation of URL Rewrite:

You can download directly from this link: https://www.iis.net/downloads/microsoft/url-rewrite

If you already have the Web Platform Installer, you can double click and find it there, under your web server>Sites>Select site>on the right-side panel you will see Management section

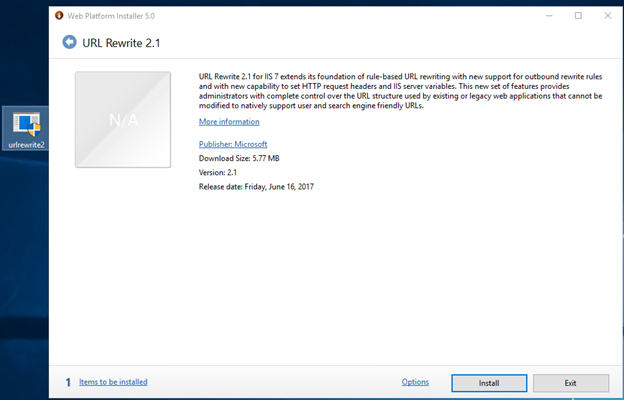
To start the installation double click on the URL Rewrite and click Install

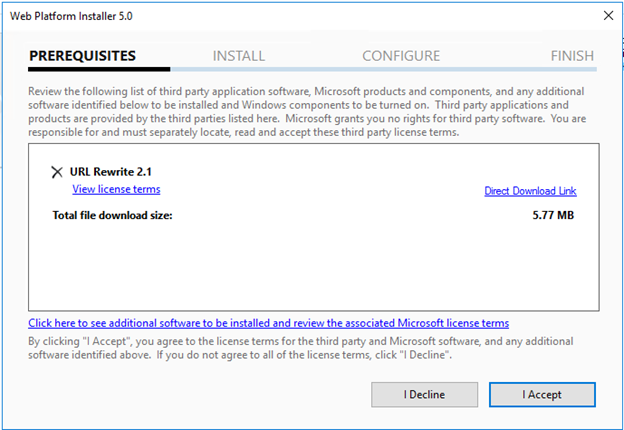
Read the terms then click on I Accept

If everything goes well you should see, successfully installed, click Finish
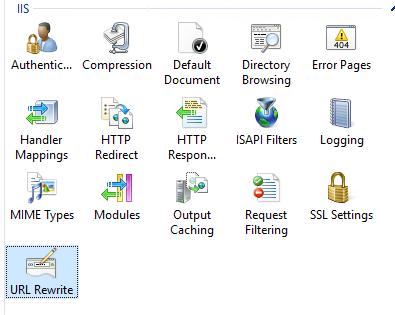
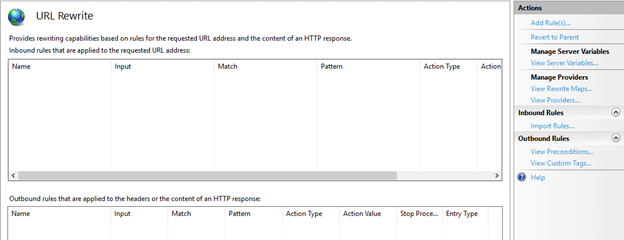
you should see the URL Rewrite, if you don’t close the IIS Manager and re-open it.

Adding Redirect Rule:

Double click on the URL Rewrite for the site you want to redirect

Add your rules here, which fits your needs you may need more than one rules

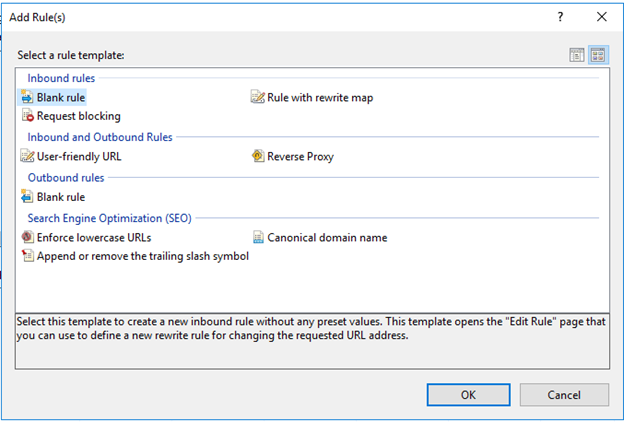
I am going to create a rule to redirect HTTP to HTTPS:

Click Add Rules(s)
Then click on Blank rule (for Inbound rules)

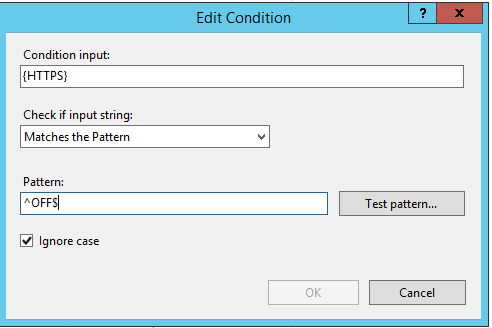
Fill in the Name and other options shown in the screenshot, then expand the Conditions and click Add

This condition will check if user type’s https, then this rule will be ignored, so it avoids the loop

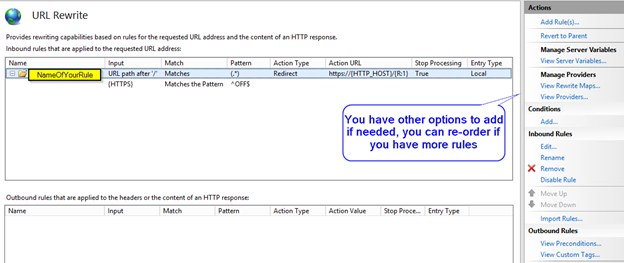
Nothing set on the server variables, unless you needed in some special case, you can add it, Next, we want to set up the redirect
https://{HTTP_HOST}/{R:1}

https://docs.microsoft.com/en-us/iis/extensions/url-rewrite-module/url-rewrite-module-configuration-reference

Your Rule should look something like this if you open your web.config file:
        <rewrite>
            <rules>
                <rule name=”http to https redirect” stopProcessing=”true”>
                    <match url=”(.*)” />
                    <conditions logicalGrouping=”MatchAny”>
                        <add input=”{HTTPS}” pattern=”^OFF$” />
                    </conditions>
                    <action type=”Redirect” url=”https://{HTTP_HOST}/{R:1}” />
                </rule>
            </rules>
        </rewrite>

If you have issues make sure to check following:

  • Make sure your webserver firewall ports 80 and 443 are opened
  • You may need to restart the IIS service for rule to take effect, also make your local cache is cleared for your browser.
  • Double-check the pattern of your rule make sure it’s correctly typed, not a typo

That’s it


How to upgrade osTicket to 1.12

osTicket v1.12 is released on April 24, 2019, it’s open source ticket system. You can find full release notes at https://github.com/osTicket/osTicket/releases. For osTicket version 1.12 PHP version 5.6 to 7.2, 7.2 is recommended.

Upgrade process is very simple, I am doing 1.10.4 to 1.12

  • Make sure you have a good backup of Database and files of osTicket
  • Then put the system in the offline mode: by going to /scp/settings.php
  • Download the new version from https://osticket.com/download/ and choose the osTicket Core, v1.12 (Latest Release)
  • Upload to your server v. 1.12 and replace current files/folders from Upload folder from your downloaded, and exclude the script folder/files

Make sure you have the correct permission, then go to the URL/SCP of the osTicket system and log in, you should see osTicket Upgrader, make sure your Prerequisites are all good, if any errors correct it, then click Start Upgrade Now

Then you will get Migrate to osTicket v1.12, click Upgrade now

Then if everything goes well you should see Upgrade Completed

Delete the /setup folder and update any customization you may have, test it, then once all is good you can put the system back online. If you have customized PHP core files, those need to be re-applied after the upgrade. Also, make sure your plugins are good, if needed upgrade do so, make sure it supports the ent version. Good luck


How to delete old VM from Hyper-V Cluster

Hyper-V cluster is a very common business network uses, which allows system admin to do system updates, without having any downtime. There are times when VM (Virtual Machine) are created for a test or just got upgraded and left to be deleted later on. Cleaning up old VM will free up the storage space. In this post I will have steps on deleting VM from Hyper-V cluster, before deleting, check the location of the VM because deleting from the Cluster server, will not free up the storage, you will need to delete it manually. You can see the location of the VM by going to settings of the VM and select the Disk, it will display full path where your VM disk is stored.

Open Failover Cluster Manager, then click on Roles, you should see list of VM’s, select the one you want to delete, then right on it and select Remove.

You will get confirmation message, make sure it’s the correct VM, then click Yes, The VM will be removed from the Cluster.

Then go to Hyper-V host where VM was running from, so you can remove from list

Confirmation are you sure you want to delete, if it’s correct VM you are deleting click Delete.

Now the VM is deleted from Cluster and remove from Hyper-V host, it’s time to delete the VM disk, by going to the location you looked at before you deleted the VM. That should give you back the storage space. That’s it, you get an error check the windows log or application log, it will give you more info.


How to restore deleted VM from Cluster

By mistaken you have deleted good VM and if you still have the VM disk, you can still bring it back online. As long as VM disk is not deleted from the Hyper-V it would be a very easy restore. Option 1 if you have not deleted VM from Hyper-V if you have deleted from Hyper-V follow option 2 after selecting VM from the Cluster Role.

Option 1

Open Failover Cluster Manager

Right click on the Roles>choose Configure Role …


Then you may get this default message: click next

Select the Virtual Machine, then click Next

Then you will see your deleted VM here: select it and click Next

If you don’t see the VM go to Option 2

Confirmation, Click Next

If everything goes well you should see success message with summary, if you want to see details click on View Report or click Finish.

Options 2

If you deleted VM and removed the Hyper-V host then you not see here, then you will need to add VM as new and use the same Disk

Adding new VM to Cluster with existing disk

Select the Cluster node (Hyper-V host), then click ok

Then you may see the New Virtual Machine Wizard, click Next

Then the VM to whatever you like, then click Next

Select the Generation of the VM:

Then set Memory and click Next

Select networking from list, then click Next

At this screen you will select the use an existing virtual hard disk, then click Next

You should see the Summary of new VM, if everything is good, click Finish

If everything goes well, you should see the Success message, click View Report for details or click Finish

That’s it, you should see your recovered VM back in the Cluster


Share files with encryption via Firefox send

Sharing files is very common these days, but is it safe and secure? Firefox has been testing for a while and now it’s an officially released a couple of days ago at https://blog.mozilla.org, it’s free up to 1GB without setting up an account, with a free account it gives 2.5 GB. It’s very easy to use for anyone who is looking to share big files that can’t be sent via email. Best thing is it doesn’t stay on the server forever, so no need to worry about, your data out there, it automatically generates a link and you choose how long it should stay shared then deletes it automatically. It’s a free encrypted file transfer service that allows users to safely and you can use any browser, you can use Firebox browser.

Here is how it looks like, all you have to do is go to URL: https://send.firefox.com Then drag and drop files or click on the select file to upload

Once the file is uploaded, you will get default option for your files to be Expires after 1 download or 1 day. You can change to up to 100 download or 7 days. Also, you get an option to put a password as well. Then click on Upload to generate the link.

It will generate the link to be share, which you can copy and paste it to your email whom you want to share your files with.

Based on your selection, you will see options, when your files will be expires. You will have option to copy link in case you forget to copy.

That’s it, very easy secure way to share big files, you can read about Firefox Privacy Notice for more info your secure files share via Firefox.