Windows operating system information

Windows operating system came long way, I am listing some links from Microsoft about Windows versions and release information, since there are so many versions it’s very hard to find information about different version.  Microsoft have listed the fact sheet for Windows at https://support.microsoft.com/en-us/help/13853, this also includes the Windows Servers version 2008-2019.

Windows version 10, 8, 7 Home, Enterprise, Education, Pro, and Pro for Workstation editions.  Also includes Windows version history, Date of availability, Mainstream support end date, and extended support end date.  If you want to know more about the Microsoft Lifecycle Policy FAQ https://support.microsoft.com/en-us/help/17140/lifecycle-faq-general-policy-questions

If you just want to know more about the Windows 10 release information: https://docs.microsoft.com/en-us/windows/windows-10/release-information

Windows Server release information https://docs.microsoft.com/en-us/windows-server/get-started/windows-server-release-info


How to set accurate time for Windows Server

Having the right time on your network is very critical to have all your network devices function correctly. Also best for troubleshooting issues to see a pattern, otherwise you will have some devices reporting a few minutes or even hours off from real-time. These days most if not all of the networks are in virtual environments (for some it’s called cloud). Windows Hyper-V’s recommendation is to turn off time sync for all VMs and let the PDC role holder go out to the internet and get time from a reliable source, then have your local device sync up to PDC. The Second option for a smaller network synchronizes your Hyper-V hosts’ hardware clock to the NTP authority. This guide is to have your Windows primary domain controller configuration of NTP (Network Time Protocol) point to the reliable source, so your local devices also get the correct time. Let’s get started

Login to your Primary Domain Controller:
Open CMD console with Admin rights:
First, check the current status:
W32tm /query /status

Or check the NTP server in use
net time

To see the current time server source:
w32tm /query /source

Then, check the current configuration:
w32tm /query /configuration

Once you have verified status and configuration, then stop the NTP service: 
net stop w32time

Find your time zone NTP server from https://www.ntppool.org/en/
Example of NorthAmerican time zone setting few servers:

w32tm /config /syncfromflags:manual /manualpeerlist:”0.pool.ntp.org 1.pool.ntp.org 2.pool.ntp.org3.pool.ntp.org”

Or you could you w32tm /config /syncfromflags:manual /manualpeerlist:pool.ntp.org and it will find the closest server automatically

To make your DC reliable time source:

w32tm /config /reliable:yes
net start w32time

To verify you can run check current configuration comment:
w32tm /query /configuration

Or registry check you should see the same:

That should be it, verify your network firewalls allowing the NTP protocol across the network.
check more info from Microsoft for Windows server NTP

common issues and solutions:

If you see the source as “Free-running System Clock”, which means your system does not have a time server set

You may get: Local CMOS Clock if it’s not updated yet

Once you have configured correctly you should see something like this:

If you see this message in your VM: Integration Services “Time synchronization” is on


How to setup WordPress for website

WordPress is a very popular platform for websites and very easy to use.  All you need is a web server that supports PHP, then setup database.  Download WordPress from https://wordpress.org/download/ to your web server and extract it.

To start go to your domain URL to run the installation of WordPress, select Language of your choice and click Continue

WordPress getting start, at this point setup database and user name, which you will need on next screen, then click Let’s go!

Fill in Database information, then click Submit

Checking communication for the database info you enter, if everything went well, then click Run the installation

Welcome to new site, fill in your website information and click Install WordPress

Successfully installed WordPress

That’s it, now just customize it to the way you like it and enjoy it
You may need to check some settings and update it

Recommended Permissions:

  • Directories: 0755
  • Files: 0644
  • owner: www-data

Here are some quick list of feature which can easy to customize your WordPress site:
It also has a new editor called “Gutenberg”, which is very easy to use, if you want to use it, click Install Gutenberg

Appearance> it will change the look of your site, based on Theme
Themes – it will list all your themes
Customize– It will bring you to your current theme, to be customizing
Widgets – list all Available Widgets, which you can activate or disable
Menus – It will list Menu options and able to customize it
Header – It will bring you to your current theme, to customize your header
Editor – It will bring you to Them files


Settings> common settings changes to your site
Genaral– Site Title, Tagline, URL,Timezone, etc..
Writing -Default Post Category, Format, etc..
Reading– Homage Displays, Blog pages show options, Search engine Visibility, etc…
Discussion– Article, Comments, and other settings
Media– image size settings when you upload
Permalinks– URL link display settings
Privacy – set custom policy page


Tools> some tools to deal with your data
Available Tools – list of tools
Import
– options to import data into your WordPress
Export – options to export your data outside of your WordPress
Export Personal Data – to export user data
Erase Personal Data – to erase user data

if you want official version of WordPRess installation you can find it here


osTicket installation on Ubuntu 16.04

osTicket is one of the great open source support system, very easy to install and use.  I have noted the whole process, short version, and detailed version.  What you will need from start to finish.  This installation is fresh, without any add-ons or any customization osTicket version 1.10.1.  I have written this installation based on Ubuntu 16.04 with Apache as a web server, it may work just fine with other versions of Ubuntu servers or similar to other flavors of Linux systems.  Assuming you have your web server and domain up and running without any issues.  So, let’s get started

What you will need

  • Server requirements:  You can get up to date from official docs from osTicket very well documented
    • PHP 5.6 (or better I am going to be using PHP7.0)
    • MySQL 5.0 (or better)
    • 2GB memory recommended 4GB or more
  • Access to web/database server via SSH
  • Access to site file via (FTP, SFT, GUI, SSH, etc. …)

Getting server ready to install osTicket:

Installing requirements, you may need to run add this to repository void error, log in to your web server via SSH

Commands:
sudo apt-add-repository ppa:ondrej/php
sudo apt-get install php7.0-gd php7.0-imap php7.0-xml php7.0-mbstring php7.0-intl phpapcu

Downloading osTicket:

https://osticket.com/download/
Once you have downloaded then extract it or upload it to your web server common location: /var/www/

Then set the permission:

commands: make sure to change /var/www/ to your path
sudo chown -R www-data:www-data /var/www/

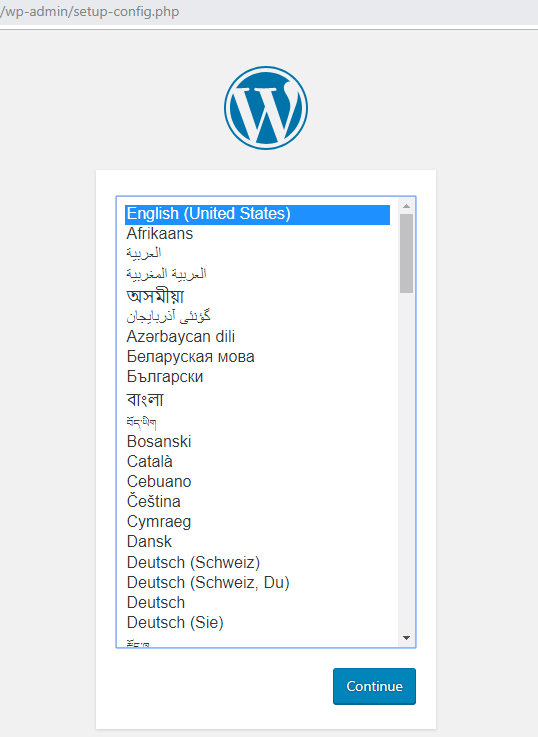
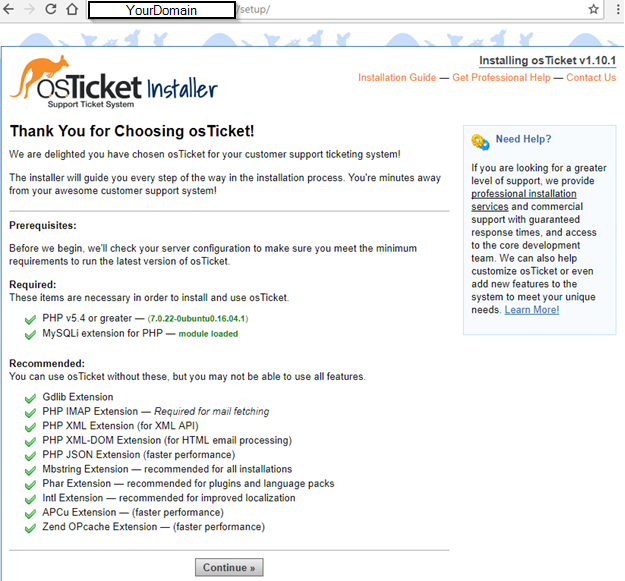
Click Continue once you have fixed any issues, please correct it before going forward

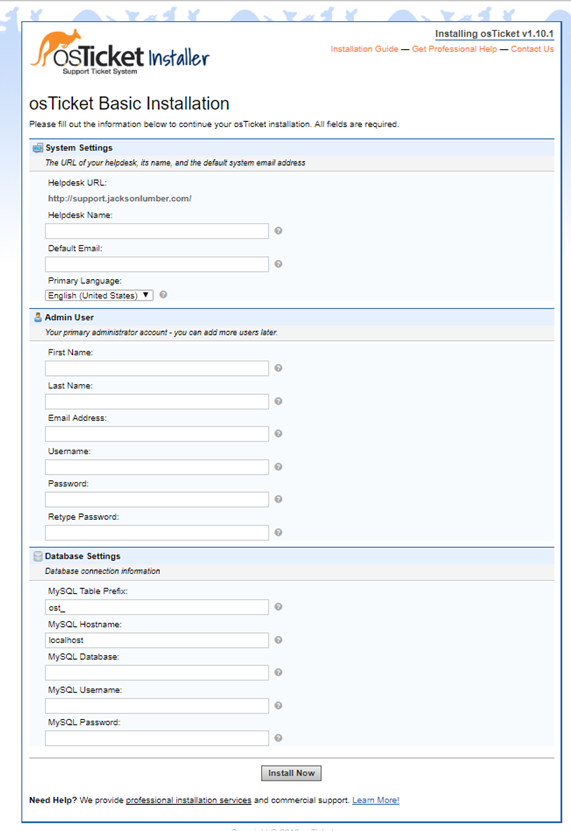
Setup osTicket Database and give full permission using whichever tool you are comfortable with it, then fill in details and click Install now

if everything went well you should see Congratulation, then just change the permission of your config file

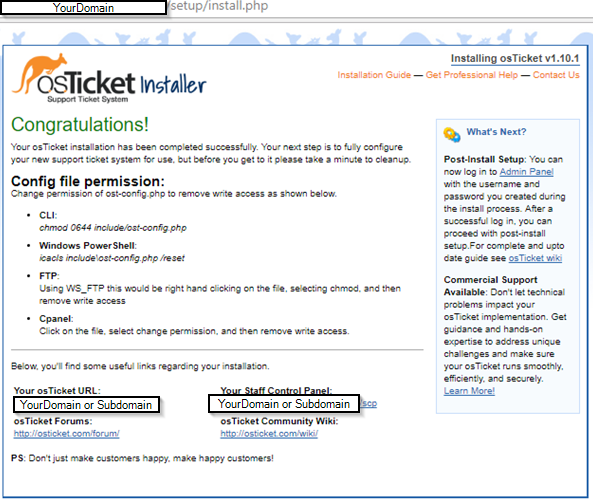
You should be able to login to your osTicket support system with the information you used earlier, see my notes, where I have put in some common issues you may encounter when installing.

Notes and common errors/solution: 

You may need to do these if you get errors or other settings changes


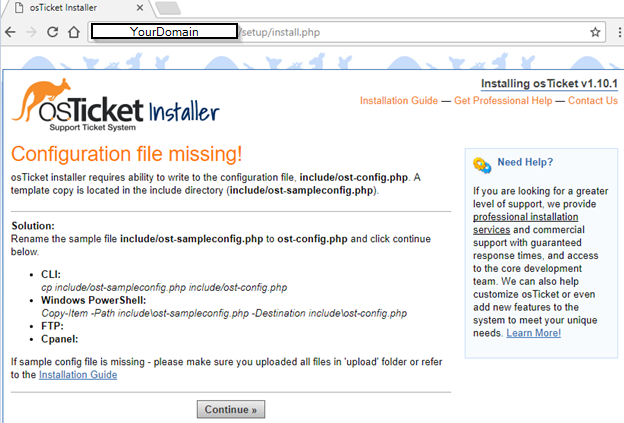
If you have not copied the ost-sampleconfig.php to include/ost-config.php
then you will get the following message


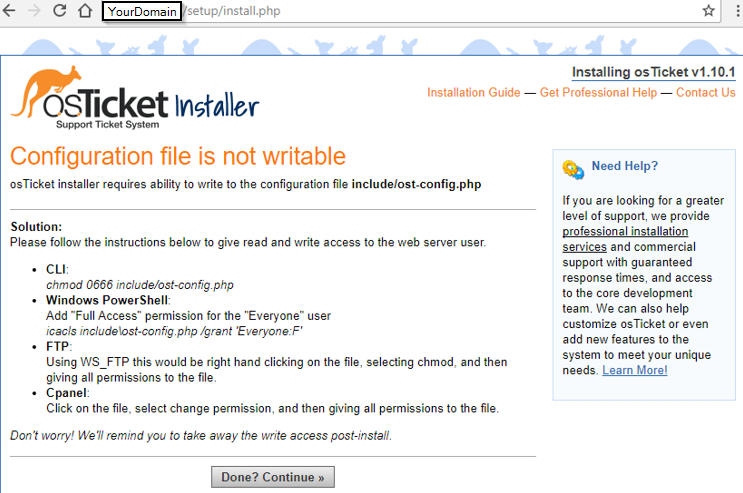
You will also need to make sure that ost-config.php has correct permission, otherwise, you will get this message:


if you have already installed the PHP IMAP extension and still gives you an error, take a look at your php.ini file and enable it by uncommenting /etc/php/php.ini:
;extension=imap.so
to
extension=imap.so


You may need to restart the web service after making changes to take effect:
sudo systemctl restart apache2


error: Valid CSRF Token Required OsTicket:
then need to edit file class.ostsession.php round line 191
catch (DoesNotExist $e) {
$this->data = new SessionData([‘session_id’ => $id]);
$this->data->session_data = “”;


error: Php 7.2 compatibility issue (not recommended to use this version of PHP on osTicket 1.10.1 or 1.10.4, it should support on new version 1.11)
then need to edit file class.ostsession.php round line 197

if(!is_string($this->data->session_data)) { $this->data->session_data = strval($this->data->session_data);

}


These commands to install PHP version 7.0 extensions manually one at a time:
Sudo apt-get install php7.0-gd
Sudo apt-get install php7.0-imap
Sudo apt-get install php7.0-xml
Sudo apt-get install php7.0-mbstring
Sudo apt-get install php7.0-intl
Sudo apt-get install php-apcu


Make sure to protect your ost-config after the installation by changing the permission:
sudo chmod 0644 /var/www/include/ost-config.php


Open Source osTicket system

osTicket is one of the great open source Ticket system.  You can customize the way you like if you know how to code.  They also offer services like other open source projects Installation, customization, Hosted, etc… You can check them out at osticket.com.  What I want to say my two cent is, based on what I know and been testing and knowing for few years and now I am using the osTicket in a live environment with 3 departments, this is truly one of the support systems, that have all common function you would look in the support system.  I have tested and used other open source ticket system, most if not all lack some basic function, which available if you get premium support.  osTicket, only thing is lacking is Advance Reporting/theme/nested help topic (been hearing rumor ver. 2.0 will have more options), which I don’t really use it at the moment.  I have changed it the way I like it with a few CSS styles changes and very little PHP code.

  • It can take incoming email, web portal, API and convert it into a ticket, you have options to send alert to a user, manager, an agent.
  • It has options to setup multiple departments, so it’s it feels seamless for Agents/Users.
  • It has a plugin for LDAP so a user doesn’t need to remember another username/password to submit a ticket.
  • You can add custom fields into your own form/lists.
  • You can add SLA’s (Service Level Agreements) across or for each department can have their own SLA’s.
  • It has Ticket filters for incoming tickets so you can set up to automate of ticket routing or block it.
  • and much more they are adding more

Note: one thing you have to understand in open source project is, if you use out of the box and continue updating as they release updates then it’s great.  If you customize, then you will have to keep track of your changes and would have to reapply it after the updates.

Hope this helps someone who is looking to have their own support system, without paying the high price commercial system, thank you for the great system to osTicket team, for their very hard work