How to clean up temp files automatically on Windows 10

Many users ask if there is a way to clean up temp files automatically.  Well now you can with Windows 10, you can set it up to do for you.  Just be careful about what you select to clean up automatically.  I have taken screenshots here to give you an overview, but you can go to each category to see more details and settings options.  So make the selection that works for you and let the Windows 10 automatically clean up your temp files.  Many people don’t clean up.  The download folder is where you have download any files from the internet, it could anything like a photo, videos, software, etc… So you can choose to empty automatically or do it manually.  Also, emptying recycle bin, after you delete a file by default it does not empty recycle bit, you will have to do it manually or it will do for you automatically when you reach disk space low and will empty any files deleted over 30 days.

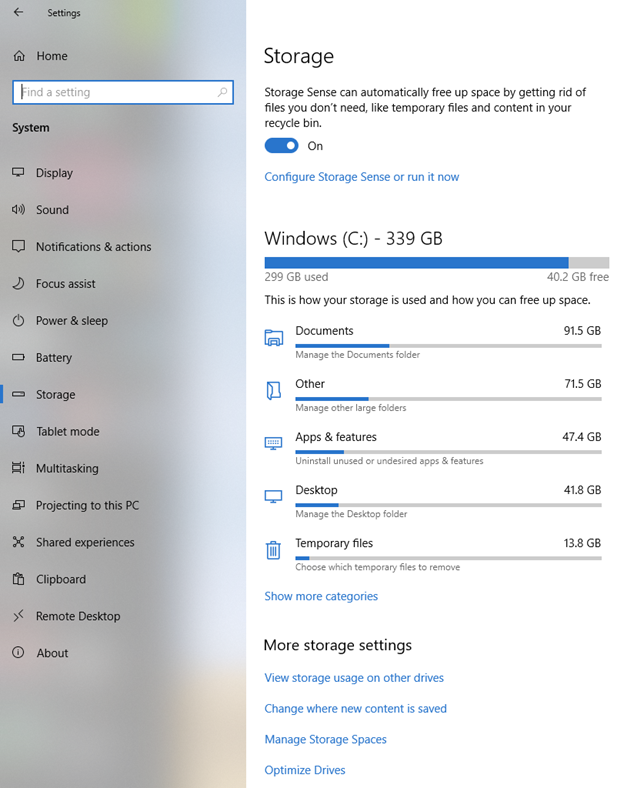
To get to storage settings:

Start>Settings (Gear Icon)>System>Storage

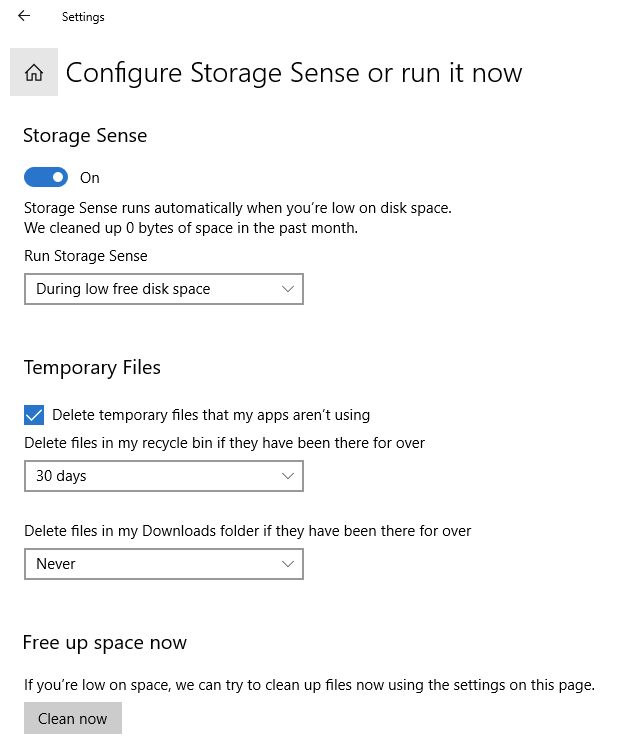
To configure Storage settings:

Click on Configure Storage Sense or run it now link

Choose the options that work for you, the screenshot shows you default settings.  If you want to make changes to Temporary Files take a look at the next screenshot

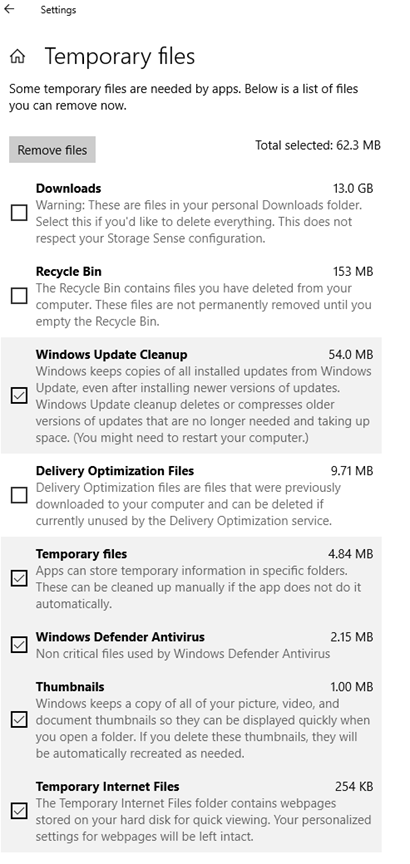
Start>Settings (Gear Icon)>System>Storage>click on Temporary Files

I had already run the clean up so don’t have much now, but I did have about 6 GB of Windows update, Temp files.  Select the options that work for you.  Common area people miss is the Download folder

That’s it, hope this helps out some people, each selection have many options you can choose the one that fits your needs, you can read little help sections about the selection to help you decide, if you should delete or keep some of the temp files.


How to manage your contacts on Android phone

Managing contacts are getting easier and it could also get confusing since there are many options to sync your contact with so many accounts types.  I am going to show you some options that might help you decide and manage contacts on your Android phone.  Make sure you have a good backup of your contact is a key because when you switch to a new phone/device or lose a phone/device and set up a new phone/device you will need to sync back your contacts.  How do you know which contacts are sync to which accounts?

How to see options to manage your contacts?

Open Contact app

Then click on Menu and select Manage Contacts

  • Merge contacts
    • Able to help you find duplicate contacts, you might see 3 options: Number, Email, or Name
  • Import/export contacts
    • Allows you to Import contacts from one location to another
    • Allows you to Export contacts from one location to another
  • Sync contacts
    • This normally happens automatic, unless you have turned off
  • Default storage location
    • This is where your contact gets saved when you create a new contact by default unless you choose to save to another location
    • You might have different accounts one for personal another for Work contacts

How to merge contacts?

Sometimes you might have more than one contact with the same phone number, email or name. 


When you click on the Menu>Manage Contacts>Merge contacts

Merge contacts

How to exporting Contacts:

Open Contact app

Then click on Menu and select Manage Contacts

Select the option Import/export contacts>click on Export

Select where you want to export to, based on storage location you may have one or more options

Once you have made your selection, you can click on the Export to start exporting

How to Import Contacts:

Open Contact app

Then click on Menu and select Manage Contacts

Select the option Import/export contacts

Select the location you want the contacts import from, this maybe different for you based on how many account you have on your phone

Then select where you want to import to, again this might be different based on accounts you have on your phone.

Once you made your selection, you can click on the Import to start the import process.

How to change the Default Location to save contact:

Open Contact app>Click Manage Contacts>Click on the Default storage location

You may see more or less options based on accounts you have on your phone.

That’s it, hope this helps out some people


How to upgrade Ubuntu Mate on the Raspberry Pi

Because of a remake from xenial to bionic, it’s not able to update automatically, you will have to change the source file list.  Before you make the change make sure your current version is updated and disk space to do an upgrade. You can

To update:

sudo apt update && sudo apt upgrade
Optional: To clean up unused packages no longer needed
sudo apt-get autoremove

Once you have all up to date, then try running apt dist-upgrade
You should see everything up to date and not able to see 18.04 LTS option

Now, modify the sources list via the editor of your choice /etc/apt/sources.list change all xenial to bionic, and then save the file

Before the sources file change screenshot:

After the sources file change screenshot:

Then check for the updates:
sudo apt update

After that, you need to remove a package from your system that prevents the upgrade:
sudo apt remove python3-aptdaemon.pkcompat

If you try to before removing python3-aptdaemon.pkcompat, you will get this error:

To start the upgrade


all packages on your system will be upgraded to Bionic versions.
sudo apt upgrade && sudo apt dist-upgrade

You might get some options to choose for some settings to be upgraded or keep the current version of packages. Default is N, I have chosen Y

Once the upgrade is completed, Your Raspberry Pi will need to reboot. You should see a new version of Ubuntu MATE 18.04.

Some notes:

You might see around 68% looks like it’s stuck, but it’s just taking a long time

To check the version:
lsb_release -a

You might still need to fix some other packages that need to be upgraded or replaced if they don’t support the bionic version of it.


How to Uninstall Windows Defender from Windows Server 2016

Most servers have 3rd party Antivirus solution, so you don’t need or want Windows Defender on your server. Here is how to uninstall it, so you can free up the resources of your server. You can remove via server manager or using PowerShell.

You can run this command to check if Windows Defender is running:

sc query Windefend

SERVICE_NAME: Windefend
        TYPE : 10  WIN32_OWN_PROCESS
        STATE : 4  RUNNING
                                (STOPPABLE, NOT_PAUSABLE, ACCEPTS_SHUTDOWN)
        WIN32_EXIT_CODE    : 0  (0x0)
        SERVICE_EXIT_CODE  : 0  (0x0)
        CHECKPOINT         : 0x0
        WAIT_HINT          : 0x0

If you get this message, which means Windows Defender is not running your system:

[SC] EnumQueryServicesStatus:OpenService FAILED 1060:
The specified service does not exist as an installed service.

or check via GUI: from Windows server manager

Remove just Windows Defender GUI:

Run PowerShell in Administrator, which will remove GUI only:

Uninstall-WindowsFeature -Name Windows-Defender-GUI

To completely remove Windows Defender

Uninstall-WindowsFeature -Name Windows-Defender

Then, just restart your server to finish the process

You can check if your Windows Defender is really removed from your server by going back to server manager

You can also check it by going to Settings>Update & Security>Windows Defender

Just in case you need to re-install Windows Defender back:

To install Windows Defender back for whatever reason, just service:

Install-Windows-Feature -Name Windows-Defender

To install Windows Defender with GUI:

Install-WindowsFeature -Name Windows-Defender-GUI

That’s it, hope you find it useful


How to be safe and stay alert of scams

There are many types of scams that happen around holidays, many are via email, text or phone calls.  So many robocalls collecting information and sending to unknown people, then real people follow up with the targeted user/company to get more information.  So please be careful while you shop online and unknown websites or even known websites that look official but are fake, they take your info then redirect to official websites.  The best way to stay safe in this technology age is to keep online activities limited and only download or use apps that are official and keep it up to date.  There is no way to be 100 % safe since everything is connected to the internet these days and controlled via software, so it’s just coded for good or used as bad are depends on usage and what you do with data.

Email Scam:

Many ways you can tell if emails are legit or fake:

  • Just looking at the text of the email, it may look like the real person writing, but they are generic text generated by robots automatically, each time you reply to it, they get more info about you. 
  • A signature will be generic as well
  • The person address to could be generic, sometimes even typo in the name
  • When you move your mouse over the username/email it should display a full real email address or when you reply it will show different email addresses.
  • Some have very small text asking to take action fast, reply and confirm your info with urgent or don’t tell anyone
  • Many more similar messages which you can spot it if you look carefully

Text messages:

Don’t click on them unless you are making changes to your account and you know it

  • With links to reset your password or update your password
  • Track your packages
  • There is a change in shipping, here is to update
  • Check this photo/Video out
  • etc.…

Phone calls:

Don’t give any personal info over the phone just hang up. Then if you think it’s legit you start the call with your Bank, Credit card, Vendor or whatever account/service is effected directly. Also if it’s a bank or tax-related normally they don’t contact you via phone, they will send you regular mail.

  • To confirm your name/address
  • Act as FBI, Police, company you may know
  • Your package has issues that need to verify …
  • You’re a bank account is locked, need to confirm …
  • Want to send you free info can you give your email address, etc…

Apps on your phone can be hacked which steals your data, so void downloading apps you don’t use/need or unsure of it and if you are using make sure they get updated. The donation phone call, it’s very hard to tell if it’s legit, so let them send you via regular mail if they ask to give your address info don’t if they found your phone number then you can find your address too. So, please be very careful of any emails, text messages or phone calls around holiday time, many scams happen.  They may seem like it’s coming from the known person.  Just don’t click anything you don’t know and if someone calls you to verify your personal information, they may act like Bank or Government, just hang up the call. Keep eyes on activity of your Finance info for Bank, Credit card, etc….