How to set Time Zone in osTicket

How to setup Time Zone in osTicket, which is very important to have your system work correctly.  If the time zone is incorrect tickets get mixed up marked wrong data/time, SLA, etc.. So here are few places you can check to confirm your system is correctly setup.  I am using an Ubuntu system other Linux system works similar path might be different.  If your time shows incorrect you should also check to make sure you have installed the PHP Extensions “Intel” which effects the time you can check it at /scp/system.php. There at least 4 places you can set the time zone, I am listing it here, your settings may vary.

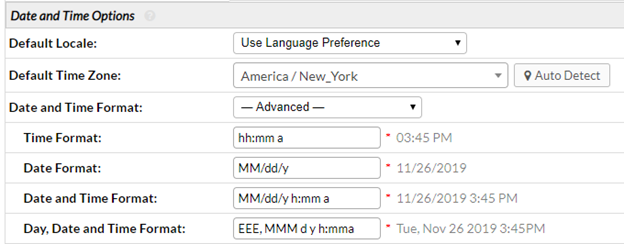
Option 1: from osTicket admin panel System Settings and Preferences

/scp/settings.php

Default settings: Locale Defaults

If you need to customize:

Option 2: via php.ini file

Search or in your file under Date and just uncomment date.timezone =
Put your time zone name after = America/New_York (This would be mine)

Timezone name list: https://www.php.net/manual/en/timezones.php

Sample php.ini file looks like
[Date]
; Defines the default timezone used by the date functions
; http://php.net/date.timezone
;date.timezone =

Option 3: via MySQL directly on the database

To see what’s currently is:

mysql -u YourDataBaseUserName -p -e “SELECT NOW();”

To see your current timezone within mysql: use the following command:

mysql> select now();

or
SHOW VARIABLES LIKE ‘%time_zone%’;

or
SELECT @@GLOBAL.time_zone, @@SESSION.time_zone;

To set a time zone or a value: make sure to choose your own time zone:

SET time_zone = America/New_York;

or
SET GLOBAL time_zone = ‘+8:00’;

or
SET GLOBAL time_zone = ‘ America/New_York ‘;

or
SET @@global.time_zone = ‘+00:00’;

To configure the time zone in Ubuntu system:

 sudo dpkg-reconfigure tzdata

Restart the server or you can restart Apache 2 and MySQL:
/etc/init.d/mysql restart

Option 4: Agent profile, which does not affect system-wide

osTicket Agent profile: Agent panel -> Profile -> Preferences -> Localization

That’s it, check the logs of PHP, web server and osTicket if you having any issues, that will give you some more clue.

Issues you might have:

Time issues: if Intel PHP Extension is not installed:

Once you installed Intel PHP extension then, restart your apache (your webserver) service, if everything goes well it should be fine:


How to upgrade osTicket to 1.14.1

osTicket v1.14.1 is released today November 21, 2019, it’s open-source ticket system. You can find full release notes at https://github.com/osTicket/osTicket/releases. For osTicket version 1.14.1 PHP version 7.0 to 7.3, 7.3 is recommended. The process is the same as before just make sure you have a good backup of database and osTicket files.

The Upgrade process is very simple, I am doing 1.12 to 1.14.1

  • Make sure you have a good backup of Database and files of osTicket
  • Then put the system in the offline mode: by going to URL of your osTicket support ticket /scp/settings.php
  • Download the new version from https://osticket.com/download/ and choose the osTicket Core, v1.14.1 (Latest Release) don’t download any Languages or plugins, you can add them after to void issues with the upgrade.
  • Upload to your server v. 1.14.1 and replace current files/folders from the Upload folder from your downloaded, and exclude the script folder/files. Also, Maintain the directory hierarchy any changes could cause an issue with the upgrade process or something might not work well.
    • Optional: Script folder only needed if you are using remote piping, so if you are not using remote piping don’t upload.
  • Make sure NOT to replace your \include\ost-config.php which does not include in the download.

Make sure you have the correct permission, then go to the URL/SCP of the osTicket system and log in, you should see osTicket Upgrader, make sure your Prerequisites are all good, if any errors correct it, then click Start Upgrade Now

Then you will get Migrate to osTicket v1.14.1, click Upgrade now
My screenshot shows 1.14 because at the time 1.14.1 was not out. If you were to do an upgrade from 1.14 to 1.14.1 there is no database change so you will not see the upgrade screen.

If everything goes well you should see Upgrade Completed! screen

After the installation

Delete the /setup folder and update any customization you may have, test it, then once all is good you can put the system back online. Also, remove the write permission to \include\ost-config.php to secure your config. If you have customized PHP core files, those need to be re-applied after the upgrade. Also, make sure your plugins are good, if needed upgrade do so, make sure it supported version. Good luck

Also make sure to enable new feature Link and Merge tickets, by default it’s off

If you are looking at a list of open tickets you will see two new options:

Link: The ability to link tickets and Merge – the ability to merge tickets

Documentation on how to use it: https://docs.osticket.com/en/latest/Features/Ticket%20Merge%20&%20Link.html

If you have click on the ticket, then option for Link and Merge ticket are shown when clicked on the arrow next to gear icon:

Official documentation: https://docs.osticket.com/en/latest/index.html
Link to: Changelog and Community forum: https://forum.osticket.com/


How to clean up old DHCP server’s entry in a domain via PowerShell and netsh command

It’s very easy to forget old server entries and it may cause an issue in your network.  Sometimes system/network admin wait for approval process or schedule to clean up or just simply don’t know how to.  Whatever your reason is, this should be done to keep your network healthy from any unknown issues.  Here are some ways to clean up, I have listed PowerShell, Netsh and via GUI.

Via PowerShell:

To see list of all DHCP server run PowerShell command:

PS C:\>Get-DhcpServerInDC

To remove it:

You have to be domain or enterprise admin to remove it otherwise, you will get error

PS C:\>Remove-DhcpServerInDC –DnsName YourDHCPserver –IPAddress

This is without error: if you have run as admin

To add it:

You have to be domain or enterprise admin to remove it otherwise, you will get error

PS C:\> Add-DhcpServerInDC –DnsName YourDHCPserver –IPAddress

Using netsh commands

To the list of commands: netsh dhcp list

To add:

Netsh dhcp add server NameOfYourDHCPServer IP address

To delete:

Dhcp delete server NameOfYourServer IP address

Via GUI:

To add:
open your DHCP server, right-click, and select add

To Remove:
open your DHCP server, right-click and select Manage authorized servers …
Then just remove HDCP server that’s no longer in use

That’s it


How to enable Remote Desktop Using PowerShell

Remote Desktop is very common still for many companies remote users to use, not all users needed since they most likely use VPN to get access to apps or just using the cloud-based. PowerShell is a new way to make changes to your remote computer lot easier than opening GUI and waiting for it to load and make changes. If you are admin of the network, it’s very easy to make changes and get the status of remote computer settings. Here in this post will do the Remote Desktop enable using PowerShell, let’s get started it

Computer or server must meet the following requirements:

  • The WinRM service should be started
  • You must have administrator permissions on the remote device
  • Firewall rule should be set to allow RDP connection default port 3389 if you have changed the default port make sure to add to your firewall rule

To start the session from your Windows 10 computer or Windows server, open PowerShell with Administrator

Command: Enter-PSSession -ComputerName YourRemoteComputerName or IP address -Credential domain\administrator

Once you are connected to a remote computer or server, you can run the following command to get current status:

Get-ItemProperty -Path ‘HKLM:\System\CurrentControlSet\Control\Terminal Server’-name “fDenyTSConnections”

Then to change the setting to allow RDP connection, just run following:

Set-ItemProperty -Path ‘HKLM:\System\CurrentControlSet\Control\Terminal Server’-name “fDenyTSConnections” -Value 0

You should also make sure that you have only secured RDP authentication (NLA – Network Level Authentication) to check  run the command: you should see 1

Get-ItemProperty -Path ‘HKLM:\System\CurrentControlSet\Control\Terminal Server\WinStations\RDP-Tcp’ -name “UserAuthentication”

 If you see 0 then set it to 1 by running:

Set-ItemProperty -Path ‘HKLM:\System\CurrentControlSet\Control\Terminal Server\WinStations\RDP-Tcp’ -name “UserAuthentication” -Value 1

To test the Remote Desktop connection:

Test-NetConnection ComputerName or IP address -CommonTCPPort RDP

That’s it for now, here is a screenshot of the GUI look like after you have enabled the RDP

Note: if the user whom RDP into this remote computer is not admin user you need to add them to a remote desktop group, if you want to do via PowerShell you can check this post out: How to add a local user to windows 10 via PowerShell


How to improve application pool timeouts in IIS

There are many settings you can adjust to improve the application pool in IIS, one of them is timeouts. Please take a backup of your settings before making any changes, in case you need to revert it back. Each default settings you change may impact the health of the overall server. There are many reasons to keep it default and many to change it, all depends on the needs of your application. I would not change the IIS recycle settings, they are there to clean up the resources of applications that aren’t in use, like memory, database sessions, etc.. Some settings can be set up within your application to keep it alive by use of a ping service just makes a request on the site every so often.

Login in to your server, open IIS Manager.

In the left pane (Connections), select Application Pools.
In the middle pane (Application Pools), select YourApp.
On the right pane (Actions), select Edit Application Pool > Advanced Settings… or just right click and select Advanced settings ..

Then in the Advanced Settings window, under Process Model, set Idle Time-out (minutes) to 0 if you want to disable or change from default 20 minutes to whatever works for you.
Then click OK.

You can change other settings that might help your application performance to stay wake longer, so end users don’t feel the slowness, just keep in mind overall server health, load, memory, CPU will be effected. That’s it for now