How to enable Remote Desktop Using PowerShell

Remote Desktop is very common still for many companies remote users to use, not all users needed since they most likely use VPN to get access to apps or just using the cloud-based. PowerShell is a new way to make changes to your remote computer lot easier than opening GUI and waiting for it to load and make changes. If you are admin of the network, it’s very easy to make changes and get the status of remote computer settings. Here in this post will do the Remote Desktop enable using PowerShell, let’s get started it

Computer or server must meet the following requirements:

  • The WinRM service should be started
  • You must have administrator permissions on the remote device
  • Firewall rule should be set to allow RDP connection default port 3389 if you have changed the default port make sure to add to your firewall rule

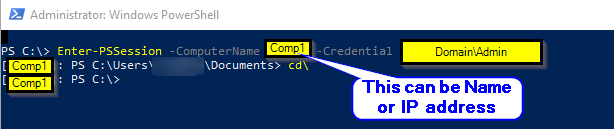
To start the session from your Windows 10 computer or Windows server, open PowerShell with Administrator

Command: Enter-PSSession -ComputerName YourRemoteComputerName or IP address -Credential domain\administrator

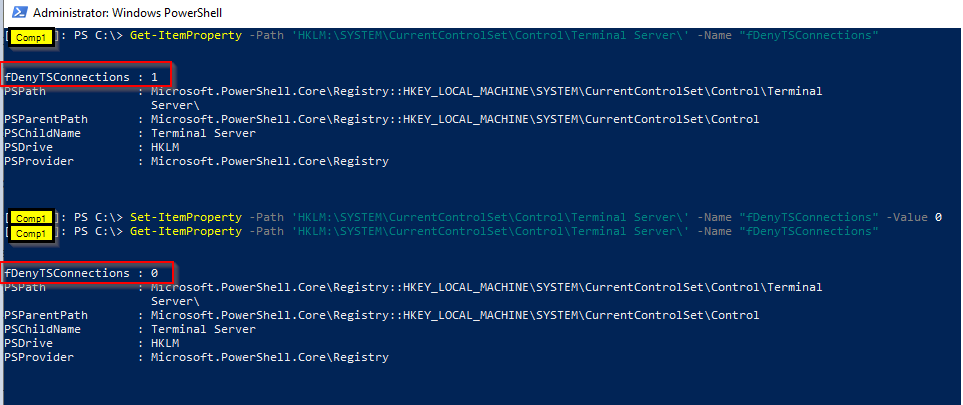
Once you are connected to a remote computer or server, you can run the following command to get current status:

Get-ItemProperty -Path ‘HKLM:\System\CurrentControlSet\Control\Terminal Server’-name “fDenyTSConnections”

Then to change the setting to allow RDP connection, just run following:

Set-ItemProperty -Path ‘HKLM:\System\CurrentControlSet\Control\Terminal Server’-name “fDenyTSConnections” -Value 0

You should also make sure that you have only secured RDP authentication (NLA – Network Level Authentication) to check  run the command: you should see 1

Get-ItemProperty -Path ‘HKLM:\System\CurrentControlSet\Control\Terminal Server\WinStations\RDP-Tcp’ -name “UserAuthentication”

 If you see 0 then set it to 1 by running:

Set-ItemProperty -Path ‘HKLM:\System\CurrentControlSet\Control\Terminal Server\WinStations\RDP-Tcp’ -name “UserAuthentication” -Value 1

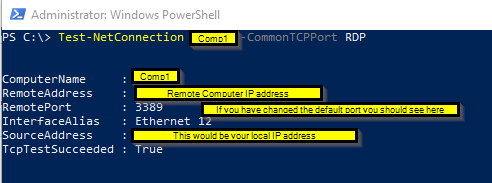
To test the Remote Desktop connection:

Test-NetConnection ComputerName or IP address -CommonTCPPort RDP

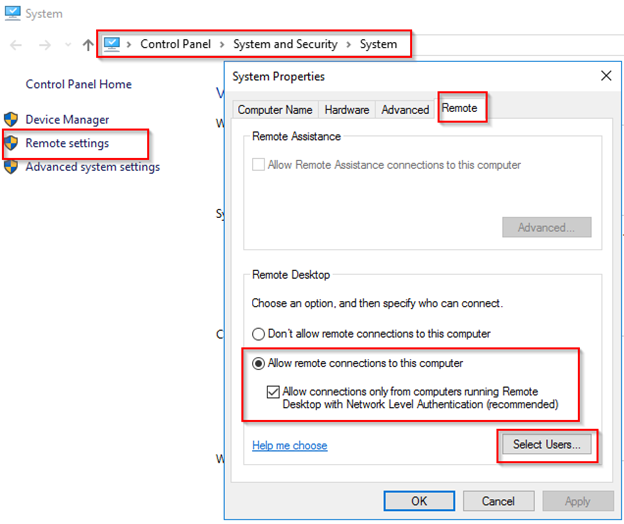
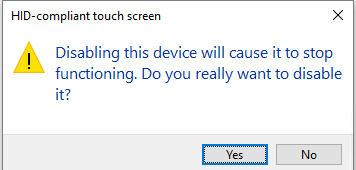
That’s it for now, here is a screenshot of the GUI look like after you have enabled the RDP

Note: if the user whom RDP into this remote computer is not admin user you need to add them to a remote desktop group, if you want to do via PowerShell you can check this post out: How to add a local user to windows 10 via PowerShell


How to turn on/off Narrator on Windows 10

Sometimes you may have turned on the narrator by mistake or using a combination key of Windows+ CTRL+ ENTER which will turn on and turn off the narrator’s voice.  The quickest way to use the shortcut keys to turn on/off using these key combinations may vary from OS versions. There are many people who find these settings helpful and some just find annoying if they are turning on by mistake. So, whatever your case is here are the options.

When you first turn on the Narrator you get this screen, where it shows the shortcut keys.

Here is a list of keys

To turn off:

  • Hold the CAPS LOCK key and press ESC key
  • Press WINDOWS + CTRL + ENTER key (if it’s off it will turn back on it toggles on/off)
  • Hold the WINDOWS Key and press ENTER

To turn it on/Off:

Press WINDOWS + CTRL + ENTER key (if it’s off it will turn back on it toggles on/off)

You can also go through the settings options to turn it off, but you will have to press each action twice because first is selection narrator will read to you second time it will make the selection.

Select START > SETTINGS

Then click on Open Ease of Access and select Narrator you will see all the options to turn on/off the narrator

Or

Select START>SETTINGS

Then in the search type narrator, it should give you so of these options and for all options click Show all results:

If you have Surface or other tablets, this might work for you:

Hold down the ALT and TAB keys simultaneously. Then it will bring up the Microsoft Settings window, which will give you options to turn on/off the narrator.

I hope this helps others who looking to turn on/off via registry key, please take a backup in case you need to restore it.

If you really want to turn off permanently or disable Narrator including shortcut key, then you will have to do it via registry key: Just change the value from 1 to 0 (1=on or 0=off)


How to add a local user to Windows 10 via PowerShell

PowerShell is very common to use these days as more and more software doing automation.  Many times it’s harder to find Graphical User Interface (GUI) to add a user or find other settings.  In this post, I am adding a local user via PowerShell and adding a user to a local group.  PowerShell has built-in help and examples too, so if you want to know more about the command just type Get-Help then Name of command and it will give more info about it. Let’s get started exploring the options starting with viewing current users.

To see current local users:

PS C:\> Get-LocalUser

To see Local Groups:

PS C:\> Get-LocalGroup

To see Local Groups Members:

PS C:\> Get-LocalGroupMember -Group Administrators

Adding a new user:

PS C:\>New-LocalUser –Name WhatEverName

When you hit Enter it will give you the option to put the password

Add user to Local Admin Group:

My example user name is: Admin replace that with your user name

PS C:\> add-LocalGroupMember -Group “Administrators” -Member “Admin”

To add more users to a Local admin group:

PS C:\> Add-LocalGroupMember -Group “Administrators” -Member “User1”, “User2”, etc…

To add a domain user to Local Administrator Group:

PS C:\> Add-LocalGroupMember -Group “Administrators” -Member YourDomainName\UserName

To remove a local user:

Make sure you have at least one user account and it’s a member of LocalAdmin group

PS C:\> Remove-LocalUser -Name WhatEverNameYouWantToRemove

To Remove a domain user from Local Administrator Group:

PS C:\> Remove-LocalGroupMember -Group “Administrators” -Member YourDomainName\UserName

There are many more options available using PowerShell now, if you get an error make sure to read it and see where the error is, it will give you clue and also some commands require Admin right you will get an error like Access denied


How to hide Windows updates

Windows 10 recently having many issues, here is how to hide updates that may be causing issues. Windows 10 updates install automatically by default and it also updates some drivers, which may cause an issue with your device or application. The First thing to do is check to see if you have any updates pending if so update it and see if your issues are fixed. If your issues are not fixed then you want to try uninstalling the recent update. After uninstalling the recent update and restarting your computer fixes the issue you can hide that update so Windows 10 doesn’t automatically try the install again. Here is how to hide the updates, so it does not re-install. You should still try to update windows updates to protect your computers, not all updates causing issues.

You will need to Download the “Show or hide updates” troubleshooter package from the (no longer available via Microsoft website), then follow the instructions, I am going to show you one of the updates that are causing issues with Start Menu and Microsoft Edge on some computers. Once you have downloaded the Show and hide update package, run it and click Next

it will scan for issues

Then give you options to Hide updates or Show hidden updates, click on hide update

Select the update you want to hide, and click Next

You should see Troubleshooting has completed, click Close

That’s it, if you need to unhide it, you can following the same process, just have to click on Show hidden updates in earlier step then you will be able to install that update. I hope this helps out some users who are having issues with Windows updates.


How to Disable Touch Screen

There are cases when you want to disable the touch screen when using some application that may cause issues or just you are not using it. You will need to be an administrator to make changes, otherwise, you will get a message, you don’t have rights. Here is how to do disabled, make sure you have another source of input, like external keyboard/mouse, otherwise you will not be able to use your device.

Open Device Manger by going to control panel or just search for device manager

Then expand the Device Manager>Human Interface Devices>Right click on the HID-compliant touch screen and select Disable device

You will get warning message box: Do you really want to disable it? Click Yes Make sure you have external keyboard or mouse, otherwise you will not be able to use your device at all.

That’s it, if you want to re-enable it, just right click on it and it will give you Enable device option