Benchmark solid state drive performance

It’s worth replacing your old spinning drive with a solid-state drive, take a look at my post on how to clone old drive to Samsung solid state drive or San Disk. If your computer is just running slow, take a look at the performance to see which part of your computer is slowing down. Most likely it’s a hard drive, there are cases CPU, Memory and maybe network connection cause slowness. Here I have done a benchmark of spinning drive and solid state drive, so you can see the big difference between it.

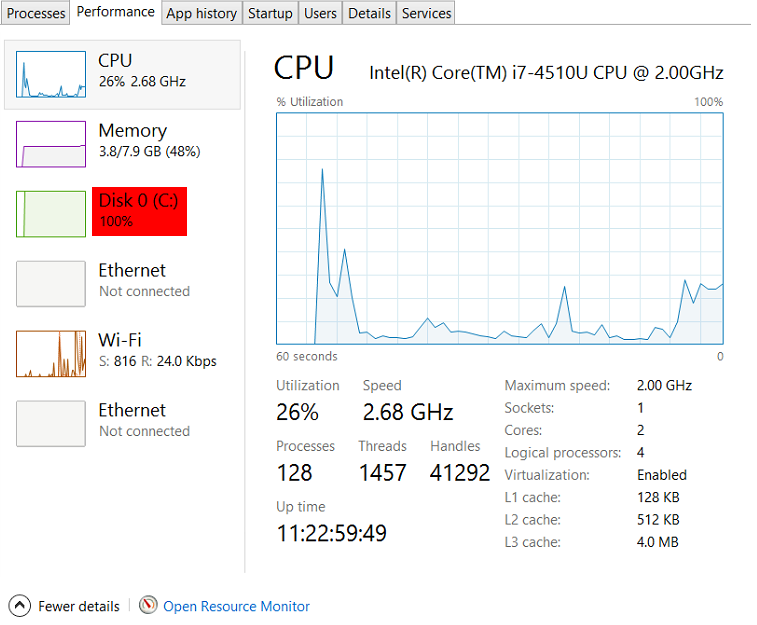
Looking at task manager while using old spinning drive, if you click on the Disk it will give you more details of which application using it.

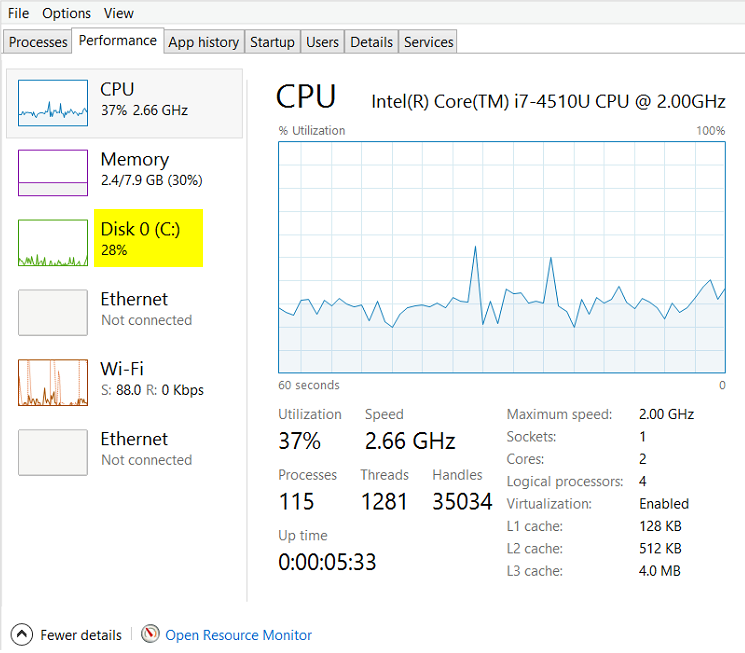
Looking at task manager while using the solid state drive, this is more like normal PC should be like on load usage of CPU, Memory, Disk etc…

Benchmark on old spinning drive:

Benchmark on solid state drive:

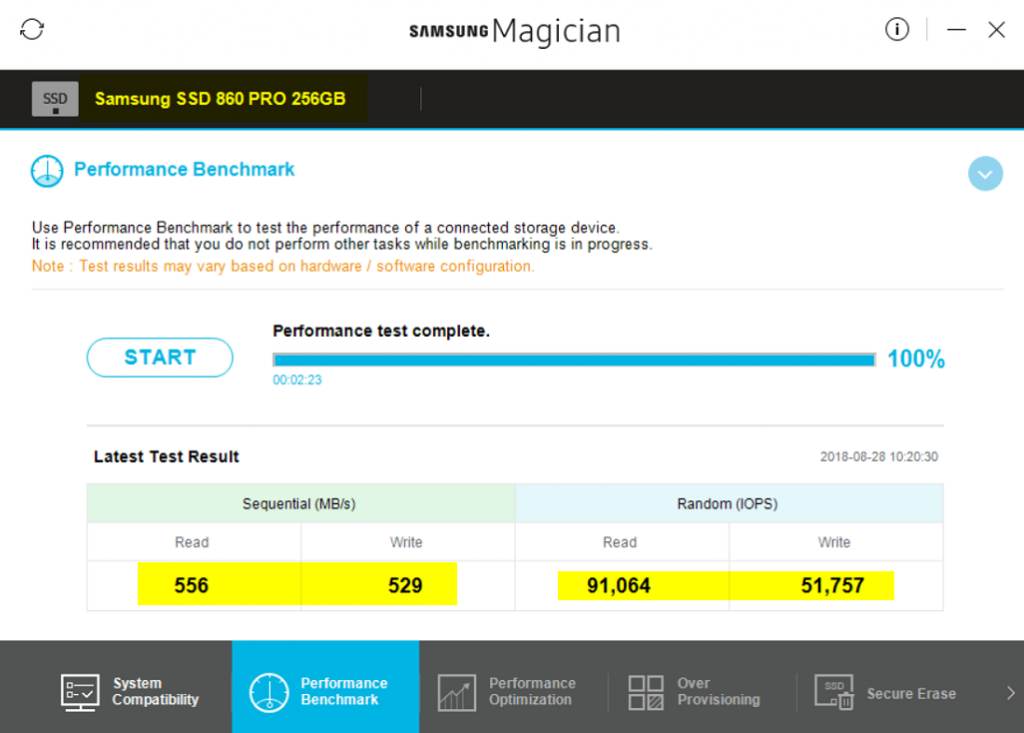
You can see big differences between spinning drive and solid state drive. This saves you time and frustration of waiting for your application to load. It also help you get things done faster, so now you will have more time to enjoy.


How to fix blurriness on Windows 10

These days we use multiple screens and it has different resolution support for each device, so you might have some application display blurry. Windows 10 normally ask you do you want to let Windows fix automatic for you? If you have missed the pop up or want to make changed to your settings, here is location where you make change.

settings>System>Display>Advanced scaling settings

by turning on the Fix scaling for apps to automatic, it should fix the blurry display.

You also have options to select each display that is connected to your Laptop or docking station for you to make the change. Sometime you want to text to display bigger or smaller to fit within your screen.

Ssettings>System>Display
or you can right click on Desktop, then select Display settings

Based on what your monitor support, you will see options for you to select the Resolution of that monitor. If you don’t see, you can click on Detect to re-scan, also make sure your monitor is Plug-in/powered on and it’s on right Input, many monitor comes with more then one Input like HDMI, DVI, VGA, Disply-Port, etc…

Windows 10 is making easier for end user to make change now, so you should see links to help you with, if you need more.


How to add new user to office 365

Office 365 is becoming very popular for home/business users. Its subscription-based service from Microsoft, it offers more than just office suite. If you are small, medium or larger business, using Microsoft office, this is best option for you have a business plan. Here is quick how to add a new user to your office 365 account. You would need to be an admin, otherwise, you will not get to add new user.

Office 365 user login: https://www.office.com
Office 365 admin login : https://admin.microsoft.com

Once you are logged in you should see Admin if you have the rights, if you don’t see Admin, that means you are not an admin.

Once you have clicked on admin you should see Microsoft 365 admin center, where you will have options to manage users. To add user click on Add a user

Fill in New user details and select the Product license, then click on Add

Then you should see summary of user account details and also Next steps links, in case you want to make changes or add more users

That’s it, Microsoft do many changes/add/remove products and service of office 365, so screenshots might be different, but you get the Idea, it’s very easy to manage.


Bring off-screen window to active Monitor

These days most of us are using more then one monitor screens and there are times, when we have open application on one screen and disconnect it without moving application back to active Window. Whatever that application is now open but you can’t see on your active monitor/screen. Restarting computer of course will clear out your issue, but you don’t want to loose what you have open. So if you know the keyboard shortcuts then it will help you here.

Option 1:

  • Alt+Tab to Application you want to move even though you may not see on screen
  • Then, use Windows+Left or Right arrow to move that application, you may need to press Windows+Arrow few time to see on your screen

Option 2:

  • Press Shift key and right-click application then select Move
  • Then use Right or Left arrow to move application

Last Option:

Would be just Restarting your computer should clear out the settings

There you have it, I will add more options, as I explore it. Many user don’t restart their computer for few weeks or months, which mean many changes to your computer settings/application may not take effect until your computer is restarted, so it’s best to restart your computer at least once a week.


Adding standalone VM to Hyper-V Cluster

If you already have created VM on Hyper-V standalone and its running, but now you want to add to part of Hyper-V Cluster so its high availability, then the process is simple.  Before taking this action make sure your storage is available on Cluster storage because your current VM will move its current local storage from standalone to Cluster storage. Also, it’s best to have a good backup in case something were to go wrong with the process. This was done on Microsoft Windows server 2012 R2, the process is similar to Windows 2016 server. When you move the VM from Windows 2012 or 2012 R2, you may get upgrade version option, don’t upgrade if you want to replicate or have option to run VM on Windows 2012 or 2012 R2.

Open up Failover Cluster Manger

Expand tree and right click on Roles>Configure Role
You may or may not get Wizard screen if you had selected “Do not show this page again” before

Select Virtual Machine from the list of Role

It’s going to find any VM that is not part of Cluster, you just need to select that VM then click Next

Confirm Virtual Machine, click Next

You will get Summary and will have option for report, double check everything well went, you may get some warning about storage or networking. like I had here, The path VMname.vhdx where the virtual hard disk is stored is not a path to storage in the cluster or to storage that can be added to the cluster. You must ensure this storage is avaiblale to every node in the cluster to make this virtual machine highly available

How to change the Storage of VM on Hypev-V Cluster:

While in the failover Cluster Manger

Right click on the VM that you want to move the Storage to cluster then Move>Virtual Machine Storage

Change the storage to new location of the Cluster storage and click Start to move the storage.

That’s is you should see your new VM now on the Hyper-V cluster

if you have any issues, check the logs, firewall, storage, version, etc.. and try again.