How to update firmware on Windows 10 computer

Microsoft has been installing drivers for your device when your computer gets an update. A user can manually update the system firmware on newer computers too, by going to Computer management. I had written a post how to secure against meltdown and spectre vulnerabilities which requires computer bios be updated to protect your computer. Some manufacture or model of your computer may need to go to their support page and install manually. This process is very easier for end users.

Open Computer management:

  • Pressing Windows Key+X
  • Select Computer Management

Or

  • Pressing Windows Key+R
  • Typing: compmgmt.msc then hit Enter
  • or devmgmt.msc it will open device manager

Or

  • Right clicking Windows Icon
  • select Computer Management

Once you have Computer Manager open, select Device Manager
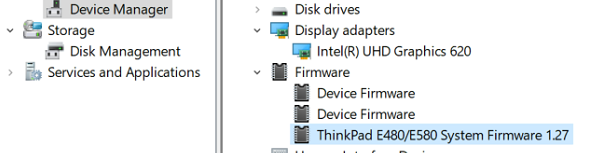
on the Right side you will see Firmware, if you don’t then your computer is old or manufacture of your computer don’t support it, so you will have to manually.

Then right click on System Firmware>select update driver
Then select Search automatically for updated driver software …

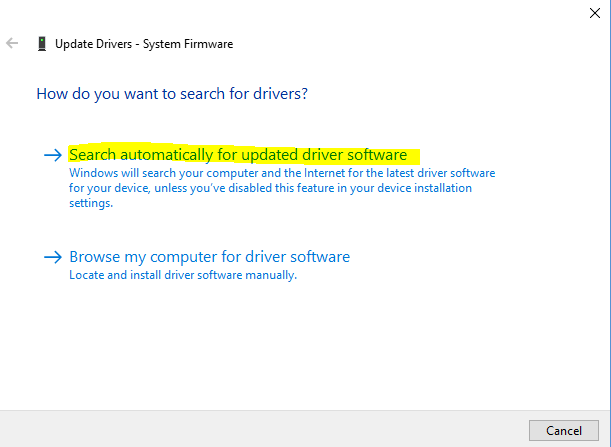
Windows will automatically search and download firmware for you, then to finish the install, you will need to restart your computer.
Note: Make sure your computer is plugged into power source and do NOT stop or turn off your computer, this could cause your computer to stop working.

After firmware update, you should see now model of your computer and firmware version.

That’s it

How to check firmware version via Powershell:

command: Get-WmiObject win32_bios

How to check computer model via powershell:

In case you need to download firmware update manually you will need to know your computer model

command: Get-wmiobject win32_computersystem


Benchmark solid state drive performance

It’s worth replacing your old spinning drive with a solid-state drive, take a look at my post on how to clone old drive to Samsung solid state drive or San Disk. If your computer is just running slow, take a look at the performance to see which part of your computer is slowing down. Most likely it’s a hard drive, there are cases CPU, Memory and maybe network connection cause slowness. Here I have done a benchmark of spinning drive and solid state drive, so you can see the big difference between it.

Looking at task manager while using old spinning drive, if you click on the Disk it will give you more details of which application using it.

Looking at task manager while using the solid state drive, this is more like normal PC should be like on load usage of CPU, Memory, Disk etc…

Benchmark on old spinning drive:

Benchmark on solid state drive:

You can see big differences between spinning drive and solid state drive. This saves you time and frustration of waiting for your application to load. It also help you get things done faster, so now you will have more time to enjoy.


How to fix blurriness on Windows 10

These days we use multiple screens and it has different resolution support for each device, so you might have some application display blurry. Windows 10 normally ask you do you want to let Windows fix automatic for you? If you have missed the pop up or want to make changed to your settings, here is location where you make change.

settings>System>Display>Advanced scaling settings

by turning on the Fix scaling for apps to automatic, it should fix the blurry display.

You also have options to select each display that is connected to your Laptop or docking station for you to make the change. Sometime you want to text to display bigger or smaller to fit within your screen.

Ssettings>System>Display
or you can right click on Desktop, then select Display settings

Based on what your monitor support, you will see options for you to select the Resolution of that monitor. If you don’t see, you can click on Detect to re-scan, also make sure your monitor is Plug-in/powered on and it’s on right Input, many monitor comes with more then one Input like HDMI, DVI, VGA, Disply-Port, etc…

Windows 10 is making easier for end user to make change now, so you should see links to help you with, if you need more.


Bring off-screen window to active Monitor

These days most of us are using more then one monitor screens and there are times, when we have open application on one screen and disconnect it without moving application back to active Window. Whatever that application is now open but you can’t see on your active monitor/screen. Restarting computer of course will clear out your issue, but you don’t want to loose what you have open. So if you know the keyboard shortcuts then it will help you here.

Option 1:

  • Alt+Tab to Application you want to move even though you may not see on screen
  • Then, use Windows+Left or Right arrow to move that application, you may need to press Windows+Arrow few time to see on your screen

Option 2:

  • Press Shift key and right-click application then select Move
  • Then use Right or Left arrow to move application

Last Option:

Would be just Restarting your computer should clear out the settings

There you have it, I will add more options, as I explore it. Many user don’t restart their computer for few weeks or months, which mean many changes to your computer settings/application may not take effect until your computer is restarted, so it’s best to restart your computer at least once a week.


Built-in OpenSSH client on Windows 10

Windows 10 has been adding more features which support open source like SSH client built-in, Windows updates started installing by default around April 2018 OpenSSH client. It’s a tool for Linux admin to connect from Windows computer before this Windows user has to install manually SSH client for Windows commonly used Putty, if you need a full set of feature of the SSH visit: https://www.openssl.org/

Now you can find it in Windows 10 under:
Settings>Apps & features>Then click on Manage optional features

You should see there OpenSSH client

To use it just open Windows command prompt or power shell and type ssh

to connect to your Linux server just type: ssh UserName@LinuxServerIP_or_DNS_Name

The first time it will prompt host key fingerprint and ask you to confirm to get connected type yes and enter your password

You should be connected to your Linux server
Start using Linux right from your Windows computer, when done just type exit as you normally would.

In case you need to remove known hosts added to your computer you can find it at C:\Users\YourUserName\.ssh\known_hosts

Next time you connect to the same server and known hosts has not been removed it will just ask for your password
Enjoy it Linux inside Window world 🙂